LibreNMS
LibreNMS監控系統
- LibreNMS架設
- LibreNMS 警報相關設定
- LibreNMS LINE Messaging API 設定
- LibreNMS Mdadm RAID監控警報
- LibreNMS 硬碟使用率監控警報
- LibreNMS CPU使用率監控警報
- LibreNMS ICMP 監控警報
- LibreNMS 自訂 LVM-Thin Pool 監控
- LibreNMS 自訂CPU溫度監控警報
- LibreNMS 外部整合
- LibreNMS 應用程式設定
- LibreNMS 被監控設備SNMP設定
- LibreNMS 掃描自動新增設備
- LibreNMS SNMP trap 設定
- LibreNMS 自訂Custom OID
- LibreNMS 修改設備IP
- LibreNMS 轉發網頁IP帶PORT
LibreNMS架設
LibreNMS架設
LibreNMS架設 - Debian 12
運行環境
- PVE
- LXC
- Debian 12
安裝nginx mariadb php
apt updateapt install php-mbstring php-cli php-common php-curl php-fpm php-gd php-mbstring php-mysql php-opcache php-readline php-snmp php-xml php-zip acl curl fping git graphviz imagemagick mariadb-client mariadb-server mtr-tiny nginx-full nmap rrdtool snmp snmpd whois unzip python3-pymysql python3-dotenv python3-redis python3-setuptools python3-systemd python3-pip -y安裝 Composer
cd /usr/local/bin

curl -sS https://getcomposer.org/installer | php

mv composer.phar composer
新增使用者
useradd librenms -d /opt/librenms -M -r -s "$(which bash)"下載LibreNMS
cd /opt && \
git clone https://github.com/librenms/librenms.git
設定權限
chown -R librenms:librenms /opt/librenms && \
chmod 771 /opt/librenms && \
setfacl -d -m g::rwx /opt/librenms/rrd /opt/librenms/logs /opt/librenms/bootstrap/cache/ /opt/librenms/storage/ && \
setfacl -R -m g::rwx /opt/librenms/rrd /opt/librenms/logs /opt/librenms/bootstrap/cache/ /opt/librenms/storage/
安裝 LibreNMS和套件
su librenms
cd /opt/librenms/
./scripts/composer_wrapper.php install --no-dev

exit
pip3 install --user --break-system-packages -r /opt/librenms/requirements.txt
修改PHP時區
sed -i "s|^;date.timezone =.*$|date.timezone = Asia/Taipei|" /etc/php/8.2/fpm/php.ini
sed -i "s|^;date.timezone =.*$|date.timezone = Asia/Taipei|" /etc/php/8.2/cli/php.ini

系統設定時區
timedatectl set-timezone Asia/Taipei
設定 PHP-FPM
cp /etc/php/8.2/fpm/pool.d/www.conf /etc/php/8.2/fpm/pool.d/librenms.conf
nano /etc/php/8.2/fpm/pool.d/librenms.conf
Change [www] to [librenms]:
[librenms]
Change user and group to “librenms”:
user = librenms
group = librenms
Change listen to a unique name:
listen = /run/php-fpm-librenms.socksystemctl enable php8.2-fpm
systemctl restart php8.2-fpm設定MariaDB
編輯/etc/mysql/mariadb.conf.d/50-server.cnf
[mysqld]底下新增
innodb_file_per_table=1
lower_case_table_names=0systemctl enable mariadb
systemctl restart mariadbMariaDB新增使用者
mysql -u root
CREATE DATABASE librenms CHARACTER SET utf8mb4 COLLATE utf8mb4_unicode_ci;
CREATE USER 'librenmsuser'@'localhost' IDENTIFIED BY 'librenmspswd';
GRANT ALL PRIVILEGES ON librenms.* TO 'librenmsuser'@'localhost';
FLUSH PRIVILEGES;
exit設定Nginx
建立/etc/nginx/conf.d/librenms.conf
server {
listen 80;
server_name librenms.example.com;
root /opt/librenms/html;
index index.php;
charset utf-8;
gzip on;
gzip_types text/css application/javascript text/javascript application/x-javascript image/svg+xml text/plain text/xsd text/xsl text/xml image/x-icon;
location / {
try_files $uri $uri/ /index.php?$query_string;
}
location ~ [^/]\.php(/|$) {
fastcgi_param SCRIPT_FILENAME $document_root$fastcgi_script_name;
fastcgi_param PATH_INFO $fastcgi_path_info;
fastcgi_pass unix:/run/php-fpm-librenms.sock;
fastcgi_split_path_info ^(.+\.php)(/.+)$;
include fastcgi_params;
}
location ~ /\.(?!well-known).* {
deny all;
}
}rm /etc/nginx/sites-enabled/default
rm /etc/nginx/sites-available/default
systemctl enable nginx
systemctl restart nginxEnable lnms command completion
ln -s /opt/librenms/lnms /usr/bin/lnms
cp /opt/librenms/misc/lnms-completion.bash /etc/bash_completion.d/Configure snmpd
cp /opt/librenms/snmpd.conf.example /etc/snmp/snmpd.conf
curl -o /usr/bin/distro https://raw.githubusercontent.com/librenms/librenms-agent/master/snmp/distro
chmod +x /usr/bin/distro
systemctl enable snmpd
systemctl restart snmpd設定排成
cp /opt/librenms/dist/librenms.cron /etc/cron.d/librenms啟用調度程式
cp /opt/librenms/dist/librenms-scheduler.service /opt/librenms/dist/librenms-scheduler.timer /etc/systemd/system/
systemctl enable librenms-scheduler.timer
systemctl start librenms-scheduler.timerCopy logrotate config
cp /opt/librenms/misc/librenms.logrotate /etc/logrotate.d/librenms瀏覽器http://ip,依序安裝後進行組態驗證
cd /opt/librenms
su librenms
./validate.php更新PHP8.5
Debian 12官方套件只有到PHP8.2,加入第三方 PPA 來源來升級PHP
apt update
apt-get -y install lsb-release ca-certificates curl apt-transport-https
curl -sSLo /tmp/debsuryorg-archive-keyring.deb https://packages.sury.org/debsuryorg-archive-keyring.deb
dpkg -i /tmp/debsuryorg-archive-keyring.deb
sh -c 'echo "deb [signed-by=/usr/share/keyrings/deb.sury.org-php.gpg] https://packages.sury.org/php/ $(lsb_release -sc) main" > /etc/apt/sources.list.d/php.list'
apt update自動查詢PHP 8.2套件並安裝對應的 PHP 8.5 套件,php8.5-opcache 已經被直接內建在 php8.5-common 核心套件中故排除即可
apt install -y $(dpkg -l | grep php8.2- | grep -v 'opcache' | awk '{print $2}' | sed 's/php8.2/php8.5/g')切換系統預設 CLI 版本到 8.5,輸入8.5對應編號1
update-alternatives --config php
root@librenms:~# update-alternatives --config php
There is 1 choice for the alternative php (providing /usr/bin/php).
Selection Path Priority Status
------------------------------------------------------------
0 /usr/bin/php8.5 85 auto mode
* 1 /usr/bin/php8.5 85 manual mode確認版本
root@librenms:~# php -v
PHP 8.5.12 (cli) (built: Oct 21 2026 08:08:59) (NTS)
Copyright (c) The PHP Group
Built by Debian
Zend Engine v4.5.12, Copyright (c) Zend Technologies
with Zend OPcache v8.5.12, Copyright (c), by Zend Technologies修改時區
sed -i "s|^;date.timezone =.*$|date.timezone = Asia/Taipei|" /etc/php/8.5/fpm/php.ini
sed -i "s|^;date.timezone =.*$|date.timezone = Asia/Taipei|" /etc/php/8.5/cli/php.ini
系統設定時區
timedatectl set-timezone Asia/Taipei修改PHP-FPM
cp /etc/php/8.5/fpm/pool.d/www.conf /etc/php/8.5/fpm/pool.d/librenms.conf
nano /etc/php/8.5/fpm/pool.d/librenms.confChange [www] to [librenms]:
[librenms]
Change user and group to “librenms”:
user = librenms
group = librenms
Change listen to a unique name:
listen = /run/php-fpm-librenms.socksystemctl enable php8.5-fpm
systemctl restart php8.5-fpm
systemctl restart nginx確認PHP為8.5
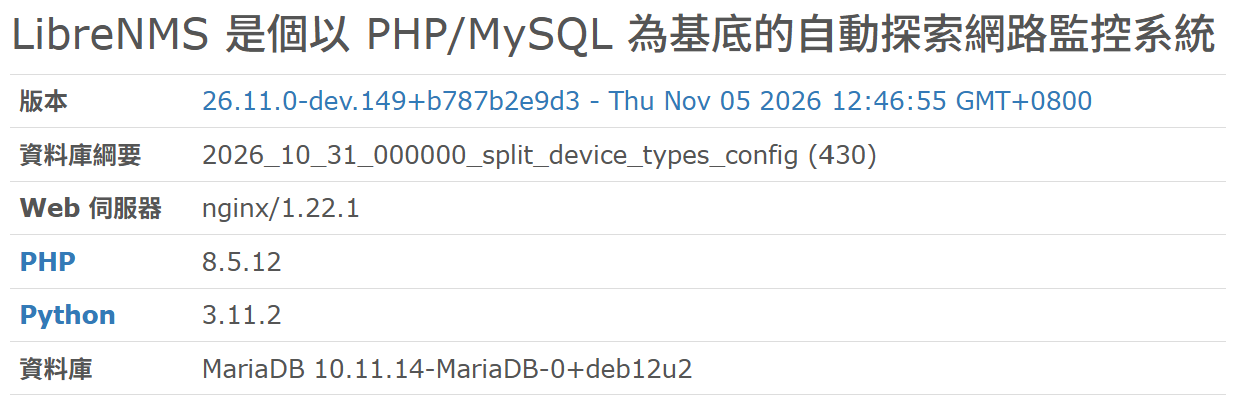
完整移除舊版本
apt purge php8.2 php8.2-*
apt autoremove --purge
LibreNMS架設 - Ubuntu 20
安裝環境
- PVE
- LXC
- Ubuntu 20
設定時區
timedatectl set-timezone Asia/Taipei最新LibreNMS已強制要求>php8.1
apt update
apt install software-properties-common
add-apt-repository universe
apt install php-mbstring php8.1-cli php8.1-common php8.1-curl php8.1-fpm php8.1-gd php8.1-mbstring php8.1-mysql php8.1-opcache php8.1-readline php8.1-snmp php8.1-xml php8.1-zip acl curl fping git graphviz imagemagick mariadb-client mariadb-server mtr-tiny nginx-full nmap rrdtool snmp snmpd whois unzip python3-pymysql python3-dotenv python3-redis python3-setuptools python3-systemd python3-pip -yphp-mbstring未安裝會造成500 ERROR
Add librenms user
useradd librenms -d /opt/librenms -M -r -s "$(which bash)"Download LibreNMS
cd /opt
git clone https://github.com/librenms/librenms.gitSet permissions
chown -R librenms:librenms /opt/librenms
chmod 771 /opt/librenms
setfacl -d -m g::rwx /opt/librenms/rrd /opt/librenms/logs /opt/librenms/bootstrap/cache/ /opt/librenms/storage/
setfacl -R -m g::rwx /opt/librenms/rrd /opt/librenms/logs /opt/librenms/bootstrap/cache/ /opt/librenms/storage/更改時區
nano /etc/php/8.1/fpm/php.ini
nano /etc/php/8.1/cli/php.ini
搜尋[Date] 把時區改為 Asia/Taipei修改MariaDB
nano /etc/mysql/mariadb.conf.d/50-server.cnf
Within the [mysqld] section add:
innodb_file_per_table=1
lower_case_table_names=0systemctl enable mariadb
systemctl restart mariadbmysql -u root
CREATE USER 'librenmsuser'@'localhost' IDENTIFIED BY 'librenmsuserpswd';
GRANT ALL PRIVILEGES ON librenms.* TO 'librenmsuser'@'localhost';
FLUSH PRIVILEGES;
exit修改PHP-FPM
cp /etc/php/8.1/fpm/pool.d/www.conf /etc/php/8.1/fpm/pool.d/librenms.conf
nano /etc/php/8.1/fpm/pool.d/librenms.conf
Change [www] to [librenms]:
[librenms]
Change user and group to “librenms”:
user = librenms
group = librenms
Change listen to a unique name:
listen = /run/php-fpm-librenms.sock
Configure Web Server建立librenms.conf
nano /etc/nginx/conf.d/librenms.conf
server {
listen 80;
server_name 127.0.0.1;
root /opt/librenms/html;
index index.php;
charset utf-8;
gzip on;
gzip_types text/css application/javascript text/javascript application/x-javascript image/svg+xml text/plain text/xsd text/xsl text/xml image/x-icon;
location / {
try_files $uri $uri/ /index.php?$query_string;
}
location ~ [^/]\.php(/|$) {
fastcgi_pass unix:/run/php-fpm-librenms.sock;
fastcgi_split_path_info ^(.+\.php)(/.+)$;
include fastcgi.conf;
}
location ~ /\.(?!well-known).* {
deny all;
}
}rm /etc/nginx/sites-enabled/default
rm /etc/nginx/sites-available/default
systemctl restart nginx
systemctl restart php8.1-fpmEnable lnms command completion
ln -s /opt/librenms/lnms /usr/bin/lnms
cp /opt/librenms/misc/lnms-completion.bash /etc/bash_completion.d/
Configure snmpd
cp /opt/librenms/snmpd.conf.example /etc/snmp/snmpd.conf

curl -o /usr/bin/distro https://raw.githubusercontent.com/librenms/librenms-agent/master/snmp/distro
chmod +x /usr/bin/distro
systemctl enable snmpd
systemctl restart snmpdCron job
cp /opt/librenms/librenms.nonroot.cron /etc/cron.d/librenmsCopy logrotate config
cp /opt/librenms/misc/librenms.logrotate /etc/logrotate.d/librenms瀏覽器http://ip,依序安裝後進行組態驗證
cd /opt/librenms

su librenms

./validate.php
LibreNMS 警報相關設定
LibreNMS 警報相關設定
LibreNMS LINE Messaging API 設定
運行環境
- Librenms 25.9.0
LINE Messaging API 申請
先在LINE Developers新增一個channel並選擇Messaging API

設定警報傳送
Type選擇LINE Messaging API
Access token輸入Channel access token
userID輸入Channel 內的user ID

設定好後點選右邊Test,LINE有出現測試訊息則成功

LibreNMS Mdadm RAID監控警報
啟用Mdadm
確認已安裝Mdadm監控
新增警報規則
Severity:警報等級
Max alert :最多通知幾次
Delay :延遲多久再來通知
Interval :通知間隔
Transports:選擇傳送類別
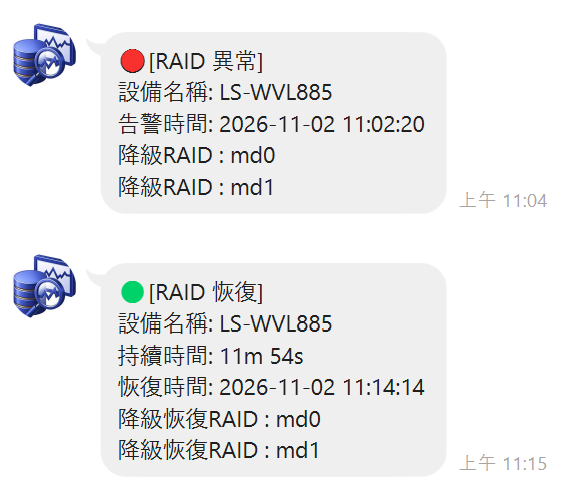
範例監控RAID降級後1分鐘發出警報

新增警報範本
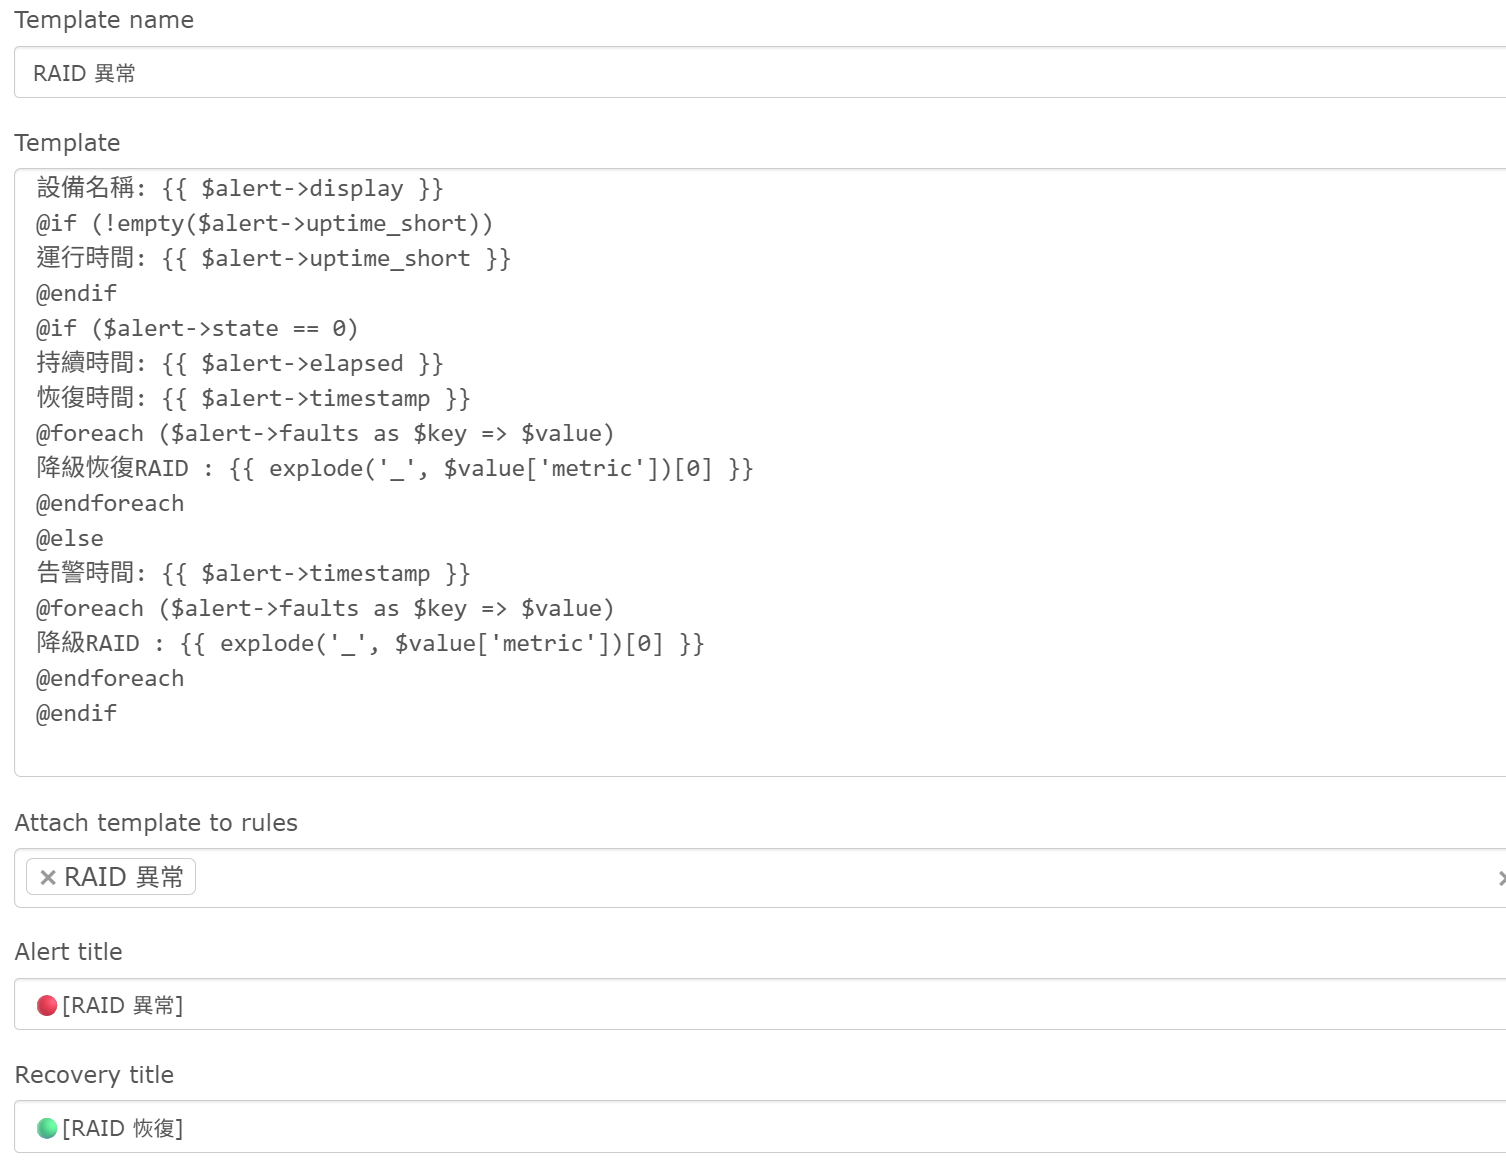
{{ $alert->title }}
設備名稱: {{ $alert->display }}
@if (!empty($alert->uptime_short))
運行時間: {{ $alert->uptime_short }}
@endif
@if ($alert->state == 0)
持續時間: {{ $alert->elapsed }}
恢復時間: {{ $alert->timestamp }}
@foreach ($alert->faults as $key => $value)
降級恢復RAID : {{ explode('_', $value['metric'])[0] }}
@endforeach
@else
告警時間: {{ $alert->timestamp }}
@foreach ($alert->faults as $key => $value)
降級RAID : {{ explode('_', $value['metric'])[0] }}
@endforeach
@endif
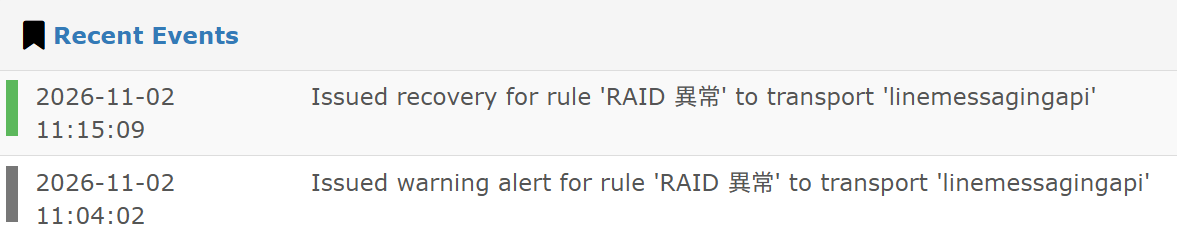
測試
LibreNMS 硬碟使用率監控警報
新增警報規則
範例監控"/"根目錄使用率超過80%
Severity:警報等級
Max alert :最多通知幾次
Delay :延遲多久再來通知
Interval :通知間隔
Transports:選擇傳送類別

新增警報範本

{{ $alert->title }}
設備名稱: {{ $alert->sysName }}
等級: {{ $alert->severity }}
運行時間: {{ $alert->uptime_short }}
警示時間: {{ $alert->timestamp }}
@foreach ($alert->faults as $key => $value)
硬碟名稱: {{ $value['storage_descr'] }}
目前硬碟使用率: {{ $value['storage_perc'] }} %
@endforeach
測試


LibreNMS CPU使用率監控警報
新增警報規則
Severity:警報等級
Max alert :最多通知幾次
Delay :延遲多久再來通知
Interval :通知間隔
Transports:選擇傳送類別
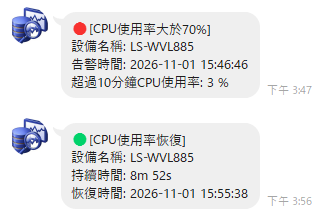
範例使用CPU>70%持續10分鐘發出警報
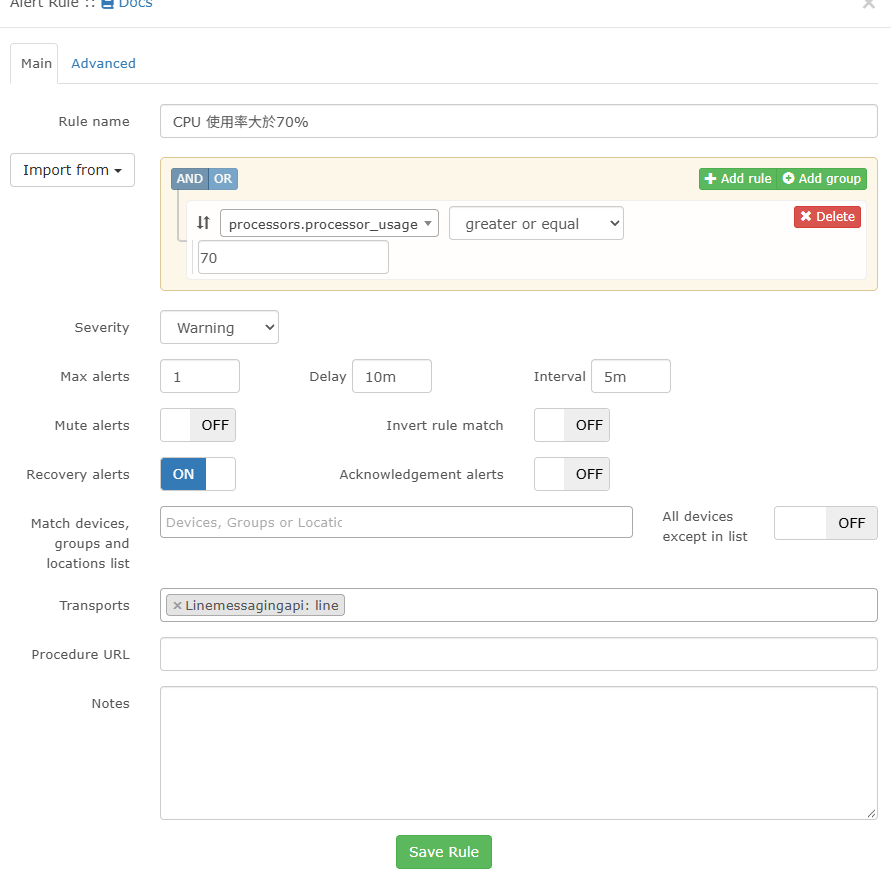
由於多核心CPU預設一顆CPU觸發就會警報,故修改使用平均使用率計算
官方解決範本https://docs.librenms.org/Alerting/Rules/#advanced,不過有GROUP語法錯誤告警
以下為自訂修改版本搭配警報範本使用,Override SQL記得開啟
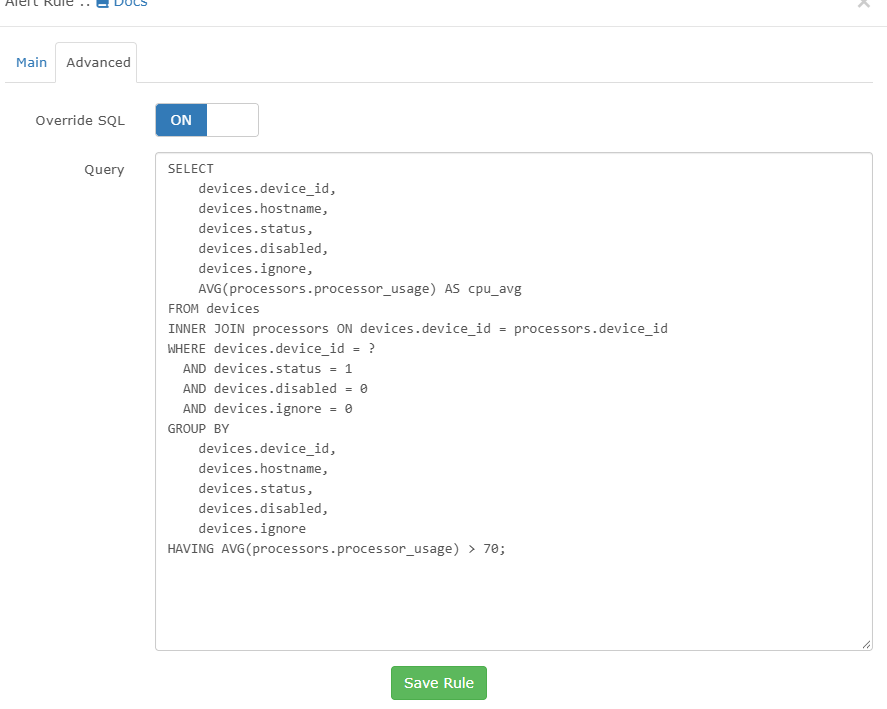
SELECT
    devices.device_id,
    devices.hostname,
    devices.status,
    devices.disabled,
    devices.ignore,
    AVG(processors.processor_usage) AS cpu_avg
FROM devices
INNER JOIN processors ON devices.device_id = processors.device_id
WHERE devices.device_id = ?
  AND devices.status = 1
  AND devices.disabled = 0
  AND devices.ignore = 0
GROUP BY
    devices.device_id,
    devices.hostname,
    devices.status,
    devices.disabled,
    devices.ignore
HAVING AVG(processors.processor_usage) > 70;
新增警報範本
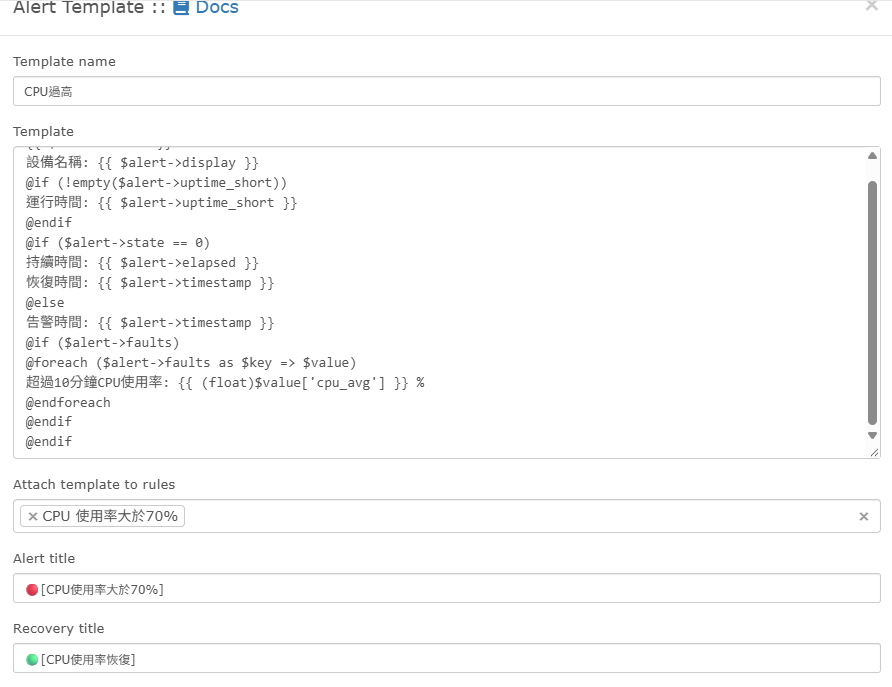
{{ $alert->title }}
設備名稱: {{ $alert->display }}
@if (!empty($alert->uptime_short))
運行時間: {{ $alert->uptime_short }}
@endif
@if ($alert->state == 0)
持續時間: {{ $alert->elapsed }}
恢復時間: {{ $alert->timestamp }}
@else
告警時間: {{ $alert->timestamp }}
@if ($alert->faults)
@foreach ($alert->faults as $key => $value)
超過10分鐘CPU使用率: {{ (float)$value['cpu_avg'] }} %
@endforeach
@endif
@endif
測試
這裡先調成>1%做測試

LibreNMS ICMP 監控警報
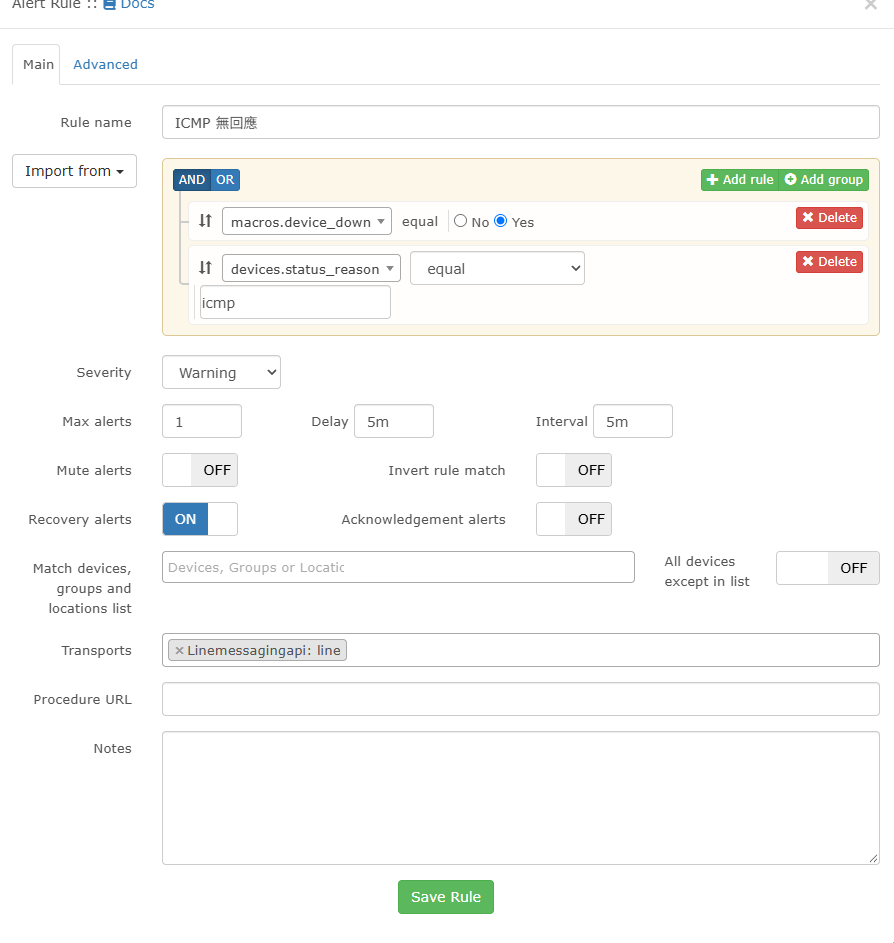
新增警報規則
若ICMP 5分鐘沒恢復則發送告警
Transport選擇要發送的位置
若不選擇設備則預設全部設備套用
新增警報範本
{{ $alert->title }}
設備名稱: {{ $alert->display }}
@if (!empty($alert->uptime_short))
運行時間: {{ $alert->uptime_short }}
@endif
@if ($alert->state == 0)
持續時間: {{ $alert->elapsed }}
恢復時間: {{ $alert->timestamp }}
@else
告警時間: {{ $alert->timestamp }}
@endif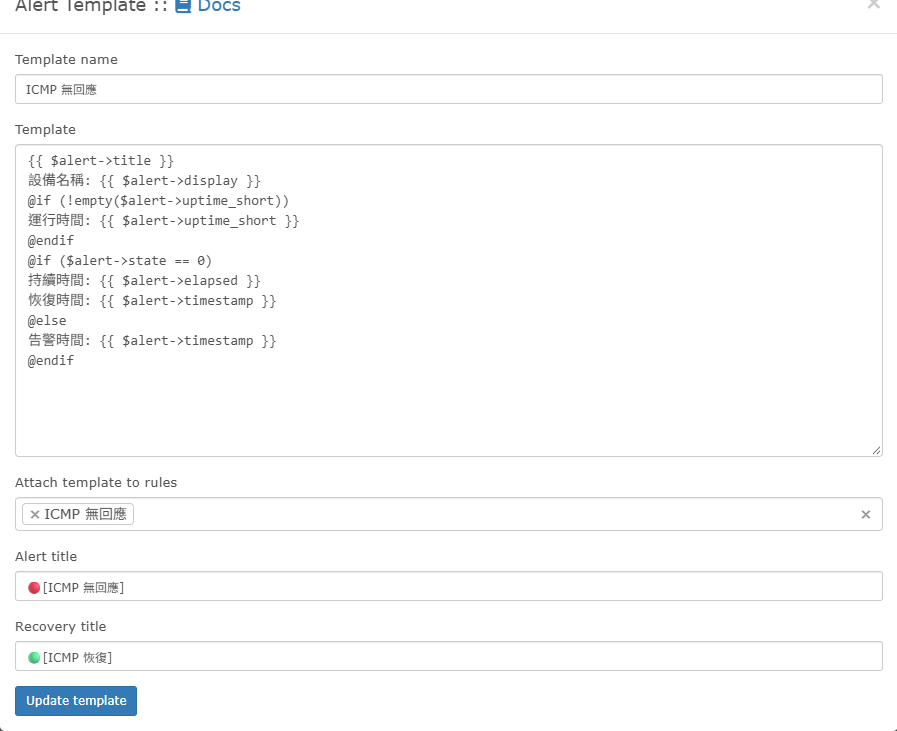
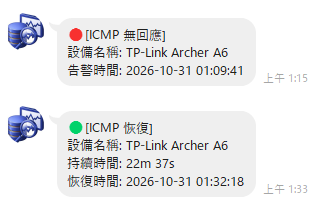
測試
測試告警
LibreNMS 自訂 LVM-Thin Pool 監控
/dev/mapper/vg-lv 掛載到 /data),它在作業系統中是一個標準的「掛載檔案系統」。LibreNMS 透過標準的 SNMP(HOST-RESOURCES-MIB)就能直接抓到這個掛載點的磁碟容量與使用率。local-lvm)。它本身沒有檔案系統,也沒有掛載到任何目錄上。因為它在系統中沒有 mount point,標準的 SNMP 走索引時根本看不到它,LibreNMS 自然就無法自動探索(Discovery)並畫出圖表。建立SNMP Extend 腳本
我的lvm-thin是使用USB外接硬碟,已經建立usb-lvm-thin
建立/etc/snmp/usb-lvm-thin,usb-lvm-thin修改成自已的Thin Pool
#!/bin/bash
percent=$(sudo /sbin/lvdisplay -m usb-lvm-thin 2>/dev/null | /bin/grep "Allocated pool data" | /usr/bin/awk '{print $4}' | /bin/sed 's/[.].*$//')

if [ -z "$percent" ]; then
    echo "0"
else
    echo "$percent"
fi
chmod +x /etc/snmp/usb-lvm-thin新增/etc/sudoers.d/snmpd-lvm,讓snmp能執行lvdisplay
Debian-snmp ALL=(ALL) NOPASSWD: /sbin/lvdisplay確認snmp程序能抓取資料
su -s /bin/bash Debian-snmp -c "/etc/snmp/usb-lvm-thin"/etc/snmp/snmpd.conf新增extend
extend lvmthin /etc/snmp/usb-lvm-thinservice snmpd restartCustom OID設定
確認已經建立OID,名稱統一為LVM-THIN,後續只要自訂LVM THIN OID都能統一套用
NET-SNMP-EXTEND-MIB::nsExtendOutLine."lvmthin".1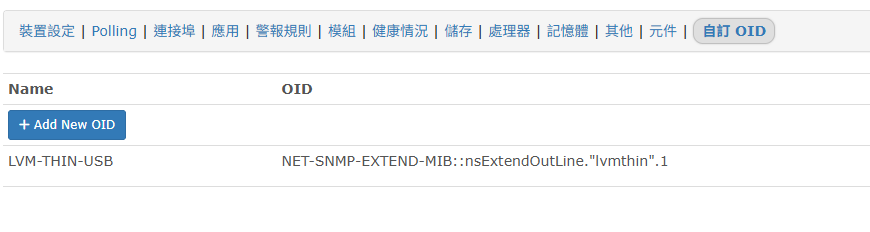
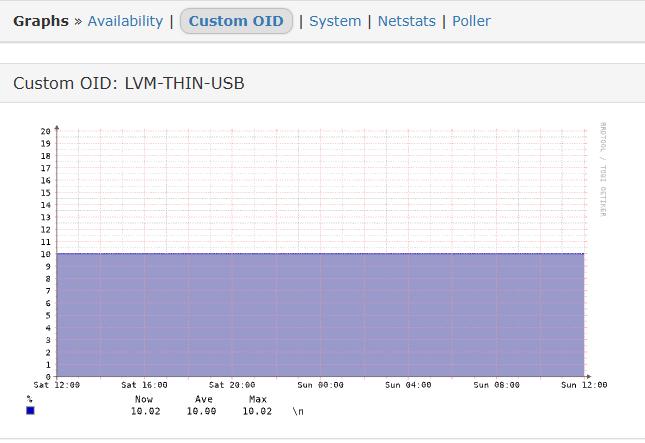
確認有顯示圖表
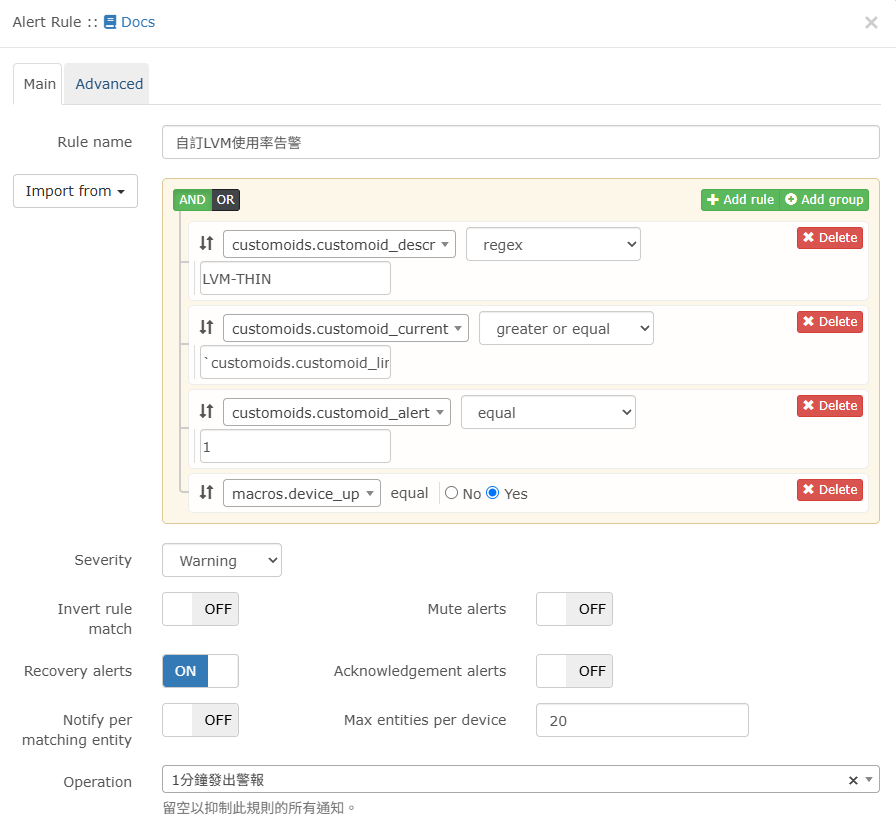
建立警報規則
選擇Create rule from collection,選擇CustomOID over warning limit
Add rule放在上面,讓descr匹配LVM-THIN
建立警報範本
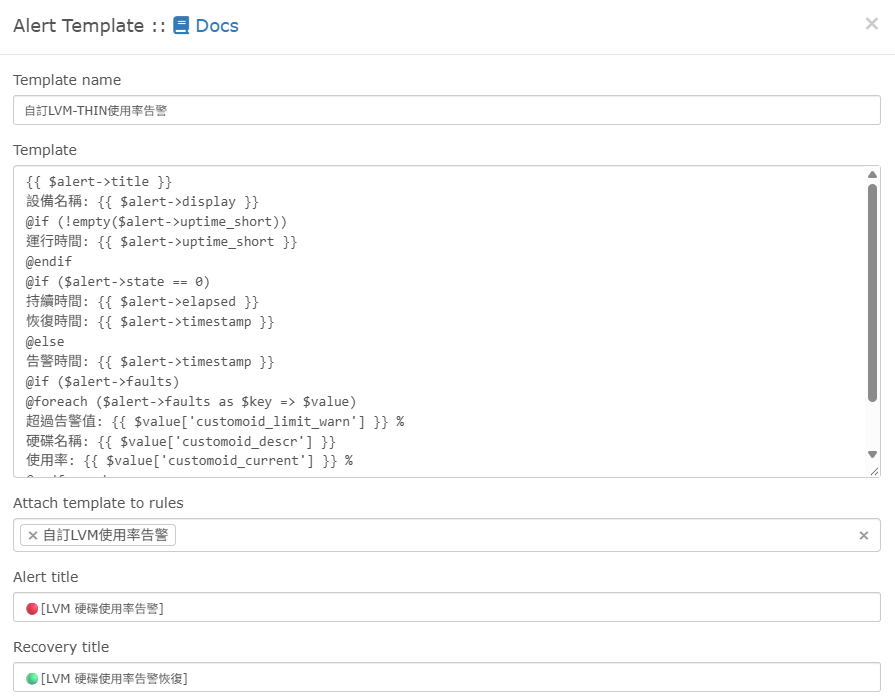
{{ $alert->title }}
設備名稱: {{ $alert->display }}
@if (!empty($alert->uptime_short))
運行時間: {{ $alert->uptime_short }}
@endif
@if ($alert->state == 0)
持續時間: {{ $alert->elapsed }}
恢復時間: {{ $alert->timestamp }}
@else
告警時間: {{ $alert->timestamp }}
@if ($alert->faults)
@foreach ($alert->faults as $key => $value)
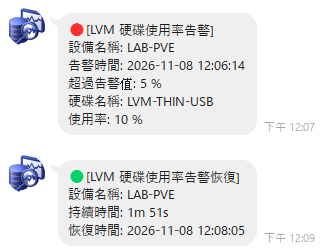
超過告警值: {{ $value['customoid_limit_warn'] }} %
硬碟名稱: {{ $value['customoid_descr'] }}
使用率: {{ $value['customoid_current'] }} %
@endforeach
@endif
@endif
LibreNMS 自訂CPU溫度監控警報
自訂OID
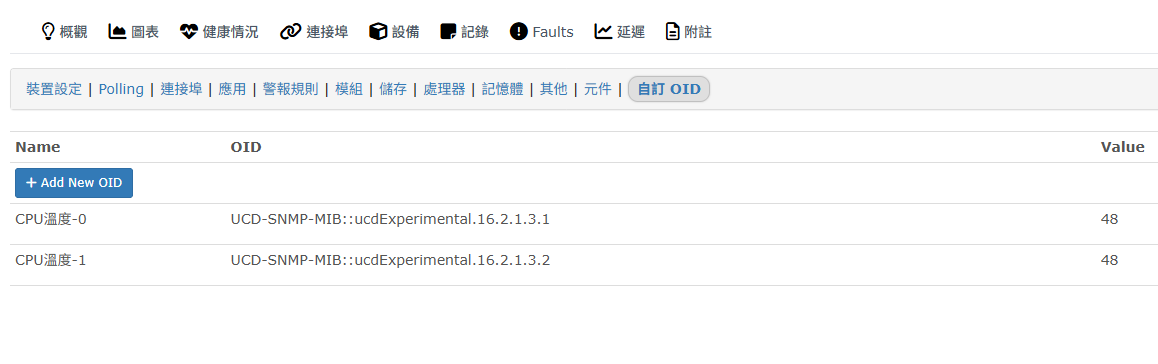
確認已經建立OID,名稱統一為CPU溫度,後續只要自訂CPU 監控OID都能統一套用
建立警報規則
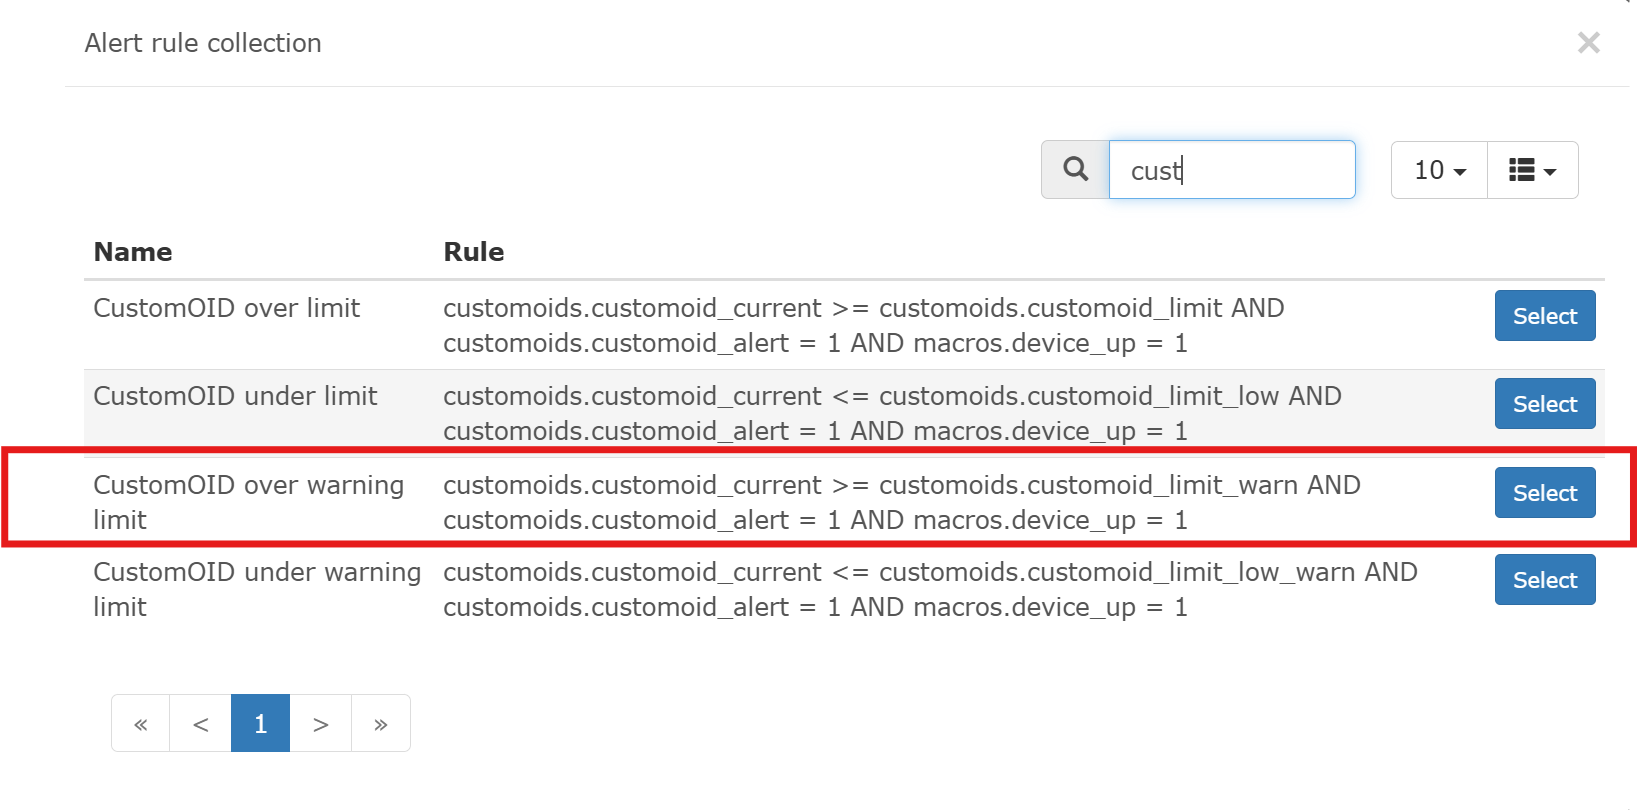
選擇Create rule from collection,選擇CustomOID over warning limit
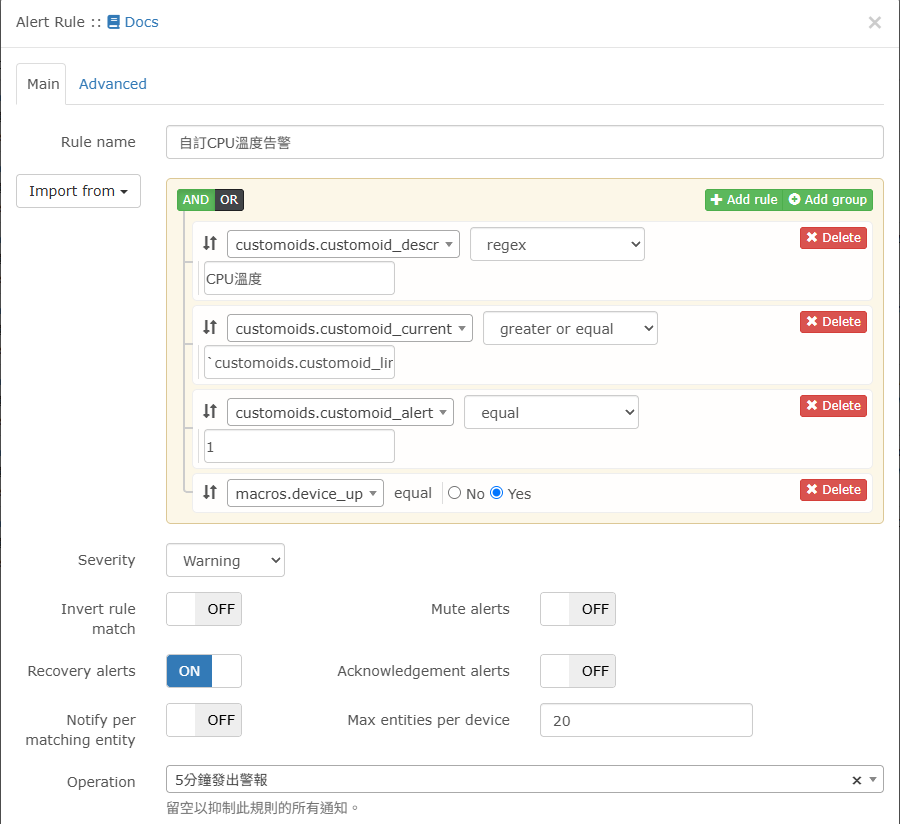
Add rule放在上面,讓descr匹配CPU溫度
建立警報範本
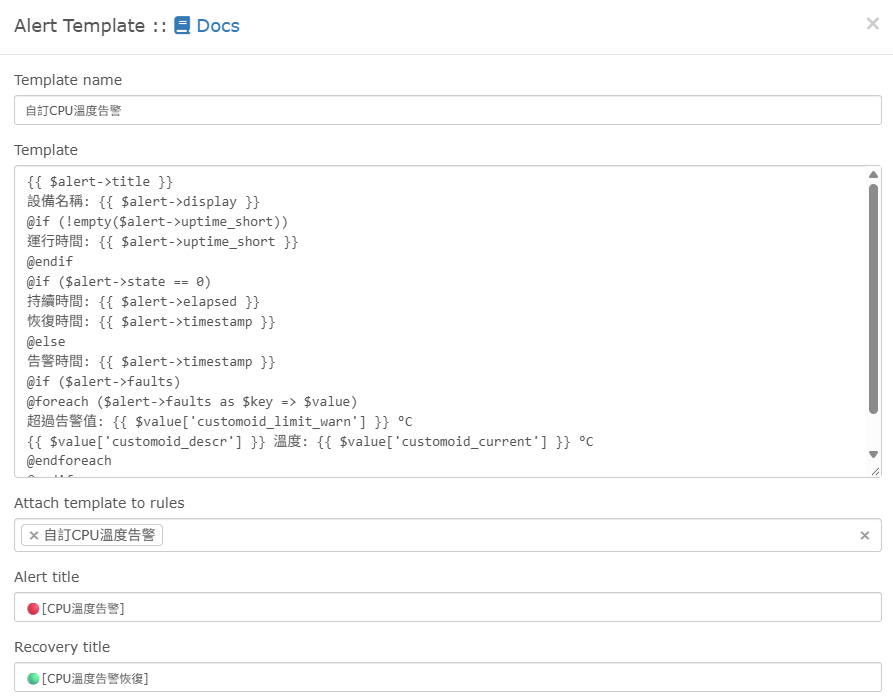
{{ $alert->title }}
設備名稱: {{ $alert->display }}
@if (!empty($alert->uptime_short))
運行時間: {{ $alert->uptime_short }}
@endif
@if ($alert->state == 0)
持續時間: {{ $alert->elapsed }}
恢復時間: {{ $alert->timestamp }}
@else
告警時間: {{ $alert->timestamp }}
@if ($alert->faults)
@foreach ($alert->faults as $key => $value)
超過告警值: {{ $value['customoid_limit_warn'] }} °C
{{ $value['customoid_descr'] }} 溫度: {{ $value['customoid_current'] }} °C
@endforeach
@endif
@endif
此為通用範例自行修改

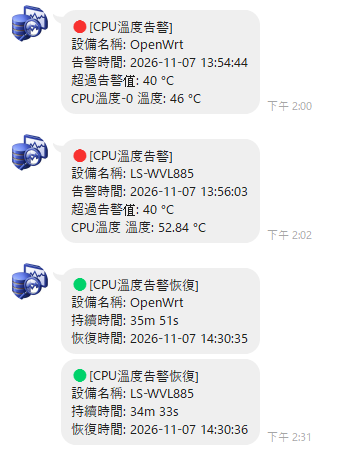
LibreNMS 外部整合
LibreNMS Smokeping 安裝設定
SmokePing為開源的網路品質監控專案,LibreNMS可整合Smokeping方便監測設備
安裝Smokeping
下載Smokeping
apt-get install smokeping複製Librenms smokeping腳本到cron
sudo cp /opt/librenms/misc/smokeping-debian.example /etc/cron.hourly/librenms-smokeping
sudo chmod +x /etc/cron.hourly/librenms-smokeping
手動執行cron一次並確認有建立檔案
/etc/cron.hourly/librenms-smokeping
ls -l /etc/smokeping/config.d/librenms-targets.conf
ls -l /etc/smokeping/config.d/librenms-probes.conf 
刪除/etc/smokeping/config.d/Probes內容並新增以下
*** Probes ***

@include /etc/smokeping/config.d/librenms-probes.conf刪除/etc/smokeping/config.d/Targets內容並新增以下
*** Targets ***

probe = FPing

menu = Top
title = Network Latency Grapher
remark = Welcome to the SmokePing website of <b>Insert Company Name Here</b>. \
         Here you will learn all about the latency of our network.

@include /etc/smokeping/config.d/librenms-targets.conf
建立Smokeping資料儲存位置
mkdir /opt/librenms/rrd/smokeping由於Smokeping執行會無法寫入/opt/librenms/rrd/smokeping
須將smokeping加入librenms群組對/opt/librenms/rrd/smokeping可讀寫
chown librenms:librenms /opt/librenms/rrd/smokeping

usermod -a -G librenms smokeping
網頁上設定剛剛建立的目錄,並設定每次測試發 20 個封包

編輯/etc/smokeping/config.d/Database,修改step改為每分鐘做一次測試(預設5分鐘)

編輯/etc/smokeping/config.d/pathnames,datadir 改為上面新增的目錄

重啟smokeping
service smokeping restart

service smokeping status
確認Librenms RRD內的smokeping已有資料

網頁上Latency內已有smokeping數值

網頁 Web UI 設定
安裝 fcgiwrap 才能使 CGI 包裝器與 Nginx 互動
apt install fcgiwrap編輯/etc/nginx/conf.d/librenms.conf設定檔加入smokeping設定
# Browsing to `http://yourlibrenms/smokeping/` should bring up the smokeping web interface

location = /smokeping/ {
        fastcgi_intercept_errors on;

        fastcgi_param   SCRIPT_FILENAME         /usr/lib/cgi-bin/smokeping.cgi;
        fastcgi_param   QUERY_STRING            $query_string;
        fastcgi_param   REQUEST_METHOD          $request_method;
        fastcgi_param   CONTENT_TYPE            $content_type;
        fastcgi_param   CONTENT_LENGTH          $content_length;
        fastcgi_param   REQUEST_URI             $request_uri;
        fastcgi_param   DOCUMENT_URI            $document_uri;
        fastcgi_param   DOCUMENT_ROOT           $document_root;
        fastcgi_param   SERVER_PROTOCOL         $server_protocol;
        fastcgi_param   GATEWAY_INTERFACE       CGI/1.1;
        fastcgi_param   SERVER_SOFTWARE         nginx/$nginx_version;
        fastcgi_param   REMOTE_ADDR             $remote_addr;
        fastcgi_param   REMOTE_PORT             $remote_port;
        fastcgi_param   SERVER_ADDR             $server_addr;
        fastcgi_param   SERVER_PORT             $server_port;
        fastcgi_param   SERVER_NAME             $server_name;
        fastcgi_param   HTTPS                   $https if_not_empty;

        fastcgi_pass unix:/var/run/fcgiwrap.socket;
}

location ^~ /smokeping/ {
        alias /usr/share/smokeping/www/;
        index smokeping.cgi;
        gzip off;
}
重啟Nginx
nginx -t

service nginx restart網頁上URL填入/smokeping

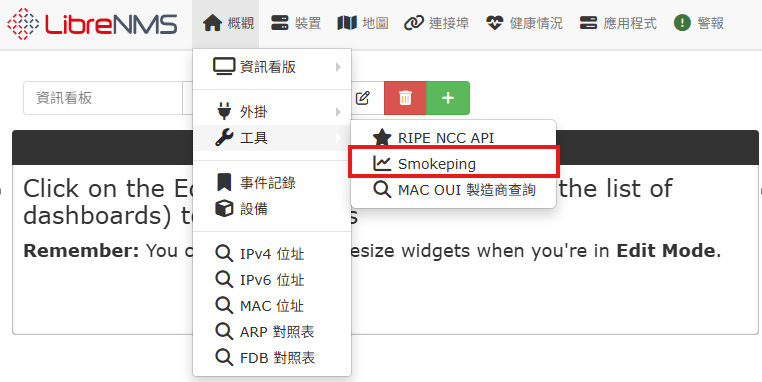
重整網頁後選擇工具>smokeping

自訂監控設定
安裝好Web UI後顯示的是Librenms監控的設備清單,可自行加入host監控
編輯/etc/smokeping/config.d/Targets,新增自訂監控設定
@include /etc/smokeping/config.d/custom.conf編輯/etc/smokeping/config.d/custom.conf,加入想要監控的host
+ Others
menu = Others
title = Others

++ GoogleDNS
menu = Google DNS
title = Google DNS
host = 8.8.8.8

++ CHTDNS
menu = CHT DNS
title = CHT DNS
host = 168.95.1.1
確認設定正確後重啟服務
smokeping --check

service smokeping restart
網頁上即可看到剛剛新增的host

自訂Probes
除了內建使用fping,也可以下載Github上的tcpping,使用traceroute和tcptraceroute的命令,增加TCP PORT的監控
curl -o /usr/bin/tcpping -L https://raw.githubusercontent.com/deajan/tcpping/master/tcpping
chmod +x /usr/bin/tcpping
測試tcpping正常
root@librenms:~#  tcpping google.com 443
seq 0: tcp response from nctsaa-ac-in-f14.1e100.net (142.250.196.206)  7.402 ms
seq 1: tcp response from hkg07s38-in-f14.1e100.net (142.250.204.46)  7.545 ms
seq 2: tcp response from lctsaa-aa-in-f14.1e100.net (142.250.66.78)  7.399 ms
預設情況下,traceroute 需要 root 權限,所以要允許smokeping使用traceroute
建立/etc/tcpping.conf設定檔,並加入-Z參數(使用sudo)
TCPPING_EXTRA_ARGS="-Z"執行visudo,讓 smokeping 以 root 身分執行 traceroute 無須密碼
smokeping ALL=(ALL) NOPASSWD: /usr/bin/traceroute編輯/etc/smokeping/config.d/Probes,增加tcpping
+ TCPPing
  binary = /usr/bin/tcpping
在監控設定檔內新增需要的host並指定probe和port
++ Google-https
menu = Google https
title = Google https
probe = TCPPing
port = 443
host = google.com
重啟smokeping後可以看到probe使用TCP Ping

LibreNMS 應用程式設定
LibreNMS 應用程式設定
LibreNMS Mdadm RAID監控
使LibreNMS可監控Mdadm RAID狀態
安裝jq套件
apt install jq下載mdadm script
wget https://raw.githubusercontent.com/librenms/librenms-agent/master/snmp/mdadm -O /etc/snmp/mdadmchmod +x /etc/snmp/mdadm確認可執行
root@LS-WVL885:~# /etc/snmp/mdadm
{"data":[{"name":"md0","level":"raid1","size":999227392,"disc_count":2,"編輯/etc/snmp/snmpd.conf
extend擴展記得included .1.3.6.1.4.1.8072.1.3
extend mdadm /etc/snmp/mdadmservice snmpd restart確認snmpwalk可以抓到mdadm
jason@test:~$ snmpwalk -v2c -c public 192.168.1.1 .1.3.6.1.4.1.8072.1.3
NET-SNMP-EXTEND-MIB::nsExtendNumEntries.0 = INTEGER: 2
NET-SNMP-EXTEND-MIB::nsExtendCommand."mdadm" = STRING: /etc/snmp/mdadm
NET-SNMP-EXTEND-MIB::nsExtendOutput1Line."mdadm" = STRING: {"data":[{"name":"md0","level":"raid1...
LibreNMS內應用程式會自動開啟Mdadm

應用程式有RAID狀態

LibreNMS SMART 監控
安裝 SMART SNMP Extend
安裝套件 Debian/Ubuntu
apt-get install smartmontools libjson-perl libmime-base64-perlwget https://github.com/librenms/librenms-agent/raw/master/snmp/smart-v1 -O /etc/snmp/smartchmod +x /etc/snmp/smart查詢硬碟
fdisk -l | grep "Disk /dev"
建立設定檔/etc/snmp/smart.config,將須監控硬碟代號填入,useSN=1顯示硬碟型號 0為不顯示
cache=/var/cache/smart
smartctl=/usr/bin/env smartctl
useSN=1
sda
sdb
確認執行有建立快取檔
/etc/snmp/smart -u

cat /var/cache/smart
新增snmp smart擴充,編輯/etc/snmp/snmpd.conf
新增
extend smart /bin/cat /var/cache/smart.snmp
重啟Snmp
systemctl restart snmpdLibrenms 設定
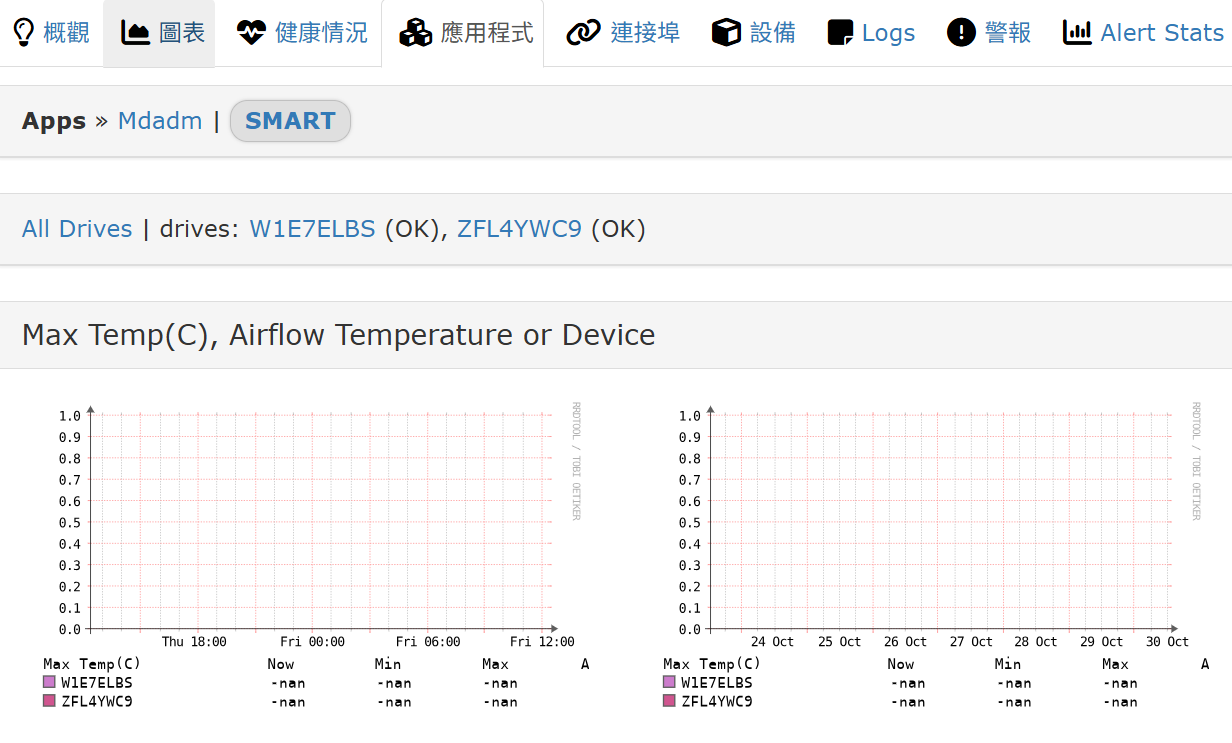
在網頁上選取設備的應用程式開啟SMART服務
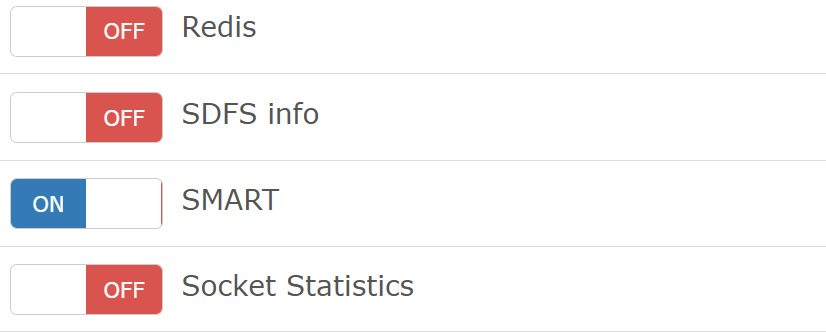
下次輪巡就會出現SMART資訊
排程設定
Crontab新增每5分鐘執行一次,這樣librenms只讀取快取檔不會受硬碟速度影響效能
*/5 * * * * /etc/snmp/smart -u可新增自我檢測,這裡範例每週一與週四的晚上 11 點 00 分執行短檢測
0 23 * * 1,4 /etc/snmp/smart -t short > /dev/null 2>&1
問題排除
後續發現/var/cache/smart沒有資料
root@LS-WVL885:~# cat /var/cache/smart
{"data":{"dev_error":0,"disks":{},"exit_nonzero":2,"unhealthy":0,"useSN":"1"},"error":0,"errorString":"","version":1}
原因是crontab執行環境找不到smartctl
root@LS-WVL885:~# env -i PATH=/usr/bin:/bin /etc/snmp/smart -u/usr/bin/env:
'smartctl': No such file or directory/usr/bin/env:
'smartctl': No such file or directory
which smartctl找出路徑後修改/etc/snmp/smart.config
smartctl=/usr/sbin/smartctl
LibreNMS 被監控設備SNMP設定
於被監控的主機上安裝Snmpd
apt install snmpd -y某些 Linux 發行版不會在SNMP中取得正確版本訊息,透過 LibreNMS 提供的 Distro 工具取得正確版本訊息
curl -o /usr/bin/distro https://raw.githubusercontent.com/librenms/librenms-agent/master/snmp/distro
chmod +x /usr/bin/distro
設定Snmpd
編輯/etc/snmp/snmpd.conf
agentAddress udp:192.168.0.1:161

view systemview included .1.3.6.1.2.1.1
view systemview included .1.3.6.1.4.1.2021
view systemview included .1.3.6.1.2.1.25
view systemview excluded .1.3.6.1.4.1.2021.13.16
view systemview included .1.3.6.1.2.1.2
view systemview included .1.3.6.1.2.1.31
extend .1.3.6.1.4.1.2021.7890.1 distro /usr/bin/distro
rocommunity nms 192.168.0.10/32 -V systemview
includeAllDisks 10%
load 12 10 5
以下為第二種extend設定,GPT回答
你看到的「extend .1.3.6.1.4.1.2021.7890.x ...」是 早期的寫法,因為:
-
舊版 SNMP / LibreNMS agent 腳本
以前大家習慣把 extend 掛在.1.3.6.1.4.1.2021(UCD-SNMP-MIB),這個 MIB 原本就有 CPU/Mem/Load,大家直接沿用。 -
相容性考量
舊的監控系統(Cacti、Nagios plugins)或舊版 LibreNMS,預設就是去.2021.7890.x找。這樣寫不用改 view,裝好就能抓到。 -
官方後來才引入 NET-SNMP-EXTEND-MIB
新版 net-snmp (5.4+) 支援extend <name> <command>,會自動掛到.1.3.6.1.4.1.8072.1.3。
這才是「標準化」的做法,也比較乾淨。
view systemview included .1.3.6.1.4.1.8072.1.3
extend distro /usr/bin/distro
基本設定說明
snmpd在本機192.168.0.1監聽
允許監控項目
.1.3.6.1.2.1.1 系統資訊
.1.3.6.1.4.1.2021 CPU 使用率、記憶體、磁碟使用等
.1.3.6.1.2.1.25 儲存設備、處理器資訊
.1.3.6.1.2.1.2 網路卡(interface)的資訊,如流量、狀態
.1.3.6.1.2.1.31 提供進階網路介面統計資訊,如 64-bit 流量統計
excluded .1.3.6.1.4.1.2021.13.16 包含禁用 sensors 偵測,如用LXC避免可顯示實體主機的 sensors資訊
.1.3.6.1.4.1.8072.1.3 NET-SNMP-EXTEND-MIB擴充
extend distro /usr/bin/distro  將/usr/bin/distro資訊回報

社群名稱為 nms
限定librenms主機 192.168.0.10 可讀取
includeAllDisks 10% 監控磁碟空間使用率
load 12 10 5 設定系統負載平均值的門檻
於Librenms加入設備後,發現設備時Operating System會顯示詳細版本資訊

LibreNMS 掃描自動新增設備
於/opt/librenms/config.php設定
$config['discovery_by_ip'] = true;
### Auto Discovery Support
$config['snmp']['community'][] = "JCE";    #community設定
$config['nets'][] = "10.166.0.0/24";       #網段或ip設定
$config['nets'][] = "10.166.64.0/24";
$config['nets'][] = "10.166.128.0/24";
$config['nets'][] = "10.166.192.0/24";
root@librenms:~$ su librenms
#切換librenms使用者
librenms@librenms:~$ ./snmp-scan.py
#執行scriptLibreNMS SNMP trap 設定
運行環境
- PVE
- LXC
- Debian 12
安裝snmptrapd
apt install snmptrapd -y設定
編輯/etc/snmp/snmptrapd.conf,新增以下
disableAuthorization yes
authCommunity log,execute,net COMMUNITYSTRING
traphandle default /opt/librenms/snmptrap.php
確認snmptrapd系統服務位置

修改/lib/systemd/system/snmptrapd.service
[Unit]
Description=Simple Network Management Protocol (SNMP) Trap Daemon.
After=network.target
ConditionPathExists=/etc/snmp/snmptrapd.conf

[Service]
Environment="MIBSDIR=/opt/librenms/mibs"
Type=simple
ExecStart=/usr/sbin/snmptrapd -f -m IF-MIB -M /opt/librenms/mibs
ExecReload=/bin/kill -HUP $MAINPID

[Install]
WantedBy=multi-user.target
重啟服務
systemctl daemon-reload
systemctl enable snmptrapd
systemctl restart snmptrapd
測試
Client發送eth0 down
snmptrap -v 2c -c public 192.168.100.1 '' .1.3.6.1.6.3.1.1.5.3 .1.3.6.1.2.1.2.2.1.1 i 2 .1.3.6.1.2.1.2.2.1.2 s "eth0" .1.3.6.1.2.1.2.2.1.7 i 1 .1.3.6.1.2.1.2.2.1.8 i 2確認網頁有收到TRAP

https://docs.librenms.org/Extensions/SNMP-Trap-Handler/#option-1
LibreNMS 自訂Custom OID
因LS-WVL SNMP無溫度輸出,使用自訂Custom OID紀錄溫度
/sys/class/thermal/thermal_zone0/temp為LS-WVL溫度值
編輯/etc/snmp/snmpd.conf
extend擴展記得included .1.3.6.1.4.1.8072.1.3
extend cpuTemp /bin/awk '{printf "%.2f",$1/1000}' /sys/class/thermal/thermal_zone0/temp確認snmpwalk可以抓到cpuTemp
jason@test:~$ snmpwalk -v2c -c public 192.168.1.1 .1.3.6.1.4.1.8072.1.3
...
NET-SNMP-EXTEND-MIB::nsExtendOutLine."cpuTemp".1 = STRING: 54.31
新增Custom OID

圖表紀錄

LibreNMS 修改設備IP
在 LibreNMS 中更改已纳管設備的 IP 地址(同時保留歷史繪圖與設定),最正規的做法是使用內建的 renamehost.php 工具能完美保留 RRD 歷史圖表
cd /opt/librenms

./renamehost.php old_ip new_ip
更改的設備Snmp若有監聽指定IP記得修改
/etc/snmp/snmpd.conf
agentAddress udp:new_ip:161
LibreNMS 轉發網頁IP帶PORT
librenms架在路由器後方需要轉送並帶PORT
在librenms主機的nginx裡新增fastcgi_param HTTP_HOST $http_host;
location ~ [^/]\.php(/|$) {
fastcgi_param SCRIPT_FILENAME $document_root$fastcgi_script_name;
fastcgi_param PATH_INFO $fastcgi_path_info;
fastcgi_pass unix:/run/php-fpm-librenms.sock;
fastcgi_split_path_info ^(.+\.php)(/.+)$;
include fastcgi_params;
fastcgi_param HTTP_HOST $http_host;
}
輸入路由器IP+PORT就能成功顯示