Linux 相關
Linux 相關
- Linux 限制使用者只允許SFTP
- Linux Expect 自動化套件
- Linux NAT MASQUERADE 設定
- Linux Rsync 同步備份配置
- Linux 新增永久路由
- Linux 新增rc.local 開機啟動腳本
- Linux OpenVPN Server 架設
- Linux TACACS+ Server 安裝
- Linux Cpufrequtils CPU頻率控制
- Linux MegaRaid CLI 陣列卡工具
- Linux R620 通過IPMI控制風扇轉速
- Linux tcpdump偵測封包
- Linux 啟用Trash 回收桶
- Linux Looking Glass IP網頁檢測
- Linux SSH KEY 免密碼登入
- Linux X11 Forwarding 圖形轉發
- Linux TAB鍵自動補全
- Linux SSH 啟用 OTP 驗證登入
- Linux 使用 nftables 和 Fail2ban 檢測封鎖
- Linux 使用 Chroot
- Linux 關閉 IPV6
- Linux Syslog-ng 轉發和過濾日誌
- Linux 簡易 Python3 FTP
- Linux Crontab 排程設定
Linux 限制使用者只允許SFTP
運行環境
- Debian 12
建立使用者
useradd -M testuser -s /usr/sbin/nologin-M 不建立家目錄
testuser 使用者
-s /usr/sbin/nologin 指定不登入bash
passwd testuser建立資料夾
假如路徑為/ftp/test,使用者限制在test資料夾
mkdir /ftp

cd /ftp

mkdir test
test資料夾權限改為使用者,上層所有皆為root
chown testuser:testuser test設定SSHD
編輯/etc/ssh/sshd_config
#Subsystem      sftp    /usr/lib/openssh/sftp-server

Subsystem sftp internal-sftp
Match User testuser
        ChrootDirectory /ftp
        ForceCommand internal-sftp
        AllowTcpForwarding no
        X11Forwarding no
service ssh restart測試
SFTP可正常登入
root@ssh:~# sftp testuser@10.0.0.200
testuser@10.0.0.200's password:
Connected to 10.0.0.200.
sftp> ls
test
sftp>
SSH登入被限制
root@ssh:~# ssh testuser@10.0.0.200
testuser@10.0.0.200's password:
This service allows sftp connections only.
Connection to 10.0.0.200 closed.
Linux Expect 自動化套件
安裝Expect
apt install expect使用範例
自動telnet登入
建立telnet_expect.sh
#!/usr/bin/expect
set username "test"
set password "test123"
set command "use command"
spawn telnet $ip
    expect {
        "*ogin:" {
            send "$username\r"
            expect "*assword:"
            send "$password\r"
            expect ">"
            send "$command\r"
            expect ">"
            send "exit\r"
        }
    }
chmod +x telnet_expect.sh多台設備多線程自動登入
建立設備清單,建立ip.txt
device_a*192.168.0.1
device_b*192.168.0.2
device_c*192.168.0.3建立多線程腳本telnet.sh,創建log資料夾儲存log
#!/bin/bash
rm log/*

for i in `cat ip.txt`
do {
substr=$(echo $i | cut -d"*" -f 2)
kip=$substr
substr=$(echo $i | cut -d"*" -f 1)
kname=$substr
/usr/bin/expect expect.sh $kip $kname
}&
done
wait建立expect.sh
#!/usr/bin/expect
set timeout 30
set username "test"
set password "test123"
set command "show configuration |display set|no-more"
set date [ clock format [ clock seconds ] -format "%Y%m%d" ]
set kip [lindex $argv 0]
set kname [lindex $argv 1]

spawn telnet $kip
log_file "log/$date-${kname}.log"
expect {
        "*ogin:" {
                send "$username\r"
                expect "*assword:"
                send "$password\r"
                expect ">"
                send "set cli timestamp\r"
                expect ">"
                send "$command\r"
                expect ">"
                send "exit\r"
                log_file
        }
}
chmod +x expect.sh執行telnet.sh
Linux NAT MASQUERADE 設定
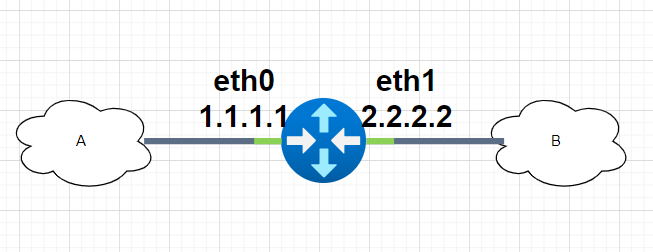
A網網段 192.168.12.0/24
B網網段 10.0.137.0/24
B網將來源偽裝使用 eth0(1.1.1.1) 進入 A網
iptables -t nat -A POSTROUTING -o eth0 -s 10.0.137.0/24 -j MASQUERADE
A網將來源偽裝使用 eth1(2.2.2.2) 進入 B網
iptables -t nat -A POSTROUTING -o eth1 -s 192.168.12.0/24 -j MASQUERADELinux Rsync 同步備份配置
安裝Rsync
Client和Server安裝Rsync
apt-get install rsyncServer Rsync 設定
編輯/etc/rsyncd.conf
[backup]
# target directory to copy
path = /backup
# hosts you allow to access
hosts allow = 10.0.0.5
hosts deny = *
list = true
uid = test1
gid = test1
read only = false
auth users = test1
secrets file = /etc/rsyncd.secrets
auth users 允許用戶
secrets file = 設定密碼root@rsync:~# cat /etc/rsyncd.secrets
test1:test1pwd
使用者:密碼
新增權限chmod 600 /etc/rsyncd.secrets建立/backup資料夾和使用者test1
# 建群組
groupadd test1

# 建使用者並指定群組
useradd -g test1 -s /usr/sbin/nologin -M test1

# 建立目錄並賦權
mkdir -p /backup
chown test1:test1 /backup
chmod 750 /backup
Client 指令
列出模組
root@synology:~# rsync -rtn rsync://test1@10.0.0.110
backup
列出模組內檔案
root@synology:~# rsync -rtn rsync://test1@10.0.0.110/backup
Password:Client新增密碼檔自動輸入密碼
新增/rsyncd.secrets ,輸入要讀取密碼
root@synology:~# cat /rsyncd.secrets
test1pwd
新增權限chmod 600 /rsyncd.secrets
備份指令
rsync -avz --chmod=Du+rwx --delete /volume1/homedata/jason --password-file=/rsyncd.secrets test1@10.0.0.110::backup-
-a:archive 模式,保留權限、時間、符號連結等 -
-v:顯示過程 -
-z:壓縮傳輸(適合跨網路,但區域網路有時反而變慢) -
--chmod=Du+rwx:強制目錄允許 u+rwx -
--delete:刪除目標端多餘檔案
第一次使用為完整備份,之後依照參數為鏡像或增量備份(–delete刪除不存在,即為兩端鏡像)
-v,-verbose增強可讀性
-q,-quiet忽略非錯誤信息
-no-motd忽略守護進程模式的MOTD信息(參見manpage告知)
-c,-checksum基於checksum校驗,而非mod-time和size
-a,-archive歸檔模式,和-rlptgoD(不要使用-H,-A,-X)參數相同
-no-OPTION關閉一些顯式的OPTION(比如-no-D)
-r,-recursive遞歸目錄
-R,-relative使用相對路徑
-no-implied-dirs不發送制定目錄的屬性,避免在目標使用-relative刪除連接重新傳輸文件
-b,-backup備份(查看-suffix&-backup-dir)
-backup-dir = DIR基於DIR來創建備份的目錄結構
-suffix = SUFFIX制定備份的後最(默認~w / o -backup-dir)
-u,-update跳過接受端較新的文件
-inplace直接在文件上更新(SEE MAN PAGE)
-append直接追加文件
-append-verify和-append很像,只是用文件的較舊的那部份做校驗和
-d,-dirs僅傳輸文件而非遞歸
-l,-links將軟鏈接當作軟鏈接來拷貝
-L,-copy-links拷貝鏈接對應的文件或者目錄而非鏈接本身
-copy-unsafe-links僅不安全的鏈接才被拷貝
-safe-links忽略那些鏈接到目錄樹外的鏈接
-k,-copy-dirlinks將鏈接翻譯成其鏈接的目錄
-K,-keep-dirlinks將目錄鏈接在接收端轉換成目錄
-H,-hard-links保留硬鏈接
-p,-perms保留權限
-E,-executability保留文件的可執行性
-chmod = CHMOD改變文件或者目錄的權限
-A,-acls保留ACL(暗示-perms)
-X,-xattrs保留擴展屬性
-o,-owner保留所有者(僅限超級用戶)
-g,-group保留組
-devices保留設備文件(僅限超級用戶)
-specials保留特殊文件
-D和-devices -specials一樣
-t,-times保留修改時間
-O,-omit-dir-times在-times選項裡忽略目錄的時間
-super允許接受方執行那個一些超級用戶的活動
-fake-super通過xattrs來存儲和回復權限
-S,-sparse高效處理稀疏文件
-n,-dry-run只運行,不做改變
-W,-whole-file拷貝貝整個文件(沒有delta-xfer算法)
-x,-one-file-system不跨越文件系統
-B,-block-size = SIZE強制指定checksum的塊大小
-e,-rsh = COMMAND指定要使用的遠程shell
-rsync-path = PROGRAM指定遠程要運行的rsync路徑
存在如果接收端不存在文件就不創建
-ignore-existing如果接收端存在就不更新文件
-remove-source-files發送端刪除已經同步的文件(非dirs)
-del -delete-during的別名
-delete刪除接收端上在發送端不存在的文件
-delete-before接收端在發送前刪除,而不是發送過程中
-delete-during接收端在發送過程中刪除
-delete-delay在發送過程中尋找文件,在發送完成後刪除
-delete-after接收端在發送完成後刪除
-delete-excluded在接收端刪除排除的文件
-ignore-errors即使有I / O錯誤也刪除
-force即使目錄不是空的也刪除
-max-delete = NUM最多刪除文件的數目
-max-size = SIZE最大傳輸文件的大小
-min-size = SIZE最小傳輸文件的大小
-partial保持部分傳輸的文件
-partial-dir = DIR制定部分傳輸文件的存放目錄
-delay-updates先傳輸,最後再更新,保持原子性
-m,-prune-empty-dirs接收端刪除空目錄
-numeric-ids接收端不要將uid / gid映射為用戶名和組名
-timeout = SECONDS設置I / O超時時間,s為單位
-contimeout = SECONDS設置鏈接服務端的時間
-I,-ignore-times即使mtime和size都相同也不跳過
-size-only只要大小相同就跳過
-modify-window = NUM比對時間時制定精確範圍,範圍內都認為時間相同
-T,-temp-dir = DIR指定創建臨時文件的目錄
-y,-fuzzy文件在接收端不存在的情況下,在當前目錄下尋找一個基礎文件,以加快傳輸
-compare-dest = DIR接收端除了和發送端對比還和這裡指定的目錄對比,適合備份上次備份改變的文件
-copy-dest = DIR和-compare-dest類似,只是接收端會用本地拷貝來複製那些未改變的文件
-link-dest = DIR和-compare-dest類似,只是接收端會建立那些未改變文件的硬鏈接
-z,-compress傳輸過程中壓縮
-compress-level = NUM指定壓縮等級
-skip-compress = LIST不壓縮指定後綴的文件
-C,-cvs-exclude以CSV的方式自動忽略文件
-f,-filter = RULE新增一個文件過濾規則
-F與-filter =’dir-merge /.rsync-filter’重複相同:-filter =’ — .rsync-filter’
-exclude = PATTERN排除規則PATTERN
-exclude-from = FILE從文件中讀取排除規則
-include = PATTERN不要排除指定規則的文件
-include-from = FILE從文件中讀取包含的規則
-files-from = FILE從文件中讀取文件列表
-0,-from0 all
-from / filter文件由0分隔
-s,-protect-args參數不許要空格分割; 只有通配符特殊字符
-address = ADDRESS綁定監聽的地址
-port = PORT制定端口號
-sockopts = OPTIONS制定TCP選項
-blocking-io在遠程shell中使用阻塞I / O.
-stats給出文件統計信息
-8,-8-bit-output輸出時不對高位字符轉義
-h,-human-readable以易於閱讀的方式打印數字
-progress顯示傳輸進度
-P與-partial-progress相同
-i,-itemize-changes打印更新的總結信息
-out-format = FORMAT以特定的格式打印更新信息
-log-file = FILE日誌文件
-log-file-format = FMT日誌文件格式
-password-file = FILE密碼文件
-list-only僅列出文件
-bwlimit = KBPS限制帶寬; 每秒KBytes
-write-batch = FILE將批量更新寫入文件
-only-write-batch = FILE和-write-batch類似但沒有更新目的地
-read-batch = FILE從文件中讀取批量更新任務
-protocol = NUM使用舊版本的協議
-iconv = CONVERT_SPEC要求文件名字符轉義
-4,-ipv4更喜歡IPv4
-6,-ipv6更喜歡IPv6
-version打印幫助信息
(-h)-help打印這個幫組信息(-h僅在單獨使用時與-help同意)Linux 新增永久路由
指令新增路由後,重啟會消失
ip route add 192.168.0.0/24 via 192.168.1.1 dev eth0編輯/etc/network/interfaces,在這個網路介面 啟動(up)時,會執行一條靜態路由的指令
up ip route add 10.8.0.6/32 via 10.0.0.5
Linux 新增rc.local 開機啟動腳本
確認系統是否使用rc.local
systemctl status rc-local.service建立rc.local服務
編輯/etc/systemd/system/rc-local.service
[Unit]
Description=/etc/rc.local Compatibility
ConditionPathExists=/etc/rc.local
[Service]
Type=forking
ExecStart=/etc/rc.local start
TimeoutSec=0
StandardOutput=tty
RemainAfterExit=yes
SysVStartPriority=99
[Install]
WantedBy=multi-user.target創建文件rc.local,/etc/rc.local
#!/bin/sh -e
指令放入這
exit 0
chmod +x /etc/rc.local啟用服務
systemctl enable rc-local
systemctl start rc-local
systemctl status rc-local
Linux OpenVPN Server 架設
下載安裝腳本
wget https://git.io/vpn -O openvpn-install.shbash ./openvpn-install.sh依照選項建立vpn server
建立好後client端檔案的位置 (/root/pve.ovpn)
Finished!

The client configuration is available in: /root/pve.ovpn
New clients can be added by running this script again.
Tap橋接模式設定
apt-get install -y bridge-utils將本身網卡註解,並加入bridge(br0),編輯/etc/network/interfaces
auto lo
iface lo inet loopback
#auto eth0
#iface eth0 inet dhcp
auto br0
iface br0 inet static
address 192.168.x.x
netmask 255.255.255.0
gateway 192.168.x.x
network 192.168.x.0
broadcast 192.168.x.255
bridge_ports eth0
#auto eth0
#iface eth0 inet static
#        address 192.168.x.x/24
#        gateway 192.168.x.x
service networking restart伺服器設定檔修改
編輯/etc/openvpn/server/server.conf
local 192.168.x.x
port 1195
proto tcp
dev tap0
ca ca.crt
cert server.crt
key server.key
dh dh.pem
auth SHA512
tls-crypt tc.key
server-bridge
push "route 192.168.x.0 255.255.255.0"
route-gateway 192.168.x.x
keepalive 10 120
user nobody
group nogroup
cipher AES-256-CBC
persist-key
persist-tun
verb 3
explicit-exit-notify 1
script-security 2
up "openvpn_up br0"
down "openvpn_down br0"
cipher AES-256-CBC
comp-lzo
status /var/log/openvpn/status.log
duplicate-cn  <<<允許多個連線,共享證書和金鑰
service openvpn-server@server restart編輯/etc/openvpn/server/openvpn_up
#!/bin/sh
BR=$1
DEV=$2
MTU=$3
/sbin/ifconfig $DEV mtu $MTU promisc up
/sbin/brctl addif $BR $DEV
/sbin/ifconfig tap0 up編輯/etc/openvpn/server/openvpn_down
#!/bin/sh
BR=$1
DEV=$2
/sbin/brctl delif $BR $DEV
/sbin/ifconfig $DEV down
客戶端設定檔修改
加入comp-lzo壓縮參數
Tun橋接模式設定
local 10.0.0.5
push "route 10.0.0.0 255.255.255.0" (推送路由)
push "route 10.8.0.0 255.255.255.0" (推送路由)
port 1194
proto udp
dev tun
ca ca.crt
cert server.crt
key server.key
dh dh.pem
auth SHA512
tls-crypt tc.key
server 10.8.0.0 255.255.255.0 (配發網段)
keepalive 10 120
user nobody
group nogroup
persist-key
persist-tun
verb 3
crl-verify crl.pem
explicit-exit-notify
comp-lzo (壓縮參數)
log-append /var/log/openvpn/op_server.log (寫入log)
status /var/log/openvpn/status.log (寫入狀態)
duplicate-cn  <<<允許多個連線,共享證書和金鑰
service openvpn-server@server restart
告警訊息修正參數
DEPRECATED OPTION: --cipher set to 'AES-256-CBC' but missing in --data-ciphers (AES-256-GCM:AES-128-GCM). Future OpenVPN version will ignore --cipher for cipher negotiations. Add 'AES-256-CBC' to --data-ciphers or change --cipher 'AES-256-CBC' to --data-ciphers-fallback 'AES-256-CBC' to silence this warning.
WARNING: 'link-mtu' is used inconsistently, local='link-mtu 1602', remote='link-mtu 1586'
WARNING: 'keysize' is used inconsistently, local='keysize 256', remote='keysize 128'
WARNING: this configuration may cache passwords in memory -- use the auth-nocache option to prevent this
Server設定檔新增
cipher AES-256-CBCClient設定檔修改
cipher AES-256-CBC
修改
data-ciphers-fallback AES-256-CBC

auth-nocache
Linux TACACS+ Server 安裝
安裝TACACS+
Ubuntu 18
apt-get install tacacs+ubuntu 20以後已棄用tacacs+軟件包,下載檔案自行編譯
apt-get update
cd ~
wget http://www.pro-bono-publico.de/projects/src/DEVEL.tar.bz2
bzip2 -dc DEVEL.tar.bz2 | tar xvfp -
cd PROJECTS
make
make install
mkdir /var/log/tac_plus
mkdir /var/log/tac_plus/access
mkdir /var/log/tac_plus/accounting
mkdir /var/log/tac_plus/authentication
cp tac_plus/extra/etc_init.d_tac_plus /etc/init.d/tac_plus
chmod +x /etc/init.d/tac_plus設定tac_plus
sample設定檔 /usr/local/etc/mavis/sample/tac_plus.cfg
新建設定檔於/usr/local/etc/tac_plus.cfg
#!/usr/local/sbin/tac_plus
id = spawnd {
    listen = { port = 49 }
}
id = tac_plus {
    # Log files
    authentication log = /var/log/tac_plus/authentication.log
    accounting log = /var/log/tac_plus/accounting.log
    authorization log = /var/log/tac_plus/authorization.log
    retire limit = 3000
    # Define external authentication module
    mavis module = external {
        exec = /usr/local/lib/mavis/mavis_tacplus_passwd.pl
    }
    # Authentication backend
    login backend = mavis
    # Default host for all connections
    host = 0.0.0.0/0 {
        key = "test"
    }
    group = admin {
                default service = permit
                service = shell {
                        default command = permit
                        default attribute = permit
                        set priv-lvl = 15
                }
        }
    user = jason {
                password = crypt <加密密碼>
                member = admin
                service = junos-exec {
                    set local-user-name =  SUPER
               }
        }
}
加密密碼
openssl passwd -crypt <密碼>systemctl enable tac_plus
systemctl restart tac_plus
systemctl status tac_plus
Linux Cpufrequtils CPU頻率控制
使用cpufrequtils可降頻來降低溫度和省電
確認CPU驅動
cat /sys/devices/system/cpu/cpu*/cpufreq/scaling_driver如果顯示為 intel_pstate,您可能需要禁用它並切換到 intel-cpufreq 驅動程序
編輯/etc/default/grub,在GRUB_CMDLINE_LINUX_DEFAULT加入intel_pstate=disable
GRUB_CMDLINE_LINUX_DEFAULT="quiet splash intel_pstate=disable"

update-grub
reboot再次確認狀態為intel-cpufre
cat /sys/devices/system/cpu/cpu*/cpufreq/scaling_driver安裝Cpufrequtils
apt-get install cpufrequtils查看支持cpu管理模式
cat /sys/devices/system/cpu/cpu0/cpufreq/scaling_available_governors
conservative ondemand userspace powersave performance schedutil
查看CPU訊息
cpufreq-inforoot@pve:~# cpufreq-info
cpufrequtils 008: cpufreq-info (C) Dominik Brodowski 2004-2009
Report errors and bugs to cpufreq@vger.kernel.org, please.
analyzing CPU 0:
driver: intel_cpufreq
CPUs which run at the same hardware frequency: 0
CPUs which need to have their frequency coordinated by software: 0
maximum transition latency: 20.0 us.
hardware limits: 1.20 GHz - 3.50 GHz
available cpufreq governors: conservative, ondemand, userspace, powersave, performance, schedutil
current policy: frequency should be within 1.20 GHz and 3.50 GHz.
The governor "ondemand" may decide which speed to use
within this range.
current CPU frequency is 3.05 GHz.修改模式
編輯/etc/init.d/cpufrequtils
ENABLE="true"
GOVERNOR="powersave"     <<<修改模式 ondemand改powersave
MAX_SPEED="0"
MIN_SPEED="0"
systemctl daemon-reload
/etc/init.d/cpufrequtils restartroot@pve:~# cpufreq-info
cpufrequtils 008: cpufreq-info (C) Dominik Brodowski 2004-2009
Report errors and bugs to cpufreq@vger.kernel.org, please.
analyzing CPU 0:
driver: intel_cpufreq
CPUs which run at the same hardware frequency: 0
CPUs which need to have their frequency coordinated by software: 0
maximum transition latency: 20.0 us.
hardware limits: 1.20 GHz - 3.50 GHz
available cpufreq governors: conservative, ondemand, userspace, powersave, performance, schedutil
current policy: frequency should be within 1.20 GHz and 3.50 GHz.
The governor "powersave" may decide which speed to use
within this range.
current CPU frequency is 1.20 GHz.Linux MegaRaid CLI 陣列卡工具
安裝LSI MegaRAID陣列卡,可讀取RAID內硬碟與整體RAID的狀態
加入 megacli apt repo
編輯/etc/apt/sources.list
deb http://hwraid.le-vert.net/debian bullseye main設定megacli apt key
wget https://hwraid.le-vert.net/debian/hwraid.le-vert.net.gpg.key
apt-key add hwraid.le-vert.net.gpg.key
安裝 megaraid tools
apt update
apt install megacli
apt install megaclisas-status
使用查詢語法
顯示 RAID 完整資訊
megacli -AdpAllInfo -aAll
顯示結果
顯示 RAID 狀態
megaclisas-status
顯示結果
查詢 RAID 內單一硬碟的 smart 資訊 Exp. RAID 在 /dev/sdb 要看裡面的第一顆資訊
smartctl -a -d megaraid,0 /dev/sdb
Linux R620 通過IPMI控制風扇轉速
測試IPMI連接
R620預設帳號密碼root/calvin
ipmitool -I lanplus -H 192.168.1.149 -U root -P calvin raw風扇設定
使用10轉16進制轉換
ipmitool -I lanplus -H 192.168.1.149 -U root -P clavin raw 0x30 0x30 0x01 0x00 關自動風扇

ipmitool -I lanplus -H 192.168.1.149 -U root -P clavin raw 0x30 0x30 0x02 0xff 0x1e 30%轉速

ipmitool -I lanplus -H 192.168.1.149 -U root -P clavin raw 0x30 0x30 0x02 0xff 0x0a 10%轉速

ipmitool -I lanplus -H 192.168.1.149 -U root -P clavin raw 0x30 0x30 0x02 0xff 0x0f 15%轉速
ipmitool -I lanplus -H 192.168.1.149 -U root -P clavin raw 0x30 0x30 0x02 0xff 0x64 100%轉速

ipmitool -I lanplus -H 192.168.1.149 -U root -P clavin raw 0x30 0x30 0x02 0xff 0x32 50%轉速

ipmitool -I lanplus -H 192.168.1.149 -U root -P clavin raw 0x30 0x30 0x01 0x01 開自動風扇
查看IPMI資訊
ipmitool lan print 1查看使用者
ipmitool -I open user list 1root@server:~# ipmitool -I open user list 1
ID Name Callin Link Auth IPMI Msg Channel Priv Limit
1 true false false NO ACCESS
2 root true true true ADMINISTRATOR修改root密碼
ipmitool -I open user set password 2Linux tcpdump偵測封包
tcpdump -i ethX icmp and icmp[icmptype]=icmp-echo
查看 tcpdump 可以監聽的接口列表:
tcpdump -D
在接口 eth0 上監聽:
tcpdump -i eth0
監聽任何可用的接口(不能在混雜模式下完成。需要 Linux 內核 2.2 或更高版本):
tcpdump -i any
捕獲數據包時要詳細:
tcpdump -v
捕獲數據包時更詳細:
tcpdump -vv
捕獲數據包時要非常詳細:
tcpdump -vvv
詳細並以十六進制和 ASCII 格式打印每個數據包的數據,不包括鏈路級標頭:
tcpdump -v -X
詳細並以十六進制和 ASCII 格式打印每個數據包的數據,還包括鏈路級標頭:
tcpdump -v -XX
捕獲數據包時不那麼冗長(比默認設置):
tcpdump -q
將捕獲限制為 100 個數據包:
tcpdump -c 100
將數據包捕獲記錄到名為 capture.cap 的文件中:
tcpdump -w capture.cap
將數據包捕獲記錄到一個名為 capture.cap 的文件中,但會在屏幕上顯示實時捕獲了多少數據包:
tcpdump -v -w capture.cap
顯示一個名為 capture.cap 的文件的數據包:
tcpdump -r capture.cap
使用名為 capture.cap 的文件的最大詳細信息顯示數據包:
tcpdump -vvv -r capture.cap
捕獲數據包時顯示 IP 地址和端口號,而不是域名和服務名稱(注意:在某些系統上,您需要指定 -nn 來顯示端口號):
tcpdump -n
捕獲目標主機為 192.168.1.1 的任何數據包。顯示 IP 地址和端口號:
tcpdump -n dst host 192.168.1.1
捕獲源主機為 192.168.1.1 的任何數據包。顯示 IP 地址和端口號:
tcpdump -n src host 192.168.1.1
捕獲源或目標主機為 192.168.1.1 的任何數據包。顯示 IP 地址和端口號:
tcpdump -n host 192.168.1.1
捕獲目標網絡為 192.168.1.0/24 的任何數據包。顯示 IP 地址和端口號:
tcpdump -n dst net 192.168.1.0/24
捕獲源網絡為 192.168.1.0/24 的任何數據包。顯示 IP 地址和端口號:
tcpdump -n src net 192.168.1.0/24
捕獲源或目標網絡為 192.168.1.0/24 的任何數據包。顯示 IP 地址和端口號:
tcpdump -n net 192.168.1.0/24
捕獲目標端口為 23 的任何數據包。顯示 IP 地址和端口號:
tcpdump -n dst port 23
捕獲目標端口介於 1 和 1023(含)之間的任何數據包。顯示 IP 地址和端口號:
tcpdump -n dst portrange 1-1023
僅捕獲目標端口介於 1 和 1023(含)之間的 TCP 數據包。顯示 IP 地址和端口號:
tcpdump -n tcp dst portrange 1-1023
僅捕獲目標端口介於 1 和 1023(含)之間的 UDP 數據包。顯示 IP 地址和端口號:
tcpdump -n udp dst portrange 1-1023
捕獲目標 IP 為 192.168.1.1 和目標端口為 23 的任何數據包。顯示 IP 地址和端口號:
tcpdump -n “dst host 192.168.1.1 and dst port 23”
捕獲目標 IP 為 192.168.1.1 和目標端口為 80 或 443 的任何數據包。顯示 IP 地址和端口號:
tcpdump -n “dst host 192.168.1.1 and (dst port 80 and dst port 443)”
捕獲任何 ICMP 數據包:
tcpdump -v icmp
捕獲任何 ARP 數據包:
tcpdump -v arp
捕獲 ICMP 或 ARP 數據包:
tcpdump -v “icmp or arp”
捕獲任何廣播或多播的數據包:
tcpdump -n “broadcast or multicast”
為每個數據包捕獲 500 字節的數據,而不是默認的 68 字節:
tcpdump -s 500
捕獲數據包內的所有數據字節:
tcpdump -s 0
Linux 啟用Trash 回收桶
安裝Trash 回收桶以避免RM 誤刪除檔案
安裝Trash-Cli
apt install trash-cli指令
刪除檔案
trash 123.txt查看回收桶
trash-list清空回收桶
trash-empty回收桶檔案路徑為~/.local/share/Trash/files/
RM指令取代Trash
建立/etc/profile.d/00-aliases.sh
alias rm='trash'Linux Looking Glass IP網頁檢測
運行環境
- Debian 12
- PHP 8
下載Looking Glass
使用hybula修改版本,建議使用PHP 8
NGINX範例
server {
	listen 80;
	listen [::]:80;

	server_name _;

	root /var/www/html/lookingglass/;
	index index.php ;
	location / {
		try_files $uri $uri/ =404;
	}

    location ~ \.php$ {
		include snippets/fastcgi-php.conf;
        fastcgi_pass unix:/var/run/php/php8.2-fpm.sock;
    }
}將config.dist.php改成config.php
ping 需要特殊權限,www-data 無法執行,須將/bin/ping開放權限
此命令會讓所有使用者有ping root權限,建議使用visudo
chmod u+s /bin/ping使用visudo 允許www-data執行ping
visudo

#最下面加入
www-data ALL=(ALL) NOPASSWD: /bin/ping
測試www-data是否可ping
user@test:~# sudo -u www-data ping 1.1.1.1
ping: socktype: SOCK_RAW
ping: socket: Operation not permitted
ping: => missing cap_net_raw+p capability or setuid?


user@test:~# sudo -u www-data sudo ping 1.1.1.1
PING 1.1.1.1 (1.1.1.1) 56(84) bytes of data.
64 bytes from 1.1.1.1: icmp_seq=1 ttl=55 time=12.7 ms
64 bytes from 1.1.1.1: icmp_seq=2 ttl=55 time=13.3 ms
64 bytes from 1.1.1.1: icmp_seq=3 ttl=55 time=13.7 ms
^C
--- 1.1.1.1 ping statistics ---
3 packets transmitted, 3 received, 0% packet loss, time 2003ms
rtt min/avg/max/mdev = 12.700/13.254/13.747/0.429 ms若有cap_net_raw+p問題,修改LookingGlass.php
return self::procExecute('ping -4 -c'.$count.' -w15', $host);
改成
return self::procExecute('sudo ping -4 -c'.$count.' -w15', $host);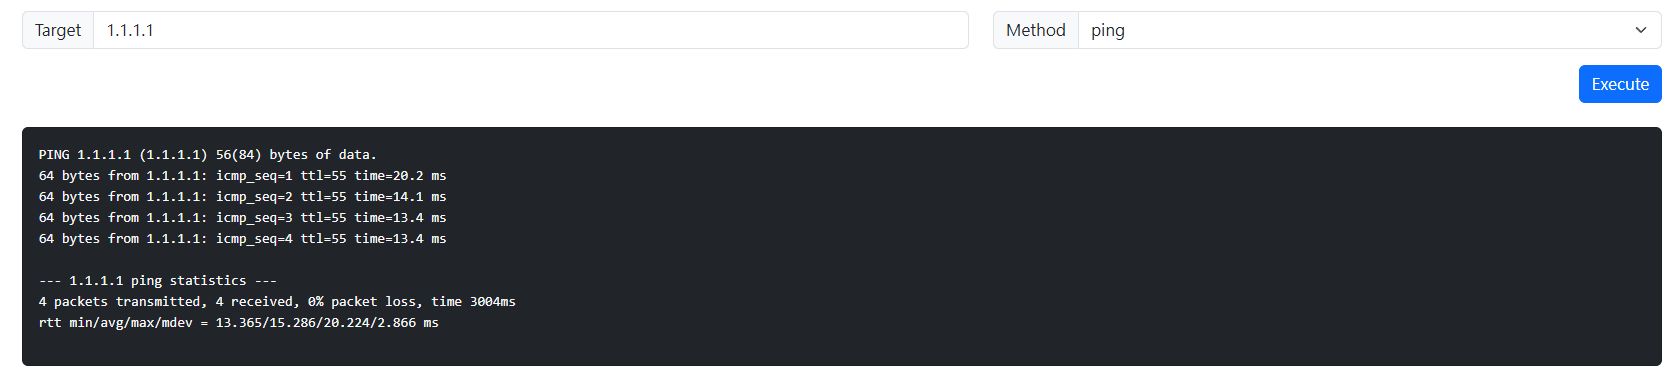
Linux SSH KEY 免密碼登入
建立Key
ssh-keygen複製到Server上
ssh-copy-id -i your_key_path username@server_host手動複製
cat ~/.ssh/id_rsa.pub | ssh user@192.168.0.100 'mkdir -p ~/.ssh && chmod 700 ~/.ssh && cat >> ~/.ssh/authorized_keys && chmod 600 ~/.ssh/authorized_keys'驗證ssh username@server_host可直接登入
若登入失敗修正權限
@@@@@@@@@@@@@@@@@@@@@@@@@@@@@@@@@@@@@@@@@@@@@@@@@@@@@@@@@@@
@         WARNING: UNPROTECTED PRIVATE KEY FILE!          @
@@@@@@@@@@@@@@@@@@@@@@@@@@@@@@@@@@@@@@@@@@@@@@@@@@@@@@@@@@@
Permissions 0777 for '/var/services/homes/user/.ssh/id_rsa' are too open.
It is required that your private key files are NOT accessible by others.
This private key will be ignored.
Load key "/var/services/homes/user/.ssh/id_rsa": bad permissions


因為 私鑰 (id_rsa) 權限太寬 (0777),SSH 出於安全性會直接拒絕使用這把 key

# 設定 .ssh 資料夾權限
chmod 700 ~/.ssh

# 設定私鑰權限 (只能自己讀寫)
chmod 600 ~/.ssh/id_rsa

# 公鑰可讀
chmod 644 ~/.ssh/id_rsa.pub
Linux X11 Forwarding 圖形轉發
Windows安裝
xming等套件後開啟
安裝X11相關套件
apt install x11-apps

apt install xauth
修改SSH設定
X11Forwarding yes
X11DisplayOffset 10
X11UseLocalhost yes
systemctl restart sshdPutty連接
選擇ssh x11 enable,輸入IP後SSH連接,確認DISPLAY有輸出
root@x11:# echo $DISPLAY
localhost:10.0
root@x11:~# xeyes
windows有小眼睛跳出則測試成功
Linux TAB鍵自動補全
若系統tab命令補全失效,安裝以下套件
apt-get install bash-completion重啟 shell
echo "source /etc/bash_completion" >> ~/.bashrc

source /etc/bash_completion
Linux SSH 啟用 OTP 驗證登入
安裝Qrencode、OATH和pam
apt install qrencode oathtool libpam-oath設定oathtool
產生一組隨機的十六進位字串,並把它存成環境變數 HEX_SECRET
export HEX_SECRET=$(head -15 /dev/urandom | sha256sum | cut -b 1-30)產生六位數OTP密碼
oathtool --totp=SHA256 --verbose --digits=6 $HEX_SECRET紀錄Base32 secret值,後續Qrencode會依照這個參數生成
root@ssh:~#  oathtool --totp=SHA256 --verbose --digits=6 $HEX_SECRET
Hex secret: 2180dcb885c46412345674e3aa4dba
Base32 secret: EGANZOEFYRddasdsa5STR2UTN2
Digits: 6
Window size: 0
TOTP mode: SHA256
Step size (seconds): 30
Start time: 1970-01-01 00:00:00 UTC (0)
Current time: 2025-10-07 14:56:47 UTC (1759849007)
Counter: 0x37F1B01 (58661633)

961769
建立oath檔案
touch /etc/users.oath
chmod 0600 /etc/users.oath
寫入oath檔案
echo HOTP/T30 $USER - $HEX_SECRET \ >> /etc/users.oath移除環境變數
unset HEX_SECRETSSH 設定
在/etc/pam.d/sshd最上面加入
auth required pam_oath.so usersfile=/etc/users.oath修改/etc/ssh/sshd_config
ChallengeResponseAuthentication yes
AuthenticationMethods keyboard-interactive:pam
KbdInteractiveAuthentication yes
service ssh restart產生Qrencode
建立otp.sh並輸入以下
secret輸入上面Base32 secret的值
#!/bin/bash
secret=EGANZOEFYRddasdsa5STR2UTN2
echo $secret
qrencode -o - $(echo otpauth://totp/test:test123?secret=${secret}&issuer=test&algorithm=SHA256&digits=6&period=30) -o qrcode.png -t png -s 5
test:test123 關聯標籤
issuer 發行人名稱
algorithm 演算法
digits OTP位數
period 時間更新執行otp.sh後會產生一個qrcode,使用任何OTP APP掃描新增
測試登入
登入後顯示要求輸入otp密碼
root@server:~# ssh 192.168.100.100
(root@192.168.100.100) One-time password (OATH) for `root':
(root@192.168.100.100) Password:
Linux 使用 nftables 和 Fail2ban 檢測封鎖
運行環境
- Debian 12
nftables 是 Linux 取代舊版 iptables 的新一代封包過濾與 NAT 框架,由於Linux各發行版已開始使用nftables,以下使用nftables 和 Fail2ban檢測登入失敗並封鎖
安裝Fail2ban
apt install fail2ban python3-systemd設定Fail2ban
建立/etc/fail2ban/fail2ban.local並配置啟用ipv6
[DEFAULT]
allowipv6 = auto建立/etc/fail2ban/jail.local
[DEFAULT]
# Debian 12 has no log files, just journalctl
backend = systemd
# Destination email for action that sends you an email
#destemail = alerts@your-domain.com
# Sender email. Warning: not all actions take this into account. Make sure to test if you rely on this
#sender    = fail2ban@your-domain.com
# Default action. Will block user and send you an email with whois content and log lines.
action    = %(action_mwl)s
# ignoreip can be a list of IP addresses, CIDR masks, or DNs hosts. Fail2ban
# # will not ban a host which matches an address in this list.
ignoreip = 127.0.0.1/8 ::1/128

# configure nftables
banaction = nftables-multiport
chain     = input

# regular banning
bantime = 7d
findtime = 1m
maxretry = 3

# "bantime.increment" allows to use database for searching of previously banned ip's to increase a
# default ban time using special formula, default it is banTime * 1, 2, 4, 8, 16, 32...
bantime.increment = true
# "bantime.rndtime" is the max number of seconds using for mixing with random time
# to prevent "clever" botnets calculate exact time IP can be unbanned again:
bantime.rndtime = 30m
# "bantime.maxtime" is the max number of seconds using the ban time can reach (don't grows further)
bantime.maxtime = 60d
# "bantime.factor" is a coefficient to calculate exponent growing of the formula or common multiplier,
# default value of factor is 1 and with default value of formula, the ban time
# grows by 1, 2, 4, 8, 16 ...
bantime.factor = 2

# purge database entries after
dbpurgeage = 30d

[sshd]
mode      = aggressive
enabled   = true
backend   = systemd
port      = 2222
maxretry = 3- backend = systemd,Debian12 使用 journalctl 紀錄log故使用systemd
- 忽略來自本機主機和 IPv6 本機的連線
- 將 nftables 配置為防火牆後端
- 設定禁止相關設置和監聽port
可設定Recidive進行額外保護,重複觸發者將永久封鎖,該規則將監控fail2ban.log,需啟用rsyslog
[recidive]
backend = auto
logpath  = /var/log/fail2ban.log
enabled = true
maxretry = 2
banaction = nftables-allports
systemctl restart fail2ban
systemctl status fail2ban查看封鎖狀態
fail2ban-client status
fail2ban-client status sshd
fail2ban-client set sshd unbanip <ip>
root@remote:~# fail2ban-client status
Status
|- Number of jail: 2
`- Jail list: recidive, sshd
root@remote:~# fail2ban-client status sshd
Status for the jail: sshd
|- Filter
| |- Currently failed: 0
| |- Total failed: 0
| `- Journal matches: _SYSTEMD_UNIT=sshd.service + _COMM=sshd
`- Actions
|- Currently banned: 0
|- Total banned: 0
`- Banned IP list:
root@remote:~# fail2ban-client status recidive
Status for the jail: recidive
|- Filter
| |- Currently failed: 0
| |- Total failed: 0
| `- File list: /var/log/fail2ban.log
`- Actions
|- Currently banned: 0
|- Total banned: 0
`- Banned IP list:
root@remote:~# Linux 使用 Chroot
運行環境
- LXC Debian 12
建立SSH chroot
建立 chroot jail
mkdir -p /home/user建立基本/dev節點
ls -l /dev/{null,zero,stdin,stdout,stderr,random,tty}若是LXC環境手動複製dev並給予權限
mkdir -p /home/user/dev/

touch /home/user/dev/{null,zero,random,tty}

chmod 666 /home/user/dev/{null,zero,random,tty}若是一般環境用mknod建立檔案
mkdir -p /home/user/dev/
cd /home/user/dev/
mknod -m 666 null c 1 3
mknod -m 666 tty c 5 0
mknod -m 666 zero c 1 5
mknod -m 666 random c 1 8
chroot jail 子目錄須為root擁有
chown root:root /home/user
chmod 0755 /home/user
ls -ld /home/user
建立SSH chroot Shell
建立bin目錄,並複製/bin/bash到目錄中,某些系統建立使用者會用/bin/sh,可以再複製/bin/sh或是修改/etc/passwd的Shell
mkdir -p /home/user/bin
cp -v /bin/bash /home/user/bin/
確認bash所需的lib檔案,並複製到lib資料夾內
ldd /bin/bash
mkdir -p /home/user/lib/x86_64-linux-gnu
mkdir -p /home/user/lib64

cp -v /lib/x86_64-linux-gnu/libtinfo.so.6 /home/user/lib/x86_64-linux-gnu/
cp -v /lib/x86_64-linux-gnu/libc.so.6 /home/user/lib/x86_64-linux-gnu/
cp -v /lib64/ld-linux-x86-64.so.2 /home/user/lib64/

建立SSH使用者
useradd user
passwd user建立etc目錄,並複製/etc/passwd和/etc/group到目錄中
mkdir /home/user/etc
cp -vf /etc/{passwd,group} /home/user/etc/
若有新增SSH chroot使用者,/etc/passwd和/etc/group都要更新到/home/user/etc中
設定SSHD
編輯/etc/ssh/sshd_config並在底下新增ChrootDirectory並開啟sftp功能
#Subsystem      sftp    /usr/lib/openssh/sftp-server
Subsystem sftp internal-sftp

Match User user
ChrootDirectory /home/user
systemctl restart sshd測試登入
root@ssh:~# ssh user@192.168.100.1
user@192.168.100.1's password:
-bash-5.2$
建立 SSH 使用者主目錄和新增指令
mkdir -p /home/user/home/user1
chown -R user:user /home/user/home/user1
chmod -R 0700 /home/user/home/user1
由於只有新增bash到chroot,無法使用其他指令,依照上述複製bash lib的方式,複製需要的指令到chroot中

複製/bin/ls,確認ls所需的lib檔案,並複製到lib資料夾內
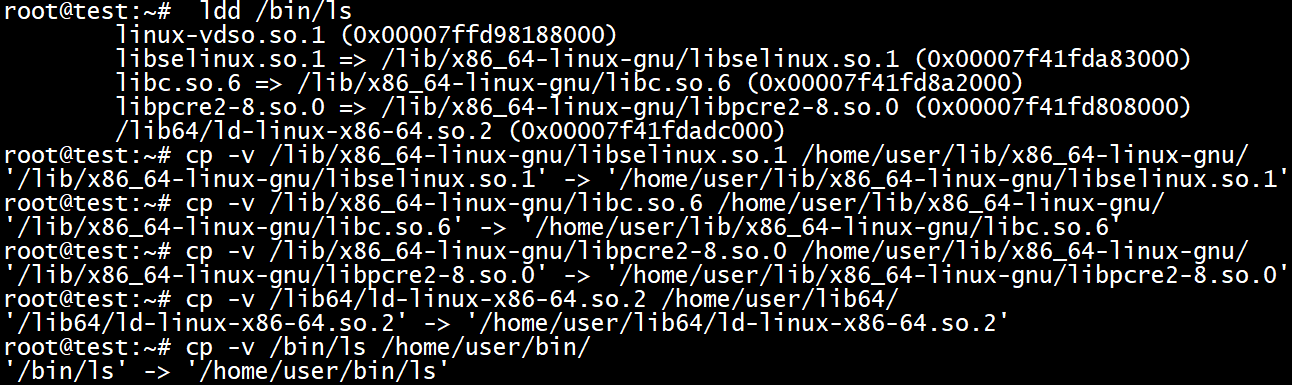
複製後可使用ls指令,其餘指令依此步驟安裝

SFTP測試

SFTP是基於SSH 的檔案傳輸協定,只要該使用者對檔案有「寫入權限」且對目錄有「寫入 + 執行權限」,就可以操作檔案
所以Shell未安裝rm,mkdir等不能使用,但sftp可以
Linux 關閉 IPV6
關閉IPV6設定,編輯/etc/sysctl.conf,新增以下設定關閉所有IPV6功能
net.ipv6.conf.all.disable_ipv6 = 1
net.ipv6.conf.default.disable_ipv6 = 1
net.ipv6.conf.lo.disable_ipv6 = 1執行sysctl -p更新設定
Linux Syslog-ng 轉發和過濾日誌
使用OpenObserve時,需要用AxoSyslog來傳送LOG,而Synology和OpenWrt內建只有基本Syslog-ng而不是加強版AxoSyslog
若要升級到AxoSyslog也非常麻煩(不支援或重新編譯),可以將Synology和OpenWrt Syslog指向已安裝AxoSyslog的設備讓它來一併轉發
編輯/etc/syslog-ng/syslog-ng.conf
options { keep-hostname(yes);chain_hostnames(off); flush_lines(0); use_dns(no); use_fqdn(no);
          dns_cache(no); owner("root"); group("adm"); perm(0640);
          stats(freq(0)); bad_hostname("^gconfd$");
};
##################################################### options內新增keep-hostname(yes); 轉發保留原設備名稱
destination d_openobserve_http {
    openobserve-log(
        url("http://192.168.100.1")
        port(5080)
        organization("default")
        stream("syslog-ng")
        user("root@example.com")
        password("b5wE158wERFTaxe0X")
    );
};


log {
    source(s_src);
    destination(d_openobserve_http);
    flags(flow-control);
};
##################################################### 上面為原本openobserve設定
source s_test {
    udp(ip(192.168.100.100) port(514));
};
log {
    source(s_test);
    destination(d_openobserve_http);
};
##################################################### 新增本機收到 udp 514 port 的log並轉發到openobserve
過濾設定
filter f_filter {
    not (
        (program("CRON") and message("/root/temp1.sh"))
    or (facility("authpriv") and message("cron:session"))
    or (program("systemd-logind") and message("suspend"));
        )
};
#########################################
以上範例過濾
CRON 進程 關於 訊息包含 "/root/temp1.sh"
facility 為"authpriv" 訊息包含 "cron:session"
systemd-logind 進程 訊息包含 "suspend"


log {
    source(s_src);
    filter(f_filter);
    destination(d_remote);
};
########################################
再轉發設定中加入filter,這樣關於過濾的訊息不會被轉送到Server
Linux 簡易 Python3 FTP
簡單的Python FTP腳本,方便測試
安裝pip
apt install python3-pip安裝pyftpdlib
pip3 install pyftpdlib執行pyftpdlib
切換到欲當作目錄的資料夾
python3 -m pyftpdlib -p 21建立有帳密的FTP
python3 -m pyftpdlib -p 21 -u test -P 123456 -w
Linux Crontab 排程設定
範例
# 查看自己的 crontab
crontab -l
# 查看指定使用者的 crontab
sudo crontab -u gtwang -l# 編輯 crontab 內容
crontab -e
# 編輯指定使用者的 crontab
crontab -u gtwang -e#
刪除 crontab 內容
crontab -r
# ┌───────────── 分鐘 (0 - 59)
# │ ┌─────────── 小時 (0 - 23)
# │ │ ┌───────── 日 (1 - 31)
# │ │ │ ┌─────── 月 (1 - 12)
# │ │ │ │ ┌───── 星期幾 (0 - 7,0 是週日,6 是週六,7 也是週日)
# │ │ │ │ │
# * * * * * /path/to/command
# 每天早上 8 點 30 分執行
30 08 * * * /home/gtwang/script.sh --your --parameter
# 每週日下午 6 點 30 分執行
30 18 * * 0 /home/gtwang/script.sh --your --parameter
# 每週日下午 6 點 30 分執行
30 18 * * Sun /home/gtwang/script.sh --your --parameter
# 每年 6 月 10 日早上 8 點 30 分執行
30 08 10 06 * /home/gtwang/script.sh --your --parameter
# 每月 1 日、15 日、29 日晚上 9 點 30 分各執行一次
30 21 1,15,29 * * /home/gtwang/script.sh --your --parameter
# 每隔 10 分鐘執行一次
*/10 * * * * /home/gtwang/script.sh --your --parameter
# 從早上 9 點到下午 6 點,凡遇到整點就執行
00 09-18 * * * /home/gtwang/script.sh --your --parameter