# Linux 相關
Linux 相關
# Linux 限制使用者只允許SFTP
#### **運行環境**
- **Debian 12**
#### **建立使用者**
```
useradd -M testuser -s /usr/sbin/nologin
```
**-M 不建立家目錄**
**testuser 使用者**
**-s /usr/sbin/nologin 指定不登入bash**
```
passwd testuser
```
#### **建立資料夾**
**假如路徑為/ftp/test,使用者限制在test資料夾**
```
mkdir /ftp
cd /ftp
mkdir test
```
**test資料夾權限改為使用者,上層所有皆為root**
```
chown testuser:testuser test
```
#### **設定SSHD**
**編輯`/etc/ssh/sshd_config`**
```
#Subsystem sftp /usr/lib/openssh/sftp-server
Subsystem sftp internal-sftp
Match User testuser
ChrootDirectory /ftp
ForceCommand internal-sftp
AllowTcpForwarding no
X11Forwarding no
```
```
service ssh restart
```
#### **測試**
**SFTP可正常登入**
```
root@ssh:~# sftp testuser@10.0.0.200
testuser@10.0.0.200's password:
Connected to 10.0.0.200.
sftp> ls
test
sftp>
```
**SSH登入被限制**
```
root@ssh:~# ssh testuser@10.0.0.200
testuser@10.0.0.200's password:
This service allows sftp connections only.
Connection to 10.0.0.200 closed.
```
# Linux Expect 自動化套件
#### **安裝Expect**
```
apt install expect
```
### **使用範例**
#### **自動telnet登入**
**建立`telnet_expect.sh`**
```
#!/usr/bin/expect
set username "test"
set password "test123"
set command "use command"
spawn telnet $ip
expect {
"*ogin:" {
send "$username\r"
expect "*assword:"
send "$password\r"
expect ">"
send "$command\r"
expect ">"
send "exit\r"
}
}
```
```
chmod +x telnet_expect.sh
```
##### **多台設備多線程自動登入**
**建立設備清單,建立`ip.txt`**
```
device_a*192.168.0.1
device_b*192.168.0.2
device_c*192.168.0.3
```
**建立多線程腳本`telnet.sh`,創建log資料夾儲存log**
```
#!/bin/bash
rm log/*
for i in `cat ip.txt`
do {
substr=$(echo $i | cut -d"*" -f 2)
kip=$substr
substr=$(echo $i | cut -d"*" -f 1)
kname=$substr
/usr/bin/expect expect.sh $kip $kname
}&
done
wait
```
**建立`expect.sh`**
```
#!/usr/bin/expect
set timeout 30
set username "test"
set password "test123"
set command "show configuration |display set|no-more"
set date [ clock format [ clock seconds ] -format "%Y%m%d" ]
set kip [lindex $argv 0]
set kname [lindex $argv 1]
spawn telnet $kip
log_file "log/$date-${kname}.log"
expect {
"*ogin:" {
send "$username\r"
expect "*assword:"
send "$password\r"
expect ">"
send "set cli timestamp\r"
expect ">"
send "$command\r"
expect ">"
send "exit\r"
log_file
}
}
```
```
chmod +x expect.sh
```
**執行`telnet.sh`**
# Linux NAT MASQUERADE 設定
[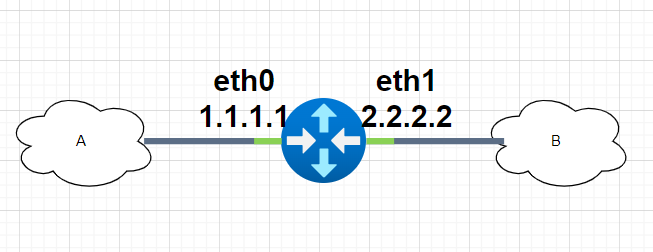](https://note.homesitetw.com/uploads/images/gallery/2025-07/75Timage.png)
**A網網段 192.168.12.0/24**
**B網網段 10.0.137.0/24**
```
B網將來源偽裝使用 eth0(1.1.1.1) 進入 A網
iptables -t nat -A POSTROUTING -o eth0 -s 10.0.137.0/24 -j MASQUERADE
```
```
A網將來源偽裝使用 eth1(2.2.2.2) 進入 B網
iptables -t nat -A POSTROUTING -o eth1 -s 192.168.12.0/24 -j MASQUERADE
```
# Linux Rsync 同步備份配置
#### **安裝Rsync**
**Client和Server安裝Rsync**
```
apt-get install rsync
```
#### **Server Rsync 設定**
**編輯`/etc/rsyncd.conf`**
```
[backup]
# target directory to copy
path = /backup
# hosts you allow to access
hosts allow = 10.0.0.5
hosts deny = *
list = true
uid = test1
gid = test1
read only = false
auth users = test1
secrets file = /etc/rsyncd.secrets
```
```
auth users 允許用戶
secrets file = 設定密碼
```
```
root@rsync:~# cat /etc/rsyncd.secrets
test1:test1pwd
使用者:密碼
新增權限chmod 600 /etc/rsyncd.secrets
```
**建立/backup資料夾和使用者test1**
```
# 建群組
groupadd test1
# 建使用者並指定群組
useradd -g test1 -s /usr/sbin/nologin -M test1
# 建立目錄並賦權
mkdir -p /backup
chown test1:test1 /backup
chmod 750 /backup
```
#### **Client 指令**
```
列出模組
root@synology:~# rsync -rtn rsync://test1@10.0.0.110
backup
```
```
列出模組內檔案
root@synology:~# rsync -rtn rsync://test1@10.0.0.110/backup
Password:
```
**Client新增密碼檔自動輸入密碼**
```
新增/rsyncd.secrets ,輸入要讀取密碼
root@synology:~# cat /rsyncd.secrets
test1pwd
新增權限chmod 600 /rsyncd.secrets
```
**備份指令**
```
rsync -avz --chmod=Du+rwx --delete /volume1/homedata/jason --password-file=/rsyncd.secrets test1@10.0.0.110::backup
```
- **`-a`:archive 模式,保留權限、時間、符號連結等**
- **`-v`:顯示過程**
- **`-z`:壓縮傳輸(適合跨網路,但區域網路有時反而變慢)**
- **`--chmod=Du+rwx`:強制目錄允許 u+rwx**
- **`--delete`:刪除目標端多餘檔案**
**第一次使用為完整備份,之後依照參數為鏡像或增量備份(–delete刪除不存在,即為兩端鏡像)**
```
-v,-verbose增強可讀性
-q,-quiet忽略非錯誤信息
-no-motd忽略守護進程模式的MOTD信息(參見manpage告知)
-c,-checksum基於checksum校驗,而非mod-time和size
-a,-archive歸檔模式,和-rlptgoD(不要使用-H,-A,-X)參數相同
-no-OPTION關閉一些顯式的OPTION(比如-no-D)
-r,-recursive遞歸目錄
-R,-relative使用相對路徑
-no-implied-dirs不發送制定目錄的屬性,避免在目標使用-relative刪除連接重新傳輸文件
-b,-backup備份(查看-suffix&-backup-dir)
-backup-dir = DIR基於DIR來創建備份的目錄結構
-suffix = SUFFIX制定備份的後最(默認~w / o -backup-dir)
-u,-update跳過接受端較新的文件
-inplace直接在文件上更新(SEE MAN PAGE)
-append直接追加文件
-append-verify和-append很像,只是用文件的較舊的那部份做校驗和
-d,-dirs僅傳輸文件而非遞歸
-l,-links將軟鏈接當作軟鏈接來拷貝
-L,-copy-links拷貝鏈接對應的文件或者目錄而非鏈接本身
-copy-unsafe-links僅不安全的鏈接才被拷貝
-safe-links忽略那些鏈接到目錄樹外的鏈接
-k,-copy-dirlinks將鏈接翻譯成其鏈接的目錄
-K,-keep-dirlinks將目錄鏈接在接收端轉換成目錄
-H,-hard-links保留硬鏈接
-p,-perms保留權限
-E,-executability保留文件的可執行性
-chmod = CHMOD改變文件或者目錄的權限
-A,-acls保留ACL(暗示-perms)
-X,-xattrs保留擴展屬性
-o,-owner保留所有者(僅限超級用戶)
-g,-group保留組
-devices保留設備文件(僅限超級用戶)
-specials保留特殊文件
-D和-devices -specials一樣
-t,-times保留修改時間
-O,-omit-dir-times在-times選項裡忽略目錄的時間
-super允許接受方執行那個一些超級用戶的活動
-fake-super通過xattrs來存儲和回復權限
-S,-sparse高效處理稀疏文件
-n,-dry-run只運行,不做改變
-W,-whole-file拷貝貝整個文件(沒有delta-xfer算法)
-x,-one-file-system不跨越文件系統
-B,-block-size = SIZE強制指定checksum的塊大小
-e,-rsh = COMMAND指定要使用的遠程shell
-rsync-path = PROGRAM指定遠程要運行的rsync路徑
存在如果接收端不存在文件就不創建
-ignore-existing如果接收端存在就不更新文件
-remove-source-files發送端刪除已經同步的文件(非dirs)
-del -delete-during的別名
-delete刪除接收端上在發送端不存在的文件
-delete-before接收端在發送前刪除,而不是發送過程中
-delete-during接收端在發送過程中刪除
-delete-delay在發送過程中尋找文件,在發送完成後刪除
-delete-after接收端在發送完成後刪除
-delete-excluded在接收端刪除排除的文件
-ignore-errors即使有I / O錯誤也刪除
-force即使目錄不是空的也刪除
-max-delete = NUM最多刪除文件的數目
-max-size = SIZE最大傳輸文件的大小
-min-size = SIZE最小傳輸文件的大小
-partial保持部分傳輸的文件
-partial-dir = DIR制定部分傳輸文件的存放目錄
-delay-updates先傳輸,最後再更新,保持原子性
-m,-prune-empty-dirs接收端刪除空目錄
-numeric-ids接收端不要將uid / gid映射為用戶名和組名
-timeout = SECONDS設置I / O超時時間,s為單位
-contimeout = SECONDS設置鏈接服務端的時間
-I,-ignore-times即使mtime和size都相同也不跳過
-size-only只要大小相同就跳過
-modify-window = NUM比對時間時制定精確範圍,範圍內都認為時間相同
-T,-temp-dir = DIR指定創建臨時文件的目錄
-y,-fuzzy文件在接收端不存在的情況下,在當前目錄下尋找一個基礎文件,以加快傳輸
-compare-dest = DIR接收端除了和發送端對比還和這裡指定的目錄對比,適合備份上次備份改變的文件
-copy-dest = DIR和-compare-dest類似,只是接收端會用本地拷貝來複製那些未改變的文件
-link-dest = DIR和-compare-dest類似,只是接收端會建立那些未改變文件的硬鏈接
-z,-compress傳輸過程中壓縮
-compress-level = NUM指定壓縮等級
-skip-compress = LIST不壓縮指定後綴的文件
-C,-cvs-exclude以CSV的方式自動忽略文件
-f,-filter = RULE新增一個文件過濾規則
-F與-filter =’dir-merge /.rsync-filter’重複相同:-filter =’ — .rsync-filter’
-exclude = PATTERN排除規則PATTERN
-exclude-from = FILE從文件中讀取排除規則
-include = PATTERN不要排除指定規則的文件
-include-from = FILE從文件中讀取包含的規則
-files-from = FILE從文件中讀取文件列表
-0,-from0 all
-from / filter文件由0分隔
-s,-protect-args參數不許要空格分割; 只有通配符特殊字符
-address = ADDRESS綁定監聽的地址
-port = PORT制定端口號
-sockopts = OPTIONS制定TCP選項
-blocking-io在遠程shell中使用阻塞I / O.
-stats給出文件統計信息
-8,-8-bit-output輸出時不對高位字符轉義
-h,-human-readable以易於閱讀的方式打印數字
-progress顯示傳輸進度
-P與-partial-progress相同
-i,-itemize-changes打印更新的總結信息
-out-format = FORMAT以特定的格式打印更新信息
-log-file = FILE日誌文件
-log-file-format = FMT日誌文件格式
-password-file = FILE密碼文件
-list-only僅列出文件
-bwlimit = KBPS限制帶寬; 每秒KBytes
-write-batch = FILE將批量更新寫入文件
-only-write-batch = FILE和-write-batch類似但沒有更新目的地
-read-batch = FILE從文件中讀取批量更新任務
-protocol = NUM使用舊版本的協議
-iconv = CONVERT_SPEC要求文件名字符轉義
-4,-ipv4更喜歡IPv4
-6,-ipv6更喜歡IPv6
-version打印幫助信息
(-h)-help打印這個幫組信息(-h僅在單獨使用時與-help同意)
```
# Linux 新增永久路由
**指令新增路由後,重啟會消失**
```
ip route add 192.168.0.0/24 via 192.168.1.1 dev eth0
```
**編輯`/etc/network/interfaces`,在這個網路介面 啟動(up)時,會執行一條靜態路由的指令**
```
up ip route add 10.8.0.6/32 via 10.0.0.5
```
# Linux 新增rc.local 開機啟動腳本
#### **確認系統是否使用rc.local**
```
systemctl status rc-local.service
```
#### **建立rc.local服務**
**編輯`/etc/systemd/system/rc-local.service`**
```
[Unit]
Description=/etc/rc.local Compatibility
ConditionPathExists=/etc/rc.local
[Service]
Type=forking
ExecStart=/etc/rc.local start
TimeoutSec=0
StandardOutput=tty
RemainAfterExit=yes
SysVStartPriority=99
[Install]
WantedBy=multi-user.target
```
**創建文件rc.local,`/etc/rc.local`**
```
#!/bin/sh -e
指令放入這
exit 0
```
```
chmod +x /etc/rc.local
```
#### **啟用服務**
```
systemctl enable rc-local
systemctl start rc-local
systemctl status rc-local
```
# Linux OpenVPN Server 架設
#### **下載安裝腳本**
```
wget https://git.io/vpn -O openvpn-install.sh
```
[openvpn-install.sh](https://note.homesitetw.com/attachments/7)
```
bash ./openvpn-install.sh
```
**依照選項建立vpn server**
**建立好後client端檔案的位置 (/root/pve.ovpn)**
```
Finished!
The client configuration is available in: /root/pve.ovpn
New clients can be added by running this script again.
```
#### **Tap橋接模式設定**
```
apt-get install -y bridge-utils
```
**將本身網卡註解,並加入bridge(br0),編輯`/etc/network/interfaces`**
```
auto lo
iface lo inet loopback
#auto eth0
#iface eth0 inet dhcp
auto br0
iface br0 inet static
address 192.168.x.x
netmask 255.255.255.0
gateway 192.168.x.x
network 192.168.x.0
broadcast 192.168.x.255
bridge_ports eth0
#auto eth0
#iface eth0 inet static
# address 192.168.x.x/24
# gateway 192.168.x.x
```
```
service networking restart
```
#### **伺服器設定檔修改**
**編輯`/etc/openvpn/server/server.conf`**
```
local 192.168.x.x
port 1195
proto tcp
dev tap0
ca ca.crt
cert server.crt
key server.key
dh dh.pem
auth SHA512
tls-crypt tc.key
server-bridge
push "route 192.168.x.0 255.255.255.0"
route-gateway 192.168.x.x
keepalive 10 120
user nobody
group nogroup
cipher AES-256-CBC
persist-key
persist-tun
verb 3
explicit-exit-notify 1
script-security 2
up "openvpn_up br0"
down "openvpn_down br0"
cipher AES-256-CBC
comp-lzo
status /var/log/openvpn/status.log
duplicate-cn <<<允許多個連線,共享證書和金鑰
```
```
service openvpn-server@server restart
```
**編輯`/etc/openvpn/server/openvpn_up`**
```
#!/bin/sh
BR=$1
DEV=$2
MTU=$3
/sbin/ifconfig $DEV mtu $MTU promisc up
/sbin/brctl addif $BR $DEV
/sbin/ifconfig tap0 up
```
**編輯`/etc/openvpn/server/openvpn_down`**
```
#!/bin/sh
BR=$1
DEV=$2
/sbin/brctl delif $BR $DEV
/sbin/ifconfig $DEV down
```
#### **客戶端設定檔修改**
```
加入comp-lzo壓縮參數
```
#### **Tun橋接模式設定**
```
local 10.0.0.5
push "route 10.0.0.0 255.255.255.0" (推送路由)
push "route 10.8.0.0 255.255.255.0" (推送路由)
port 1194
proto udp
dev tun
ca ca.crt
cert server.crt
key server.key
dh dh.pem
auth SHA512
tls-crypt tc.key
server 10.8.0.0 255.255.255.0 (配發網段)
keepalive 10 120
user nobody
group nogroup
persist-key
persist-tun
verb 3
crl-verify crl.pem
explicit-exit-notify
comp-lzo (壓縮參數)
log-append /var/log/openvpn/op_server.log (寫入log)
status /var/log/openvpn/status.log (寫入狀態)
duplicate-cn <<<允許多個連線,共享證書和金鑰
```
```
service openvpn-server@server restart
```
**告警訊息修正參數**
```
DEPRECATED OPTION: --cipher set to 'AES-256-CBC' but missing in --data-ciphers (AES-256-GCM:AES-128-GCM). Future OpenVPN version will ignore --cipher for cipher negotiations. Add 'AES-256-CBC' to --data-ciphers or change --cipher 'AES-256-CBC' to --data-ciphers-fallback 'AES-256-CBC' to silence this warning.
WARNING: 'link-mtu' is used inconsistently, local='link-mtu 1602', remote='link-mtu 1586'
WARNING: 'keysize' is used inconsistently, local='keysize 256', remote='keysize 128'
WARNING: this configuration may cache passwords in memory -- use the auth-nocache option to prevent this
```
**Server設定檔新增**
```
cipher AES-256-CBC
```
**Client設定檔修改**
```
cipher AES-256-CBC
修改
data-ciphers-fallback AES-256-CBC
auth-nocache
```
# Linux TACACS+ Server 安裝
#### **安裝TACACS+**
**Ubuntu 18**
```
apt-get install tacacs+
```
**ubuntu 20以後已棄用tacacs+軟件包,下載檔案自行編譯**
```
apt-get update
cd ~
wget http://www.pro-bono-publico.de/projects/src/DEVEL.tar.bz2
bzip2 -dc DEVEL.tar.bz2 | tar xvfp -
cd PROJECTS
make
make install
mkdir /var/log/tac_plus
mkdir /var/log/tac_plus/access
mkdir /var/log/tac_plus/accounting
mkdir /var/log/tac_plus/authentication
cp tac_plus/extra/etc_init.d_tac_plus /etc/init.d/tac_plus
chmod +x /etc/init.d/tac_plus
```
[DEVEL.tar.bz2](https://note.homesitetw.com/attachments/8)
#### **設定tac\_plus**
**sample設定檔 /usr/local/etc/mavis/sample/tac\_plus.cfg**
**新建設定檔於/usr/local/etc/tac\_plus.cfg**
```
#!/usr/local/sbin/tac_plus
id = spawnd {
listen = { port = 49 }
}
id = tac_plus {
# Log files
authentication log = /var/log/tac_plus/authentication.log
accounting log = /var/log/tac_plus/accounting.log
authorization log = /var/log/tac_plus/authorization.log
retire limit = 3000
# Define external authentication module
mavis module = external {
exec = /usr/local/lib/mavis/mavis_tacplus_passwd.pl
}
# Authentication backend
login backend = mavis
# Default host for all connections
host = 0.0.0.0/0 {
key = "test"
}
group = admin {
default service = permit
service = shell {
default command = permit
default attribute = permit
set priv-lvl = 15
}
}
user = jason {
password = crypt <加密密碼>
member = admin
service = junos-exec {
set local-user-name = SUPER
}
}
}
```
**加密密碼**
```
openssl passwd -crypt <密碼>
```
```
systemctl enable tac_plus
systemctl restart tac_plus
systemctl status tac_plus
```
# Linux Cpufrequtils CPU頻率控制
使用cpufrequtils可降頻來降低溫度和省電
#### **確認CPU驅動**
```
cat /sys/devices/system/cpu/cpu*/cpufreq/scaling_driver
```
**如果顯示為 `intel_pstate`,您可能需要禁用它並切換到 `intel-cpufreq` 驅動程序**
**編輯`/etc/default/grub`,在GRUB\_CMDLINE\_LINUX\_DEFAULT加入intel\_pstate=disable**
```
GRUB_CMDLINE_LINUX_DEFAULT="quiet splash intel_pstate=disable"
update-grub
reboot
```
**再次確認狀態為`intel-cpufre`**
```
cat /sys/devices/system/cpu/cpu*/cpufreq/scaling_driver
```
#### **安裝Cpufrequtils**
```
apt-get install cpufrequtils
```
**查看支持cpu管理模式**
```
cat /sys/devices/system/cpu/cpu0/cpufreq/scaling_available_governors
conservative ondemand userspace powersave performance schedutil
```
**查看CPU訊息**
```
cpufreq-info
```
```
root@pve:~# cpufreq-info
cpufrequtils 008: cpufreq-info (C) Dominik Brodowski 2004-2009
Report errors and bugs to cpufreq@vger.kernel.org, please.
analyzing CPU 0:
driver: intel_cpufreq
CPUs which run at the same hardware frequency: 0
CPUs which need to have their frequency coordinated by software: 0
maximum transition latency: 20.0 us.
hardware limits: 1.20 GHz - 3.50 GHz
available cpufreq governors: conservative, ondemand, userspace, powersave, performance, schedutil
current policy: frequency should be within 1.20 GHz and 3.50 GHz.
The governor "ondemand" may decide which speed to use
within this range.
current CPU frequency is 3.05 GHz.
```
**修改模式**
**編輯`/etc/init.d/cpufrequtils`**
```
ENABLE="true"
GOVERNOR="powersave" <<<修改模式 ondemand改powersave
MAX_SPEED="0"
MIN_SPEED="0"
```
```
systemctl daemon-reload
/etc/init.d/cpufrequtils restart
```
```
root@pve:~# cpufreq-info
cpufrequtils 008: cpufreq-info (C) Dominik Brodowski 2004-2009
Report errors and bugs to cpufreq@vger.kernel.org, please.
analyzing CPU 0:
driver: intel_cpufreq
CPUs which run at the same hardware frequency: 0
CPUs which need to have their frequency coordinated by software: 0
maximum transition latency: 20.0 us.
hardware limits: 1.20 GHz - 3.50 GHz
available cpufreq governors: conservative, ondemand, userspace, powersave, performance, schedutil
current policy: frequency should be within 1.20 GHz and 3.50 GHz.
The governor "powersave" may decide which speed to use
within this range.
current CPU frequency is 1.20 GHz.
```
# Linux MegaRaid CLI 陣列卡工具
**安裝LSI MegaRAID陣列卡,可讀取RAID內硬碟與整體RAID的狀態**
##### **加入 megacli apt repo**
**編輯`/etc/apt/sources.list`**
```
deb http://hwraid.le-vert.net/debian bullseye main
```
##### **設定megacli apt key**
```
wget https://hwraid.le-vert.net/debian/hwraid.le-vert.net.gpg.key
apt-key add hwraid.le-vert.net.gpg.key
```
##### **安裝 megaraid tools**
```
apt update
apt install megacli
apt install megaclisas-status
```
**使用查詢語法**
**顯示 RAID 完整資訊**
**megacli -AdpAllInfo -aAll**
**顯示結果**
**顯示 RAID 狀態**
**megaclisas-status**
**顯示結果**
**查詢 RAID 內單一硬碟的 smart 資訊 Exp. RAID 在 /dev/sdb 要看裡面的第一顆資訊**
**smartctl -a -d megaraid,0 /dev/sdb**
# Linux R620 通過IPMI控制風扇轉速
##### **測試IPMI連接**
**R620預設帳號密碼root/calvin**
```
ipmitool -I lanplus -H 192.168.1.149 -U root -P calvin raw
```
##### **風扇設定**
**使用10轉16進制轉換**
```
ipmitool -I lanplus -H 192.168.1.149 -U root -P clavin raw 0x30 0x30 0x01 0x00 關自動風扇
ipmitool -I lanplus -H 192.168.1.149 -U root -P clavin raw 0x30 0x30 0x02 0xff 0x1e 30%轉速
ipmitool -I lanplus -H 192.168.1.149 -U root -P clavin raw 0x30 0x30 0x02 0xff 0x0a 10%轉速
ipmitool -I lanplus -H 192.168.1.149 -U root -P clavin raw 0x30 0x30 0x02 0xff 0x0f 15%轉速
ipmitool -I lanplus -H 192.168.1.149 -U root -P clavin raw 0x30 0x30 0x02 0xff 0x64 100%轉速
ipmitool -I lanplus -H 192.168.1.149 -U root -P clavin raw 0x30 0x30 0x02 0xff 0x32 50%轉速
ipmitool -I lanplus -H 192.168.1.149 -U root -P clavin raw 0x30 0x30 0x01 0x01 開自動風扇
```
##### **查看IPMI資訊**
```
ipmitool lan print 1
```
**查看使用者**
```
ipmitool -I open user list 1
```
```
root@server:~# ipmitool -I open user list 1
ID Name Callin Link Auth IPMI Msg Channel Priv Limit
1 true false false NO ACCESS
2 root true true true ADMINISTRATOR
```
**修改root密碼**
```
ipmitool -I open user set password 2
```
# Linux tcpdump偵測封包
tcpdump -i ethX icmp and icmp\[icmptype\]=icmp-echo
查看 tcpdump 可以監聽的接口列表:
tcpdump -D
在接口 eth0 上監聽:
tcpdump -i eth0
監聽任何可用的接口(不能在混雜模式下完成。需要 Linux 內核 2.2 或更高版本):
tcpdump -i any
捕獲數據包時要詳細:
tcpdump -v
捕獲數據包時更詳細:
tcpdump -vv
捕獲數據包時要非常詳細:
tcpdump -vvv
詳細並以十六進制和 ASCII 格式打印每個數據包的數據,不包括鏈路級標頭:
tcpdump -v -X
詳細並以十六進制和 ASCII 格式打印每個數據包的數據,還包括鏈路級標頭:
tcpdump -v -XX
捕獲數據包時不那麼冗長(比默認設置):
tcpdump -q
將捕獲限制為 100 個數據包:
tcpdump -c 100
將數據包捕獲記錄到名為 capture.cap 的文件中:
tcpdump -w capture.cap
將數據包捕獲記錄到一個名為 capture.cap 的文件中,但會在屏幕上顯示實時捕獲了多少數據包:
tcpdump -v -w capture.cap
顯示一個名為 capture.cap 的文件的數據包:
tcpdump -r capture.cap
使用名為 capture.cap 的文件的最大詳細信息顯示數據包:
tcpdump -vvv -r capture.cap
捕獲數據包時顯示 IP 地址和端口號,而不是域名和服務名稱(注意:在某些系統上,您需要指定 -nn 來顯示端口號):
tcpdump -n
捕獲目標主機為 192.168.1.1 的任何數據包。顯示 IP 地址和端口號:
tcpdump -n dst host 192.168.1.1
捕獲源主機為 192.168.1.1 的任何數據包。顯示 IP 地址和端口號:
tcpdump -n src host 192.168.1.1
捕獲源或目標主機為 192.168.1.1 的任何數據包。顯示 IP 地址和端口號:
tcpdump -n host 192.168.1.1
捕獲目標網絡為 192.168.1.0/24 的任何數據包。顯示 IP 地址和端口號:
tcpdump -n dst net 192.168.1.0/24
捕獲源網絡為 192.168.1.0/24 的任何數據包。顯示 IP 地址和端口號:
tcpdump -n src net 192.168.1.0/24
捕獲源或目標網絡為 192.168.1.0/24 的任何數據包。顯示 IP 地址和端口號:
tcpdump -n net 192.168.1.0/24
捕獲目標端口為 23 的任何數據包。顯示 IP 地址和端口號:
tcpdump -n dst port 23
捕獲目標端口介於 1 和 1023(含)之間的任何數據包。顯示 IP 地址和端口號:
tcpdump -n dst portrange 1-1023
僅捕獲目標端口介於 1 和 1023(含)之間的 TCP 數據包。顯示 IP 地址和端口號:
tcpdump -n tcp dst portrange 1-1023
僅捕獲目標端口介於 1 和 1023(含)之間的 UDP 數據包。顯示 IP 地址和端口號:
tcpdump -n udp dst portrange 1-1023
捕獲目標 IP 為 192.168.1.1 和目標端口為 23 的任何數據包。顯示 IP 地址和端口號:
tcpdump -n “dst host 192.168.1.1 and dst port 23”
捕獲目標 IP 為 192.168.1.1 和目標端口為 80 或 443 的任何數據包。顯示 IP 地址和端口號:
tcpdump -n “dst host 192.168.1.1 and (dst port 80 and dst port 443)”
捕獲任何 ICMP 數據包:
tcpdump -v icmp
捕獲任何 ARP 數據包:
tcpdump -v arp
捕獲 ICMP 或 ARP 數據包:
tcpdump -v “icmp or arp”
捕獲任何廣播或多播的數據包:
tcpdump -n “broadcast or multicast”
為每個數據包捕獲 500 字節的數據,而不是默認的 68 字節:
tcpdump -s 500
捕獲數據包內的所有數據字節:
tcpdump -s 0
# Linux 啟用Trash 回收桶
**安裝Trash 回收桶以避免RM 誤刪除檔案**
##### **安裝Trash-Cli**
```
apt install trash-cli
```
##### **指令**
**刪除檔案**
```
trash 123.txt
```
**查看回收桶**
```
trash-list
```
**清空回收桶**
```
trash-empty
```
**回收桶檔案路徑為`~/.local/share/Trash/files/`**
##### **RM指令取代Trash**
**建立`/etc/profile.d/00-aliases.sh `**
```
alias rm='trash'
```
# Linux Looking Glass IP網頁檢測
##### **運行環境**
- **Debian 12**
- **PHP 8**
##### **下載Looking Glass**
**使用[hybula](https://github.com/hybula/lookingglass)修改版本,建議使用PHP 8**
**NGINX範例**
```
server {
listen 80;
listen [::]:80;
server_name _;
root /var/www/html/lookingglass/;
index index.php ;
location / {
try_files $uri $uri/ =404;
}
location ~ \.php$ {
include snippets/fastcgi-php.conf;
fastcgi_pass unix:/var/run/php/php8.2-fpm.sock;
}
}
```
將`config.dist.php`改成`config.php`
**`ping` 需要特殊權限,www-data 無法執行,須將/bin/ping開放權限**
**此命令會讓所有使用者有ping root權限,建議使用visudo**
```
chmod u+s /bin/ping
```
**使用visudo 允許www-data執行ping**
```
visudo
#最下面加入
www-data ALL=(ALL) NOPASSWD: /bin/ping
```
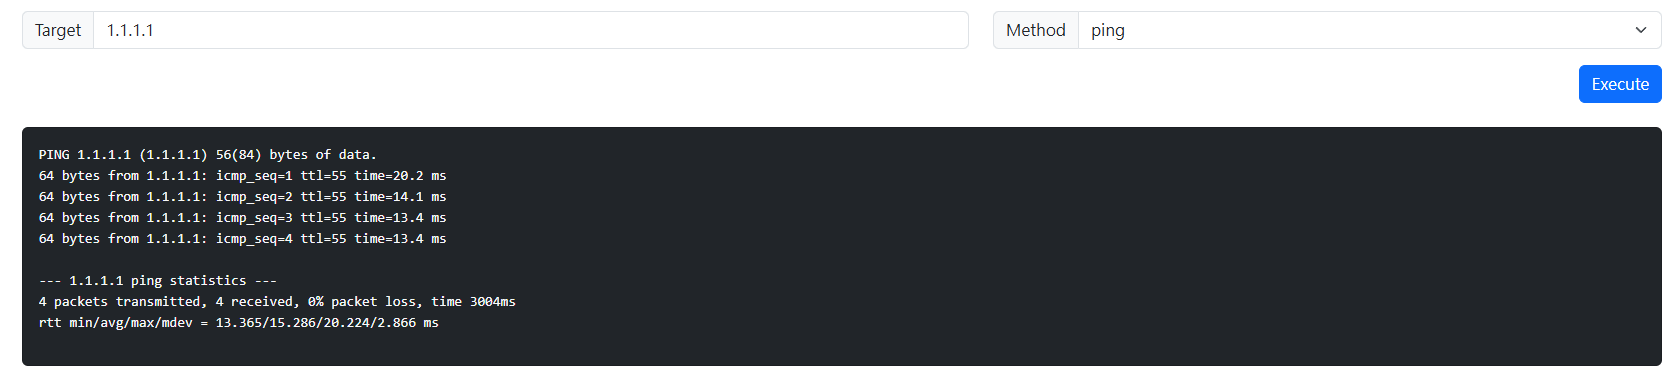
**測試www-data是否可ping**
```
user@test:~# sudo -u www-data ping 1.1.1.1
ping: socktype: SOCK_RAW
ping: socket: Operation not permitted
ping: => missing cap_net_raw+p capability or setuid?
user@test:~# sudo -u www-data sudo ping 1.1.1.1
PING 1.1.1.1 (1.1.1.1) 56(84) bytes of data.
64 bytes from 1.1.1.1: icmp_seq=1 ttl=55 time=12.7 ms
64 bytes from 1.1.1.1: icmp_seq=2 ttl=55 time=13.3 ms
64 bytes from 1.1.1.1: icmp_seq=3 ttl=55 time=13.7 ms
^C
--- 1.1.1.1 ping statistics ---
3 packets transmitted, 3 received, 0% packet loss, time 2003ms
rtt min/avg/max/mdev = 12.700/13.254/13.747/0.429 ms
```
**若有`cap_net_raw+p`問題,修改`LookingGlass.php`**
```
return self::procExecute('ping -4 -c'.$count.' -w15', $host);
改成
return self::procExecute('sudo ping -4 -c'.$count.' -w15', $host);
```
[](https://note.homesitetw.com/uploads/images/gallery/2025-08/9m8image.png)
# Linux SSH KEY 免密碼登入
**建立Key**
```
ssh-keygen
```
**複製到Server上**
```
ssh-copy-id -i your_key_path username@server_host
```
**手動複製**
```
cat ~/.ssh/id_rsa.pub | ssh user@192.168.0.100 'mkdir -p ~/.ssh && chmod 700 ~/.ssh && cat >> ~/.ssh/authorized_keys && chmod 600 ~/.ssh/authorized_keys'
```
**驗證`ssh username@server_host`可直接登入**
**若登入失敗修正權限**
```
@@@@@@@@@@@@@@@@@@@@@@@@@@@@@@@@@@@@@@@@@@@@@@@@@@@@@@@@@@@
@ WARNING: UNPROTECTED PRIVATE KEY FILE! @
@@@@@@@@@@@@@@@@@@@@@@@@@@@@@@@@@@@@@@@@@@@@@@@@@@@@@@@@@@@
Permissions 0777 for '/var/services/homes/user/.ssh/id_rsa' are too open.
It is required that your private key files are NOT accessible by others.
This private key will be ignored.
Load key "/var/services/homes/user/.ssh/id_rsa": bad permissions
因為 私鑰 (id_rsa) 權限太寬 (0777),SSH 出於安全性會直接拒絕使用這把 key
# 設定 .ssh 資料夾權限
chmod 700 ~/.ssh
# 設定私鑰權限 (只能自己讀寫)
chmod 600 ~/.ssh/id_rsa
# 公鑰可讀
chmod 644 ~/.ssh/id_rsa.pub
```
# Linux X11 Forwarding 圖形轉發
##### **Windows安裝**
**xming等套件後開啟**
##### **安裝X11相關套件**
```
apt install x11-apps
apt install xauth
```
**修改SSH設定**
```
X11Forwarding yes
X11DisplayOffset 10
X11UseLocalhost yes
```
```
systemctl restart sshd
```
##### **Putty連接**
**選擇ssh x11 enable,輸入IP後SSH連接,確認DISPLAY有輸出**
```
root@x11:# echo $DISPLAY
localhost:10.0
```
```
root@x11:~# xeyes
windows有小眼睛跳出則測試成功
```
# Linux TAB鍵自動補全
**若系統tab命令補全失效,安裝以下套件**
```
apt-get install bash-completion
```
**重啟 shell**
```
echo "source /etc/bash_completion" >> ~/.bashrc
source /etc/bash_completion
```
# Linux SSH 啟用 OTP 驗證登入
##### **安裝Qrencode、OATH和pam**
```
apt install qrencode oathtool libpam-oath
```
##### **設定oathtool**
**產生一組隨機的十六進位字串,並把它存成環境變數 `HEX_SECRET`**
```
export HEX_SECRET=$(head -15 /dev/urandom | sha256sum | cut -b 1-30)
```
**產生六位數OTP密碼**
```
oathtool --totp=SHA256 --verbose --digits=6 $HEX_SECRET
```
**紀錄Base32 secret值,後續Qrencode會依照這個參數生成**
```
root@ssh:~# oathtool --totp=SHA256 --verbose --digits=6 $HEX_SECRET
Hex secret: 2180dcb885c46412345674e3aa4dba
Base32 secret: EGANZOEFYRddasdsa5STR2UTN2
Digits: 6
Window size: 0
TOTP mode: SHA256
Step size (seconds): 30
Start time: 1970-01-01 00:00:00 UTC (0)
Current time: 2025-10-07 14:56:47 UTC (1759849007)
Counter: 0x37F1B01 (58661633)
961769
```
**建立oath檔案**
```
touch /etc/users.oath
chmod 0600 /etc/users.oath
```
**寫入oath檔案**
```
echo HOTP/T30 $USER - $HEX_SECRET \ >> /etc/users.oath
```
**移除環境變數**
```
unset HEX_SECRET
```
##### **SSH 設定**
**在`/etc/pam.d/sshd`最上面加入**
```
auth required pam_oath.so usersfile=/etc/users.oath
```
**修改`/etc/ssh/sshd_config`**
```
ChallengeResponseAuthentication yes
AuthenticationMethods keyboard-interactive:pam
KbdInteractiveAuthentication yes
```
```
service ssh restart
```
##### **產生Qrencode**
**建立otp.sh並輸入以下**
**secret輸入上面Base32 secret的值**
```
#!/bin/bash
secret=EGANZOEFYRddasdsa5STR2UTN2
echo $secret
qrencode -o - $(echo otpauth://totp/test:test123?secret=${secret}&issuer=test&algorithm=SHA256&digits=6&period=30) -o qrcode.png -t png -s 5
```
```
test:test123 關聯標籤
issuer 發行人名稱
algorithm 演算法
digits OTP位數
period 時間更新
```
**執行otp.sh後會產生一個qrcode,使用任何OTP APP掃描新增**
##### **測試登入**
**登入後顯示要求輸入otp密碼**
```
root@server:~# ssh 192.168.100.100
(root@192.168.100.100) One-time password (OATH) for `root':
(root@192.168.100.100) Password:
```
# Linux 使用 nftables 和 Fail2ban 檢測封鎖
##### **運行環境**
- **Debian 12**
**`nftables` 是 Linux 取代舊版 `iptables` 的新一代封包過濾與 NAT 框架,由於Linux各發行版已開始使用`nftables`,以下使用`nftables` 和 `Fail2ban`檢測登入失敗並封鎖**
##### **安裝Fail2ban**
```
apt install fail2ban python3-systemd
```
##### **設定Fail2ban**
**建立`/etc/fail2ban/fail2ban.local`並配置啟用ipv6**
```
[DEFAULT]
allowipv6 = auto
```
**建立`/etc/fail2ban/jail.local`**
```
[DEFAULT]
# Debian 12 has no log files, just journalctl
backend = systemd
# Destination email for action that sends you an email
#destemail = alerts@your-domain.com
# Sender email. Warning: not all actions take this into account. Make sure to test if you rely on this
#sender = fail2ban@your-domain.com
# Default action. Will block user and send you an email with whois content and log lines.
action = %(action_mwl)s
# ignoreip can be a list of IP addresses, CIDR masks, or DNs hosts. Fail2ban
# # will not ban a host which matches an address in this list.
ignoreip = 127.0.0.1/8 ::1/128
# configure nftables
banaction = nftables-multiport
chain = input
# regular banning
bantime = 7d
findtime = 1m
maxretry = 3
# "bantime.increment" allows to use database for searching of previously banned ip's to increase a
# default ban time using special formula, default it is banTime * 1, 2, 4, 8, 16, 32...
bantime.increment = true
# "bantime.rndtime" is the max number of seconds using for mixing with random time
# to prevent "clever" botnets calculate exact time IP can be unbanned again:
bantime.rndtime = 30m
# "bantime.maxtime" is the max number of seconds using the ban time can reach (don't grows further)
bantime.maxtime = 60d
# "bantime.factor" is a coefficient to calculate exponent growing of the formula or common multiplier,
# default value of factor is 1 and with default value of formula, the ban time
# grows by 1, 2, 4, 8, 16 ...
bantime.factor = 2
# purge database entries after
dbpurgeage = 30d
[sshd]
mode = aggressive
enabled = true
backend = systemd
port = 2222
maxretry = 3
```
- **backend = systemd,Debian12 使用 journalctl 紀錄log故使用systemd**
- **忽略來自本機主機和 IPv6 本機的連線**
- **將 nftables 配置為防火牆後端**
- **設定禁止相關設置和監聽port**
**可設定Recidive進行額外保護,重複觸發者將永久封鎖,該規則將監控fail2ban.log,需啟用rsyslog**
```
[recidive]
backend = auto
logpath = /var/log/fail2ban.log
enabled = true
maxretry = 2
banaction = nftables-allports
```
```
systemctl restart fail2ban
systemctl status fail2ban
```
##### **查看封鎖狀態**
```
fail2ban-client status
fail2ban-client status sshd
fail2ban-client set sshd unbanip
```
```
root@remote:~# fail2ban-client status
Status
|- Number of jail: 2
`- Jail list: recidive, sshd
root@remote:~# fail2ban-client status sshd
Status for the jail: sshd
|- Filter
| |- Currently failed: 0
| |- Total failed: 0
| `- Journal matches: _SYSTEMD_UNIT=sshd.service + _COMM=sshd
`- Actions
|- Currently banned: 0
|- Total banned: 0
`- Banned IP list:
root@remote:~# fail2ban-client status recidive
Status for the jail: recidive
|- Filter
| |- Currently failed: 0
| |- Total failed: 0
| `- File list: /var/log/fail2ban.log
`- Actions
|- Currently banned: 0
|- Total banned: 0
`- Banned IP list:
root@remote:~#
```
# Linux 使用 Chroot
##### **運行環境**
- **LXC Debian 12**
##### **建立SSH chroot**
**建立 chroot jail**
```
mkdir -p /home/user
```
**建立基本`/dev`節點**
```
ls -l /dev/{null,zero,stdin,stdout,stderr,random,tty}
```
**若是LXC環境手動複製`dev`並給予權限**
```
mkdir -p /home/user/dev/
touch /home/user/dev/{null,zero,random,tty}
chmod 666 /home/user/dev/{null,zero,random,tty}
```
**若是一般環境用`mknod`建立檔案**
```
mkdir -p /home/user/dev/
cd /home/user/dev/
mknod -m 666 null c 1 3
mknod -m 666 tty c 5 0
mknod -m 666 zero c 1 5
mknod -m 666 random c 1 8
```
**chroot jail 子目錄須為root擁有**
```
chown root:root /home/user
chmod 0755 /home/user
ls -ld /home/user
```
**[](https://note.homesitetw.com/uploads/images/gallery/2025-10/bDrimage.png)**
##### **建立SSH chroot Shell**
**建立`bin`目錄,並複製`/bin/bash`到目錄中,某些系統建立使用者會用`/bin/sh`,可以再複製`/bin/sh`或是修改`/etc/passwd`的Shell**
```
mkdir -p /home/user/bin
cp -v /bin/bash /home/user/bin/
```
**[](https://note.homesitetw.com/uploads/images/gallery/2025-10/DNIimage.png)**
**確認bash所需的`lib`檔案,並複製到`lib`資料夾內**
```
ldd /bin/bash
mkdir -p /home/user/lib/x86_64-linux-gnu
mkdir -p /home/user/lib64
cp -v /lib/x86_64-linux-gnu/libtinfo.so.6 /home/user/lib/x86_64-linux-gnu/
cp -v /lib/x86_64-linux-gnu/libc.so.6 /home/user/lib/x86_64-linux-gnu/
cp -v /lib64/ld-linux-x86-64.so.2 /home/user/lib64/
```
**[](https://note.homesitetw.com/uploads/images/gallery/2025-10/Oaiimage.png)**
**[](https://note.homesitetw.com/uploads/images/gallery/2025-10/Vapimage.png)**
##### **建立SSH使用者**
```
useradd user
passwd user
```
**建立`etc`目錄,並複製`/etc/passwd和/etc/group`到目錄中**
```
mkdir /home/user/etc
cp -vf /etc/{passwd,group} /home/user/etc/
```
**若有新增SSH chroot使用者,`/etc/passwd和/etc/group`都要更新到`/home/user/etc`中**
##### **設定SSHD**
**編輯`/etc/ssh/sshd_config`並在底下新增ChrootDirectory並開啟sftp功能**
```
#Subsystem sftp /usr/lib/openssh/sftp-server
Subsystem sftp internal-sftp
Match User user
ChrootDirectory /home/user
```
```
systemctl restart sshd
```
**測試登入**
```
root@ssh:~# ssh user@192.168.100.1
user@192.168.100.1's password:
-bash-5.2$
```
##### **建立 SSH 使用者主目錄和新增指令**
```
mkdir -p /home/user/home/user1
chown -R user:user /home/user/home/user1
chmod -R 0700 /home/user/home/user1
```
**由於只有新增bash到chroot,無法使用其他指令,依照上述複製bash lib的方式,複製需要的指令到chroot中**
[](https://note.homesitetw.com/uploads/images/gallery/2025-10/FHXimage.png)
**複製`/bin/ls`,確認`ls`所需的`lib`檔案,並複製到`lib`資料夾內**
[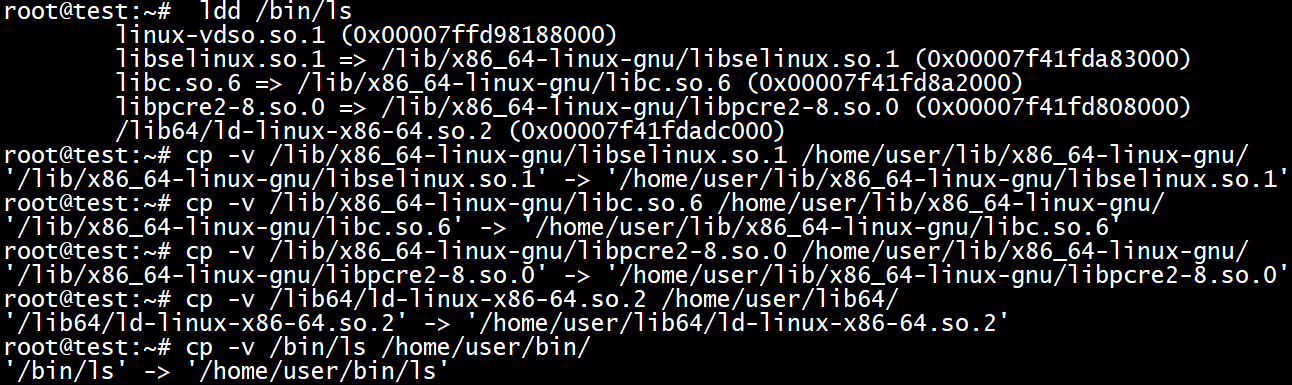](https://note.homesitetw.com/uploads/images/gallery/2025-10/kY5image.png)
**複製後可使用`ls`指令,其餘指令依此步驟安裝**
[](https://note.homesitetw.com/uploads/images/gallery/2025-10/ZzVimage.png)
**SFTP測試**
[](https://note.homesitetw.com/uploads/images/gallery/2025-10/B99image.png)
**SFTP是基於SSH 的檔案傳輸協定,只要該使用者對檔案有「寫入權限」且對目錄有「寫入 + 執行權限」,就可以操作檔案**
**所以Shell未安裝rm,mkdir等不能使用,但sftp可以**
# Linux 關閉 IPV6
**關閉IPV6設定,編輯`/etc/sysctl.conf`,新增以下設定關閉所有IPV6功能**
```
net.ipv6.conf.all.disable_ipv6 = 1
net.ipv6.conf.default.disable_ipv6 = 1
net.ipv6.conf.lo.disable_ipv6 = 1
```
**執行`sysctl -p`更新設定**
# Linux Syslog-ng 轉發和過濾日誌
**使用OpenObserve時,需要用AxoSyslog來傳送LOG,而Synology和OpenWrt內建只有基本Syslog-ng而不是加強版AxoSyslog**
**若要升級到**AxoSyslog也非常麻煩(不支援或重新編譯),可以將Synology和OpenWrt Syslog指向已安裝AxoSyslog的設備讓它來一併轉發****
****編輯`/etc/syslog-ng/syslog-ng.conf`****
```
options { keep-hostname(yes);chain_hostnames(off); flush_lines(0); use_dns(no); use_fqdn(no);
dns_cache(no); owner("root"); group("adm"); perm(0640);
stats(freq(0)); bad_hostname("^gconfd$");
};
##################################################### options內新增keep-hostname(yes); 轉發保留原設備名稱
destination d_openobserve_http {
openobserve-log(
url("http://192.168.100.1")
port(5080)
organization("default")
stream("syslog-ng")
user("root@example.com")
password("b5wE158wERFTaxe0X")
);
};
log {
source(s_src);
destination(d_openobserve_http);
flags(flow-control);
};
##################################################### 上面為原本openobserve設定
source s_test {
udp(ip(192.168.100.100) port(514));
};
log {
source(s_test);
destination(d_openobserve_http);
};
##################################################### 新增本機收到 udp 514 port 的log並轉發到openobserve
```
**過濾設定**
```
filter f_filter {
not (
(program("CRON") and message("/root/temp1.sh"))
or (facility("authpriv") and message("cron:session"))
or (program("systemd-logind") and message("suspend"));
)
};
#########################################
以上範例過濾
CRON 進程 關於 訊息包含 "/root/temp1.sh"
facility 為"authpriv" 訊息包含 "cron:session"
systemd-logind 進程 訊息包含 "suspend"
log {
source(s_src);
filter(f_filter);
destination(d_remote);
};
########################################
再轉發設定中加入filter,這樣關於過濾的訊息不會被轉送到Server
```
# Linux 簡易 Python3 FTP
**簡單的Python FTP腳本,方便測試**
---
##### **安裝pip**
```
apt install python3-pip
```
##### **安裝pyftpdlib**
```
pip3 install pyftpdlib
```
##### **執行pyftpdlib**
**切換到欲當作目錄的資料夾**
```
python3 -m pyftpdlib -p 21
```
**建立有帳密的FTP**
```
python3 -m pyftpdlib -p 21 -u test -P 123456 -w
```
#####
# Linux Crontab 排程設定
**範例**
**\# 查看自己的 crontab**
**crontab -l**
**\# 查看指定使用者的 crontab**
**sudo crontab -u gtwang -l# 編輯 crontab 內容**
**crontab -e**
**\# 編輯指定使用者的 crontab**
**crontab -u gtwang -e#**
**刪除 crontab 內容**
**crontab -r**
**\# ┌───────────── 分鐘 (0 - 59)**
**\# │ ┌─────────── 小時 (0 - 23)**
**\# │ │ ┌───────── 日 (1 - 31)**
**\# │ │ │ ┌─────── 月 (1 - 12)**
**\# │ │ │ │ ┌───── 星期幾 (0 - 7,0 是週日,6 是週六,7 也是週日)**
**\# │ │ │ │ │**
**\# \* \* \* \* \* /path/to/command**
**\# 每天早上 8 點 30 分執行**
**30 08 \* \* \* /home/gtwang/script.sh --your --parameter**
**\# 每週日下午 6 點 30 分執行**
**30 18 \* \* 0 /home/gtwang/script.sh --your --parameter**
**\# 每週日下午 6 點 30 分執行**
**30 18 \* \* Sun /home/gtwang/script.sh --your --parameter**
**\# 每年 6 月 10 日早上 8 點 30 分執行**
**30 08 10 06 \* /home/gtwang/script.sh --your --parameter**
**\# 每月 1 日、15 日、29 日晚上 9 點 30 分各執行一次**
**30 21 1,15,29 \* \* /home/gtwang/script.sh --your --parameter**
**\# 每隔 10 分鐘執行一次**
**\*/10 \* \* \* \* /home/gtwang/script.sh --your --parameter**
**\# 從早上 9 點到下午 6 點,凡遇到整點就執行**
**00 09-18 \* \* \* /home/gtwang/script.sh --your --parameter**