# OpenWrt
OpenWrt 軟路由
# OpenWrt 安裝
#### **運行環境**
- **PVE**
#### **下載OpenWrt檔案**
**倉庫地址[https://downloads.openwrt.org/releases/](https://downloads.openwrt.org/releases/),選擇x86 / 64,generic-ext4-combined-efi.img.gz**
**解壓成img後上傳**
[](https://note.homesitetw.com/uploads/images/gallery/2025-06/qaJimage.png)
#### **建立VM虛擬機**
**不使用媒體**
[](https://note.homesitetw.com/uploads/images/gallery/2025-06/TxWimage.png)
**基本需求CPU 2核心 1G RAM即可**
#### **匯入OpenWrt到VM**
**進入pve shell輸入指令**
```
qm importdisk 101 /var/lib/vz/template/iso/openwrt-23.05.3-x86-64-generic-ext4-combined-efi.img local
```
**101為VM ID**
**/var/lib/vz/template/iso/openwrt-23.05.3-x86-64-generic-ext4-combined-efi.img 為上傳的檔案位置**
**local 儲存至何處**
[](https://note.homesitetw.com/uploads/images/gallery/2025-06/VGNimage.png)
**匯入完成**
#### **PVE 虛擬機設定**
**匯入的img已變成未使用磁碟**
**移除DVD和預設SCSI硬碟**
[](https://note.homesitetw.com/uploads/images/gallery/2025-06/cn6image.png)
**未使用磁碟新增SCSI硬碟**
[](https://note.homesitetw.com/uploads/images/gallery/2025-06/Geiimage.png)
**加入第二張網卡才能啟動**
[](https://note.homesitetw.com/uploads/images/gallery/2025-06/xBbimage.png)
**開機自啟打開,開機順序將硬碟調整至第一位後開機運行**
[](https://note.homesitetw.com/uploads/images/gallery/2025-06/LEEimage.png)
#### **OpenWrt 設定**
**設定openwrt的IP,`vi /etc/config/network`**
```
config interface 'lan'
option device 'br-lan'
option proto 'static'
option ipaddr '192.168.100.254'
option netmask '255.255.255.0'
```
**重啟網路**
```
service network restart
```
**瀏覽器輸入IP 登入openwrt網頁**
# OpenWrt 繁體中文和美化介面
#### **運行環境**
- **PVE**
#### **安裝繁體中文**
**轉到`System -> Software`,按下Update lists 更新軟體包,搜尋`luci-i18n-base-zh`安裝**
**[](https://note.homesitetw.com/uploads/images/gallery/2025-06/KmOimage.png)**
#### **開源介面Argon安裝**
**下載最新安裝包[https://github.com/jerrykuku/luci-theme-argon/releases](https://github.com/jerrykuku/luci-theme-argon/releases)**
**[luci-theme-argon\_2.3.2-r20250207\_all.ipk](https://note.homesitetw.com/attachments/5)**
**點擊`系統>軟體>上傳套件包`,將檔案上傳後安裝**
**[](https://note.homesitetw.com/uploads/images/gallery/2025-06/FXLimage.png)**
**重新打開網頁即可看到新的介面**
**[](https://note.homesitetw.com/uploads/images/gallery/2025-06/wq5image.png)**
# OpenWrt NAT設定
**若在防火牆區域勾選NAT或IP動態偽裝,則會上下行都會使用OpenWrt本身IP,若NAT後主機則無法取得真實IP**
#### **基本NAT設定**
**勾選NAT內部主機即可外連**
[](https://note.homesitetw.com/uploads/images/gallery/2025-07/image.png)
#### **只需內部主機對外NAT**
**取消勾選NAT,新增NAT規則**
**來源位址輸入內部網段**
[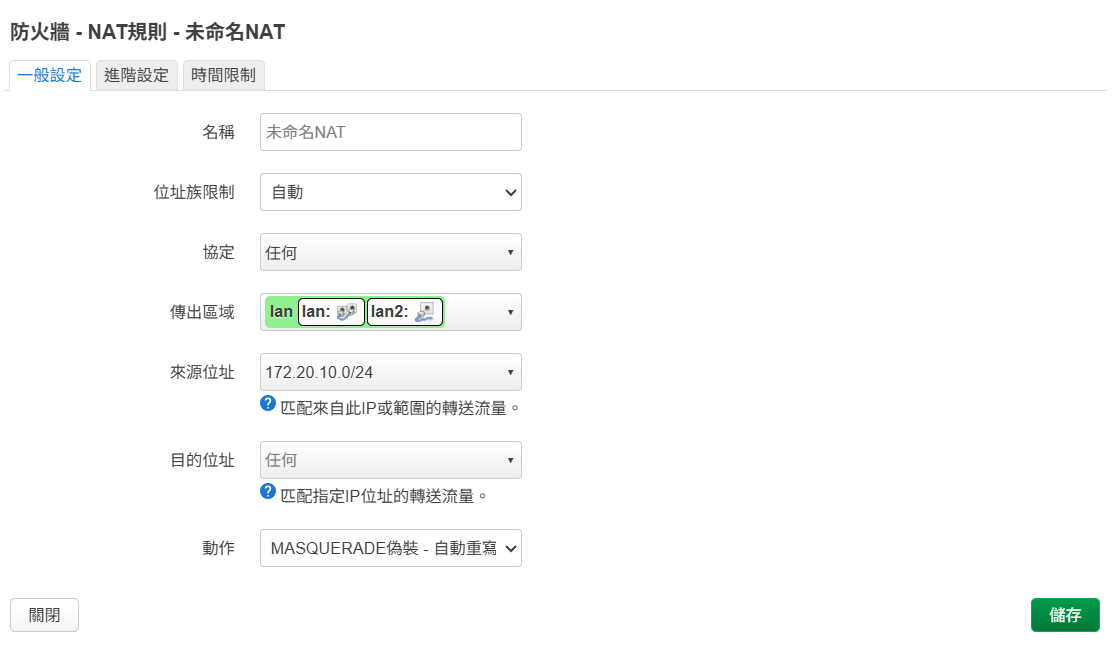](https://note.homesitetw.com/uploads/images/gallery/2025-07/1TJimage.png)
#### **iptables 指令**
**172.20.10.0/24對外br-lan介面進行NAT**
```
iptables -A POSTROUTING -t nat -s 172.20.10.0/255.255.255.0 -o br-lan -j MASQUERADE
```
# OpenWrt WireGuard安裝
#### **安裝套件**
**WEB CLI上安裝以下套件**
```
wireguard-tools
luci-app-wireguard
qrencode
```
#### **新增WireGuard介面**
**10.9.0.1/32 為此介面ip**
[](https://note.homesitetw.com/uploads/images/gallery/2025-07/BGXimage.png)
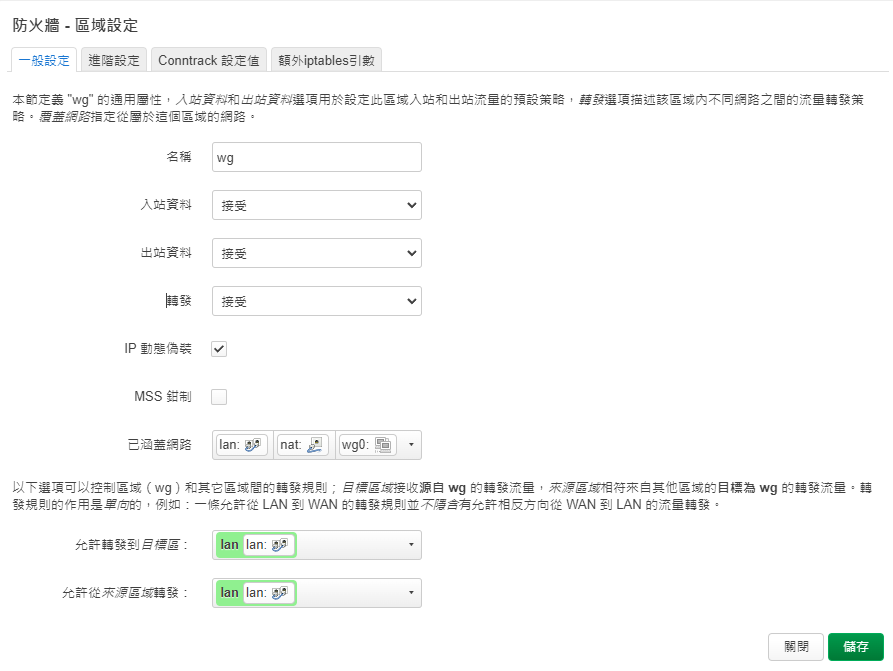
#### **建立防火牆**
[](https://note.homesitetw.com/uploads/images/gallery/2025-07/nlLimage.png)
#### **對等端Client*設定***
**客戶端公鑰**
**10.9.0.2/32 客戶端IP**
[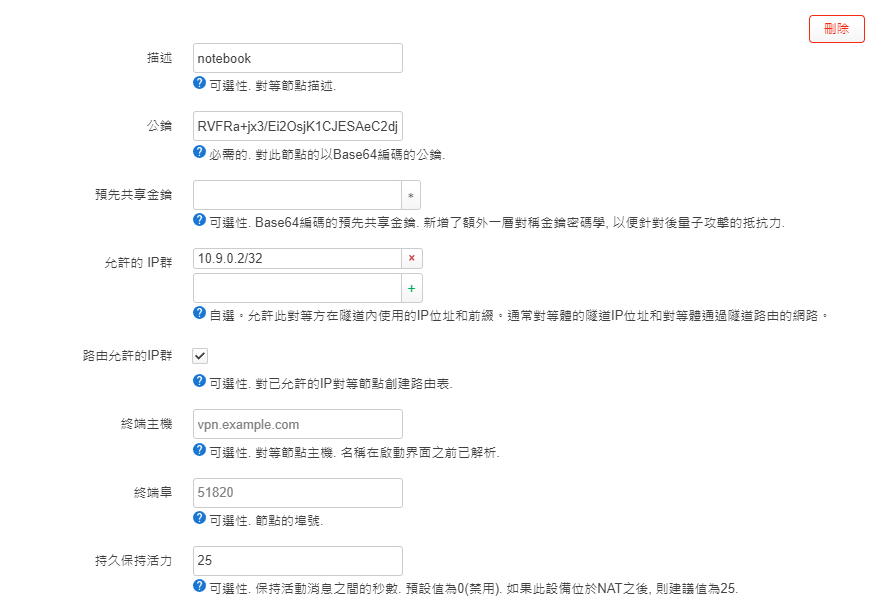](https://note.homesitetw.com/uploads/images/gallery/2025-07/n1Ximage.png)
[](https://note.homesitetw.com/uploads/images/gallery/2025-07/Fpyimage.png)
```
編輯新增的防火牆設定wg
wireguard介面設定完皆須重新啟動
如果要將所有流量通過vpn上internet,防火牆需新增
iptables -t nat -A POSTROUTING -s 10.9.0.0/24 -o br-lan -j MASQUERADE
重啟防火牆
```
**Windows WireGuard設定**
```
Address wireguard ip
PublicKey server公鑰
AllowedIPs 允許網段通過vpn
Endpoint server ip和port
```
[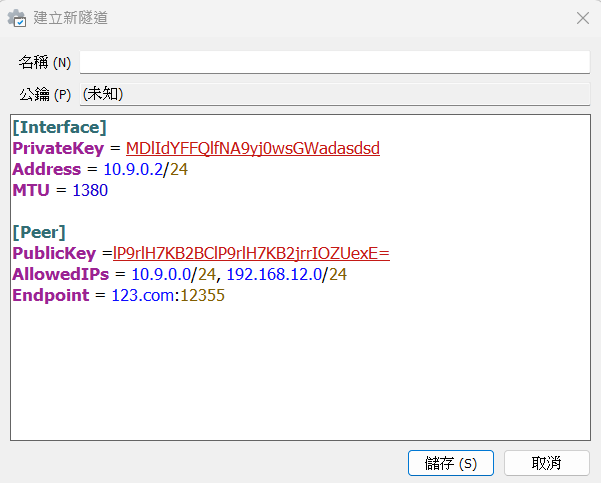](https://note.homesitetw.com/uploads/images/gallery/2025-07/Mr3image.png)
**MTU自行調整,建議1380**
# OpenWrt OpenVPN Server安裝
[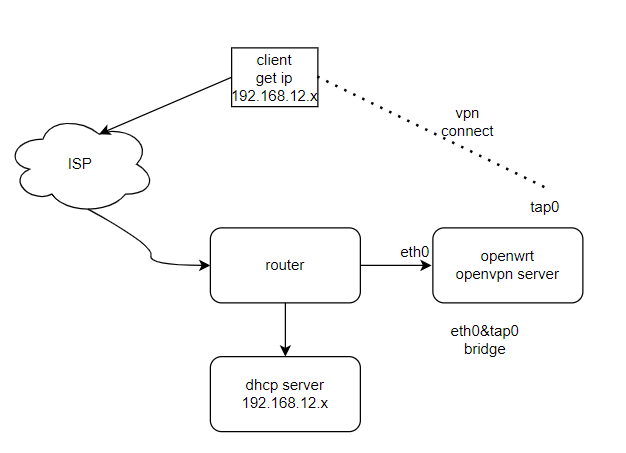](https://note.homesitetw.com/uploads/images/gallery/2025-07/osRimage.png)
#### **運行環境**
- **OpenWrt 21.02.3**
#### **安裝套件**
```
opkg update
opkg install openvpn-openssl openvpn-easy-rsa
opkg install luci-app-openvpn
#web介面管理
```
```
# Configuration parameters
OVPN_PKI="/etc/easy-rsa/pki"
export EASYRSA_PKI="${OVPN_PKI}"
export EASYRSA_REQ_CN="ovpnca"
export EASYRSA_BATCH="1"
# Remove and re-initialize the PKI directory
easyrsa init-pki
# Generate DH parameters
easyrsa gen-dh
# Create a new CA
easyrsa build-ca nopass
# Generate a key pair and sign locally for a server
easyrsa build-server-full server nopass
# Generate a key pair and sign locally for a client
easyrsa build-client-full client nopass
# Generate TLS PSK
openvpn --genkey --secret ${OVPN_PKI}/tc.pem
```
#### **設定**
**新增server設定,這裡使用tap bridge為範例,編輯`/etc/config/openvpn`**
```
config openvpn 'vpntap'
option enable '1'
option proto 'udp'
option dev 'tap0'
option ca '/etc/easy-rsa/pki/ca.crt'
option cert '/etc/easy-rsa/pki/issued/server.crt'
option key '/etc/easy-rsa/pki/private/server.key'
option dh '/etc/easy-rsa/pki/dh.pem'
option tls_auth '/etc/easy-rsa/pki/tc.pem 0'
option tls_server '1'
option keepalive '10 120'
option comp_lzo 'adaptive'
option persist_key '1'
option persist_tun '1'
option status '/tmp/openvpn-status.log'
option verb '3'
option server_bridge ' '
option port '12975'
option duplicate_cn '1' <<允許多個client
```
```
/etc/init.d/openvpn restart
```
**client config設定**
```
client
dev tap
proto udp
remote 12975
remote-cert-tls server
nobind
comp-lzo
persist-key
persist-tun
verb 3
key-direction 1
tls-client
放置 /etc/easy-rsa/pki/ca.crt
放置 etc/easy-rsa/pki/issued/client.crt
放置 /etc/easy-rsa/pki/private/client.key
放置 /etc/easy-rsa/pki/tc.pem
```
**於openwrt web介面選擇橋接裝置,將橋接裝置新增tap0介面即完成**
# OpenWrt IPv6 設定
##### **運行環境**
- **OpenWrt 23.05**
##### **Dnsmasq 設定**
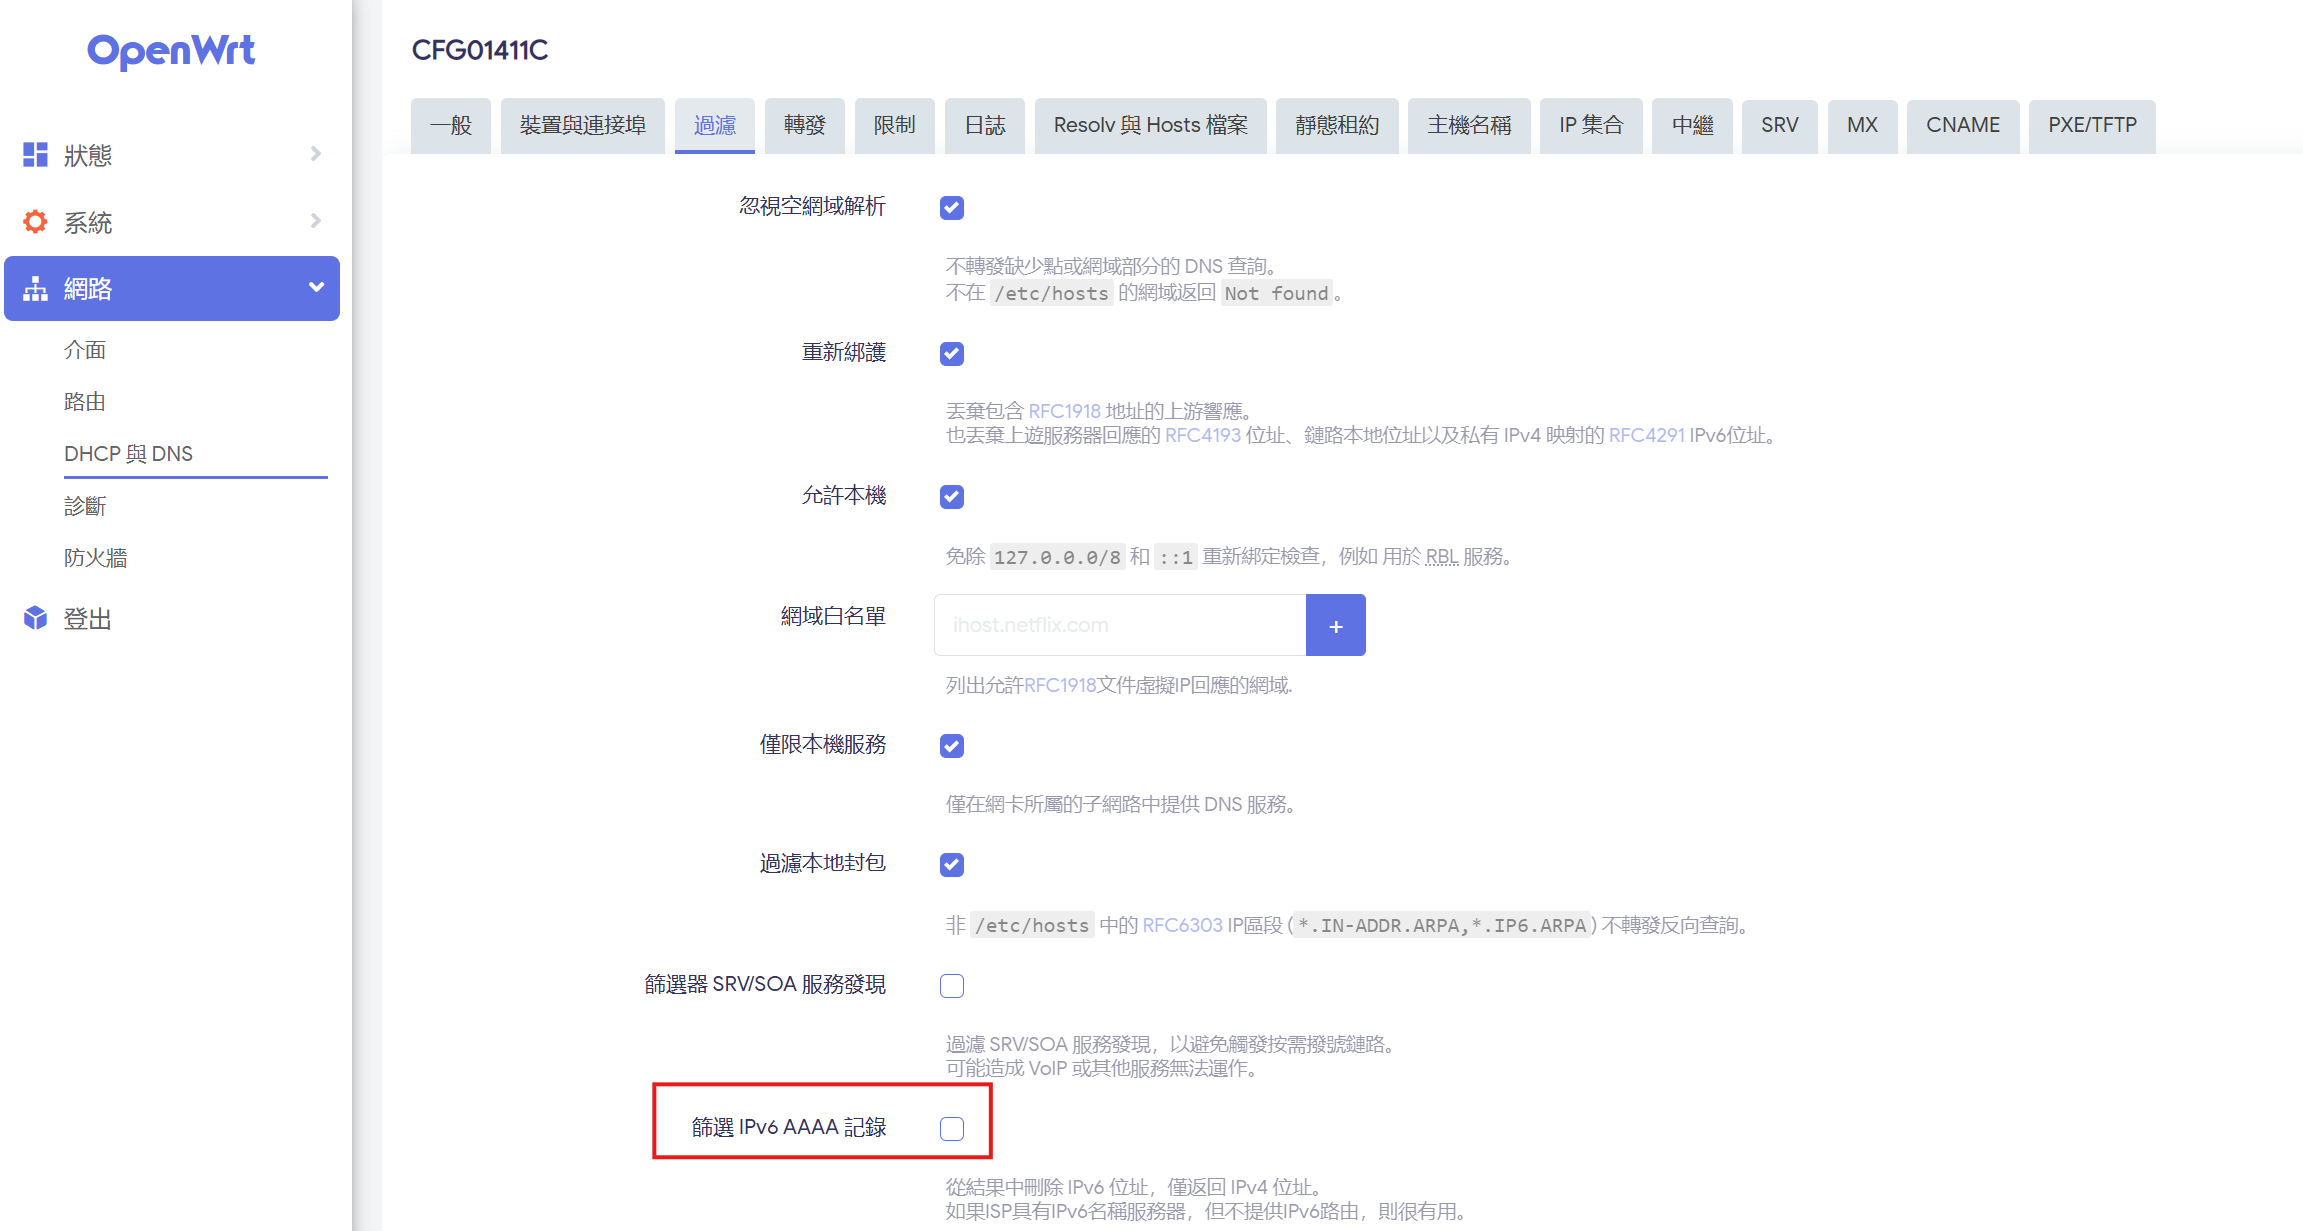
**篩選 IPv6 AAAA 記錄取消勾選**
[](https://note.homesitetw.com/uploads/images/gallery/2025-10/Gndimage.png)
##### **WAN介面(PPPOE)IPv6設定**
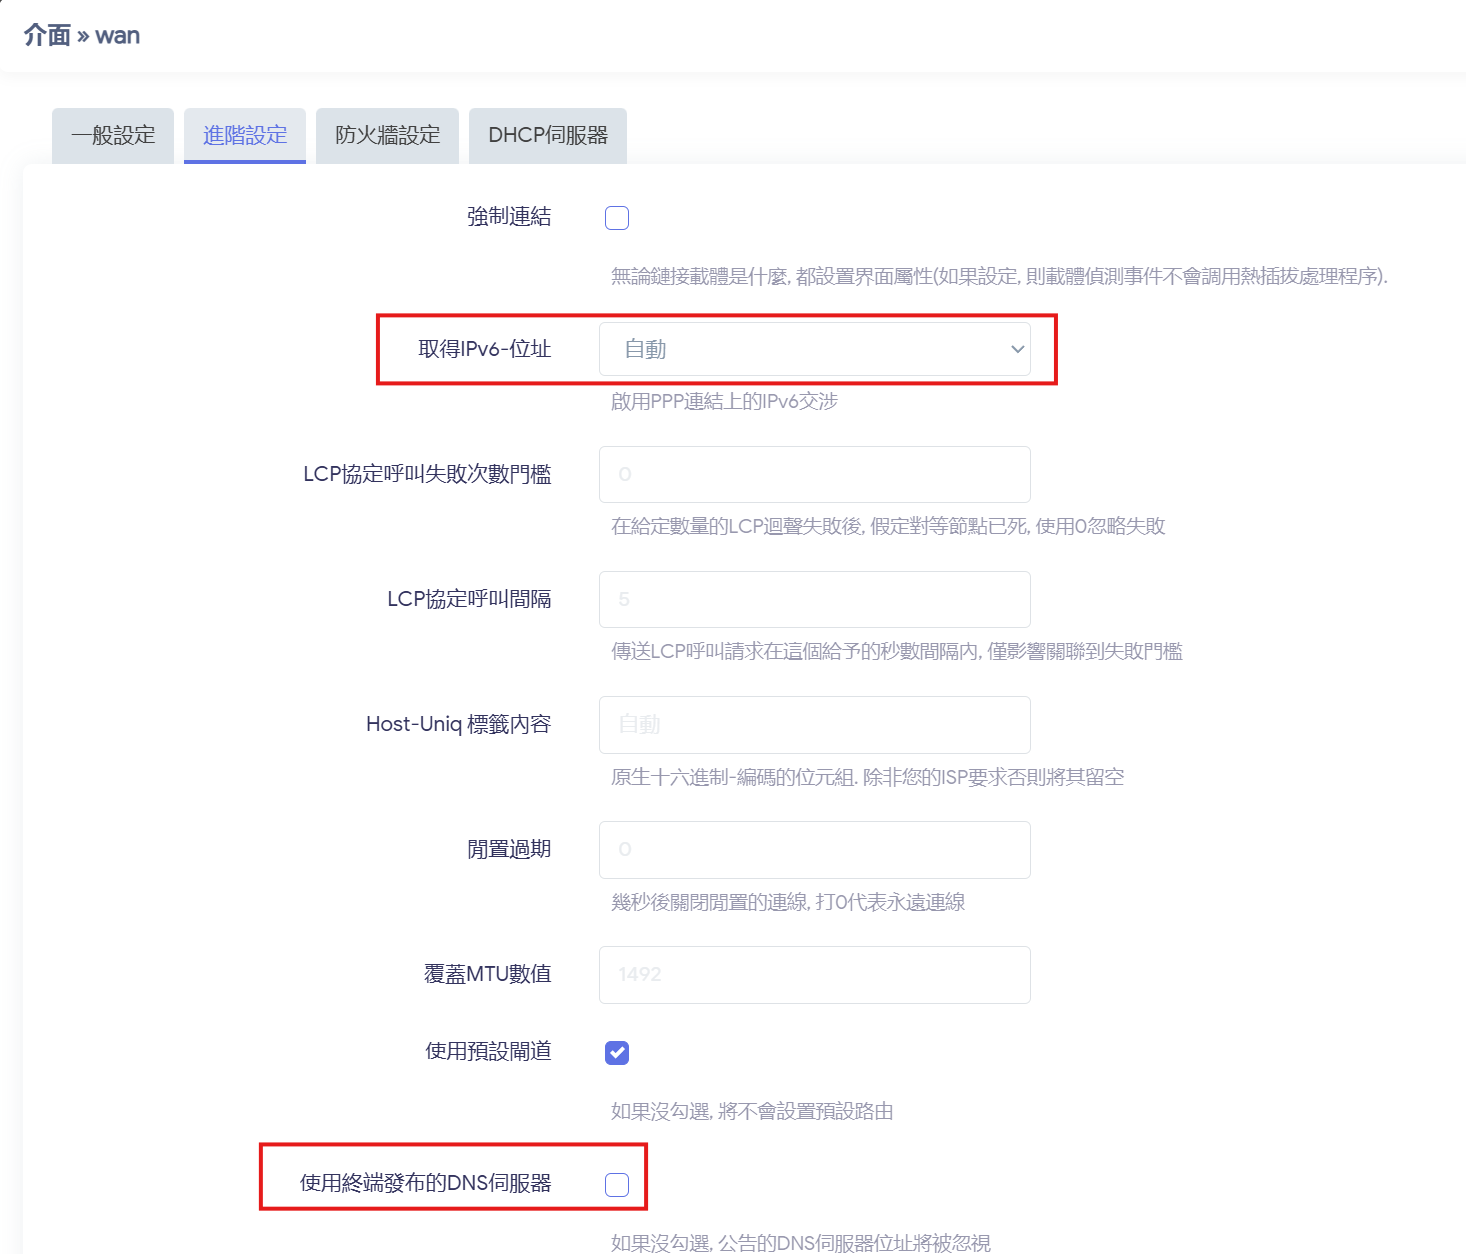
**刪除已有WAN6介面,在WAN介面開啟IPv6後會自動產生動態虛擬介面**
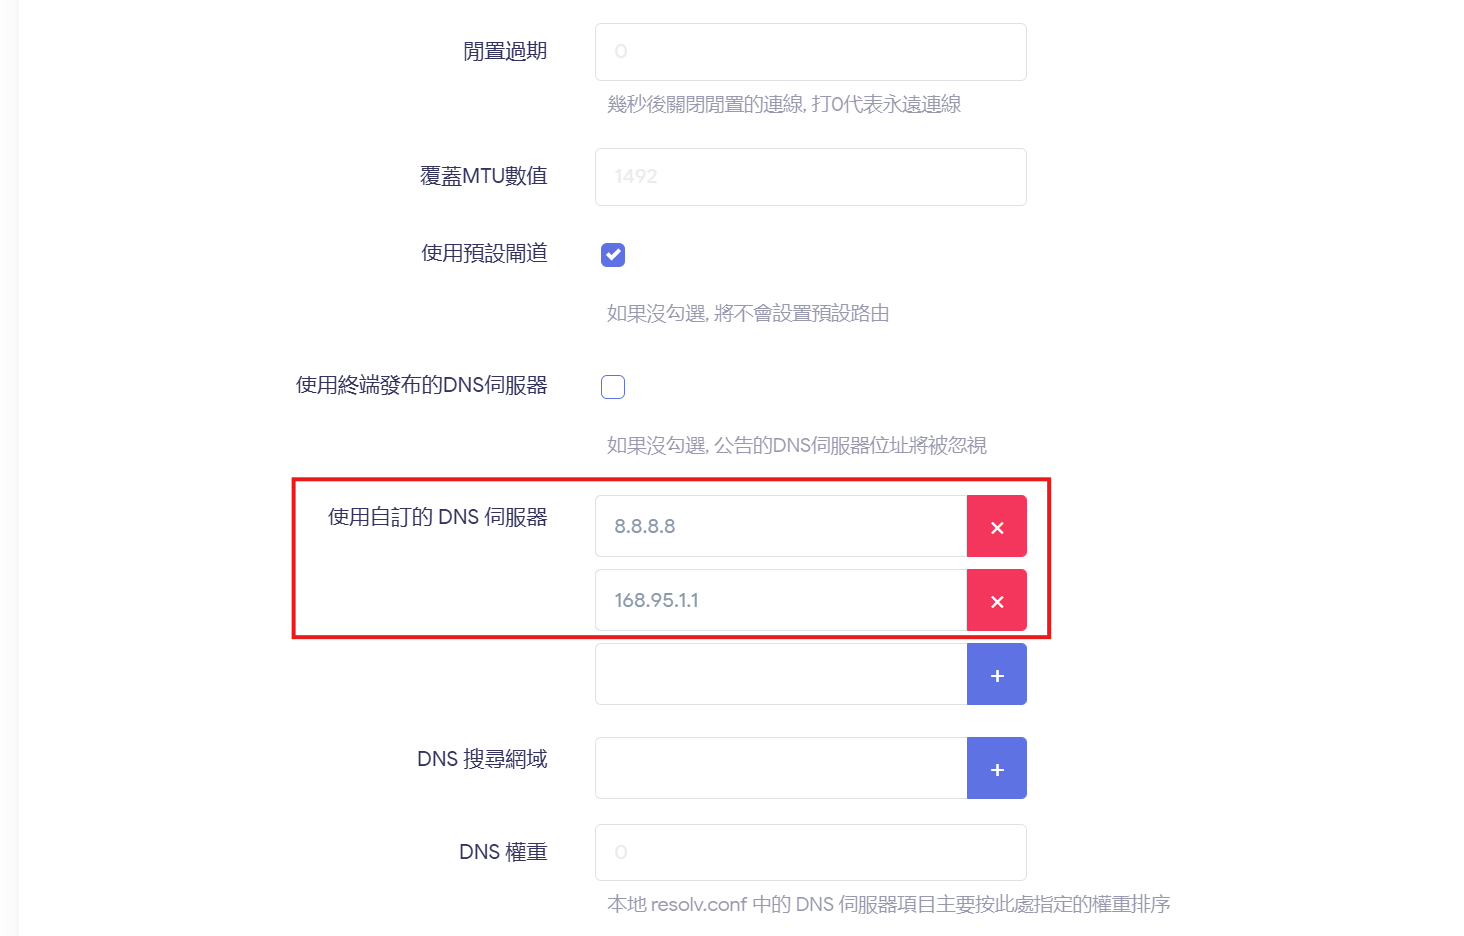
**若不勾選使用終端發布的DNS伺服器,可自訂要使用的DNS**
[](https://note.homesitetw.com/uploads/images/gallery/2025-10/Mrximage.png)
[](https://note.homesitetw.com/uploads/images/gallery/2025-10/kzMimage.png)
[](https://note.homesitetw.com/uploads/images/gallery/2025-10/tnpimage.png)
**確認WAN介面上DHCP已關閉**
[](https://note.homesitetw.com/uploads/images/gallery/2025-10/XPoimage.png)
**儲存套用設定後,會出現DHCPv6 客戶端虛擬介面,確認有取得IPv6-前綴代理**
[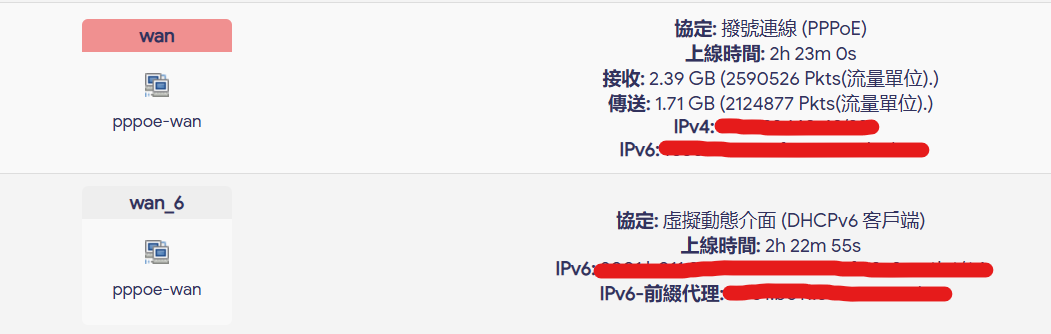](https://note.homesitetw.com/uploads/images/gallery/2025-10/8Aaimage.png)
##### **LAN介面IPv6設定**
**LAN介面>進階設定,委派 IPv6 首碼不勾選,IPv6 分配長度依照IPv6-前綴代理取得的長度設定**
**IPv6 尾碼輸入eui64**
[](https://note.homesitetw.com/uploads/images/gallery/2025-10/Jhqimage.png)
**IPv6 DHCP設定,RA選伺服器模式,不勾選IPv6 DNS伺服器,用IPv4來解析IPv6域名**
[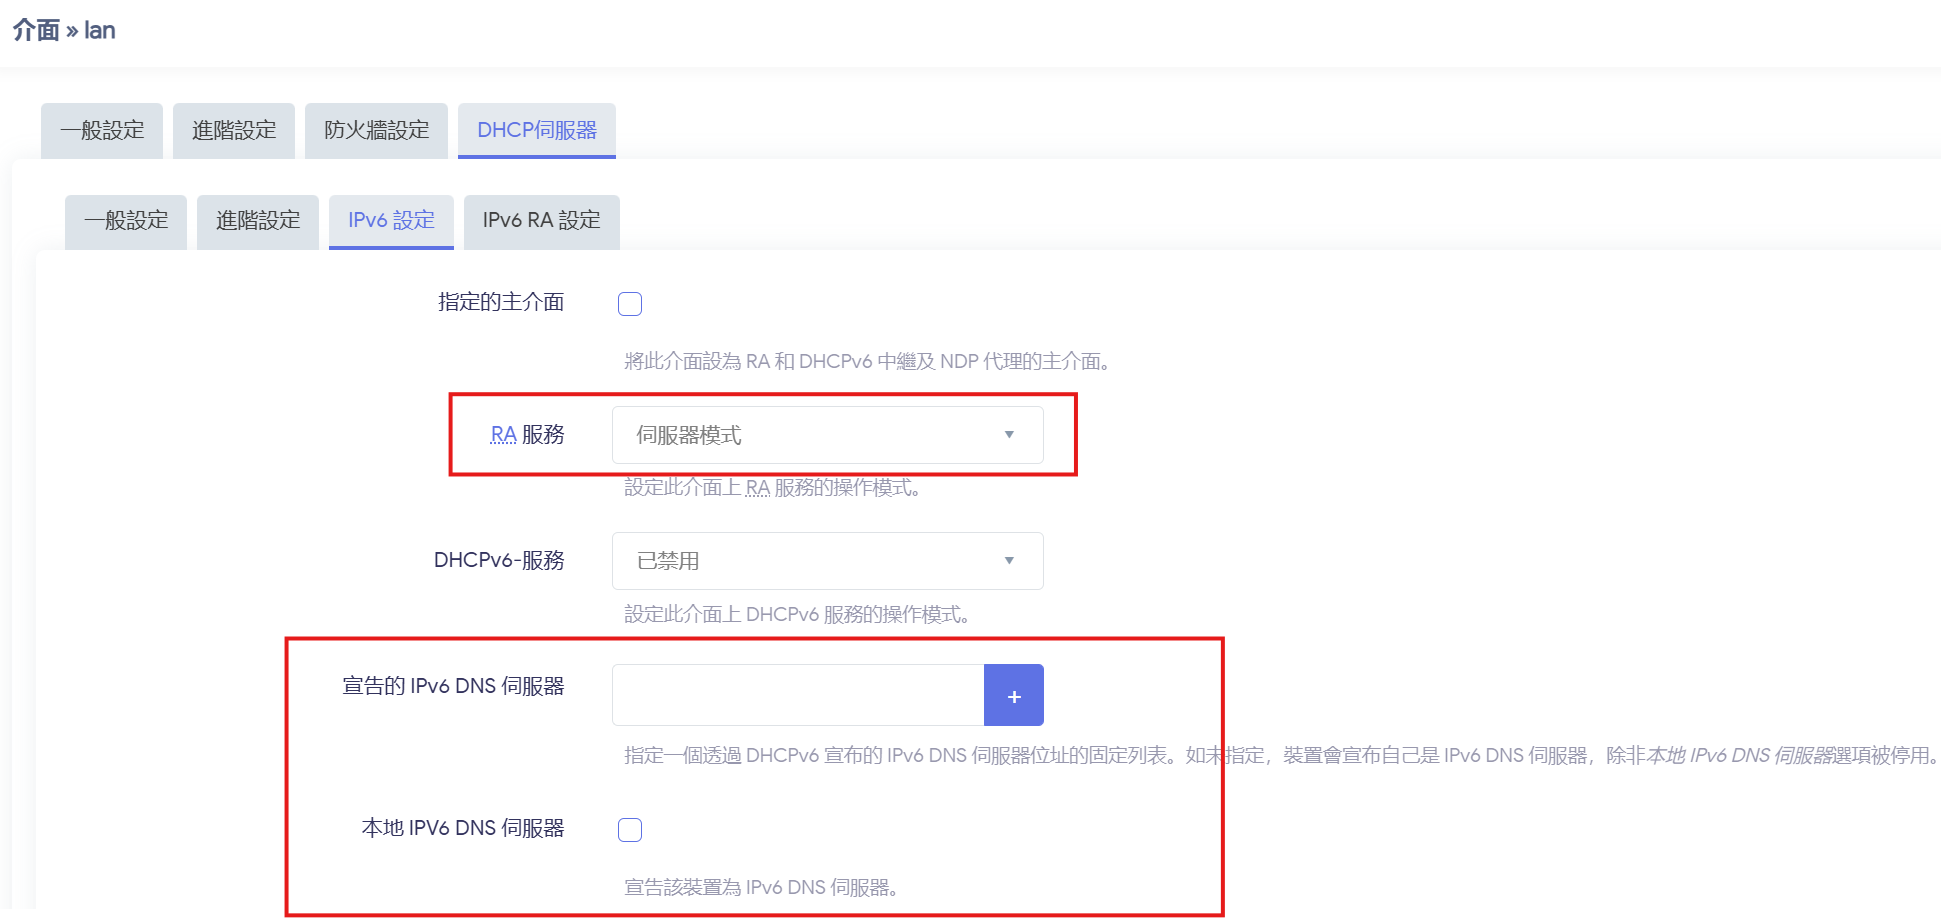](https://note.homesitetw.com/uploads/images/gallery/2025-10/rWhimage.png)
[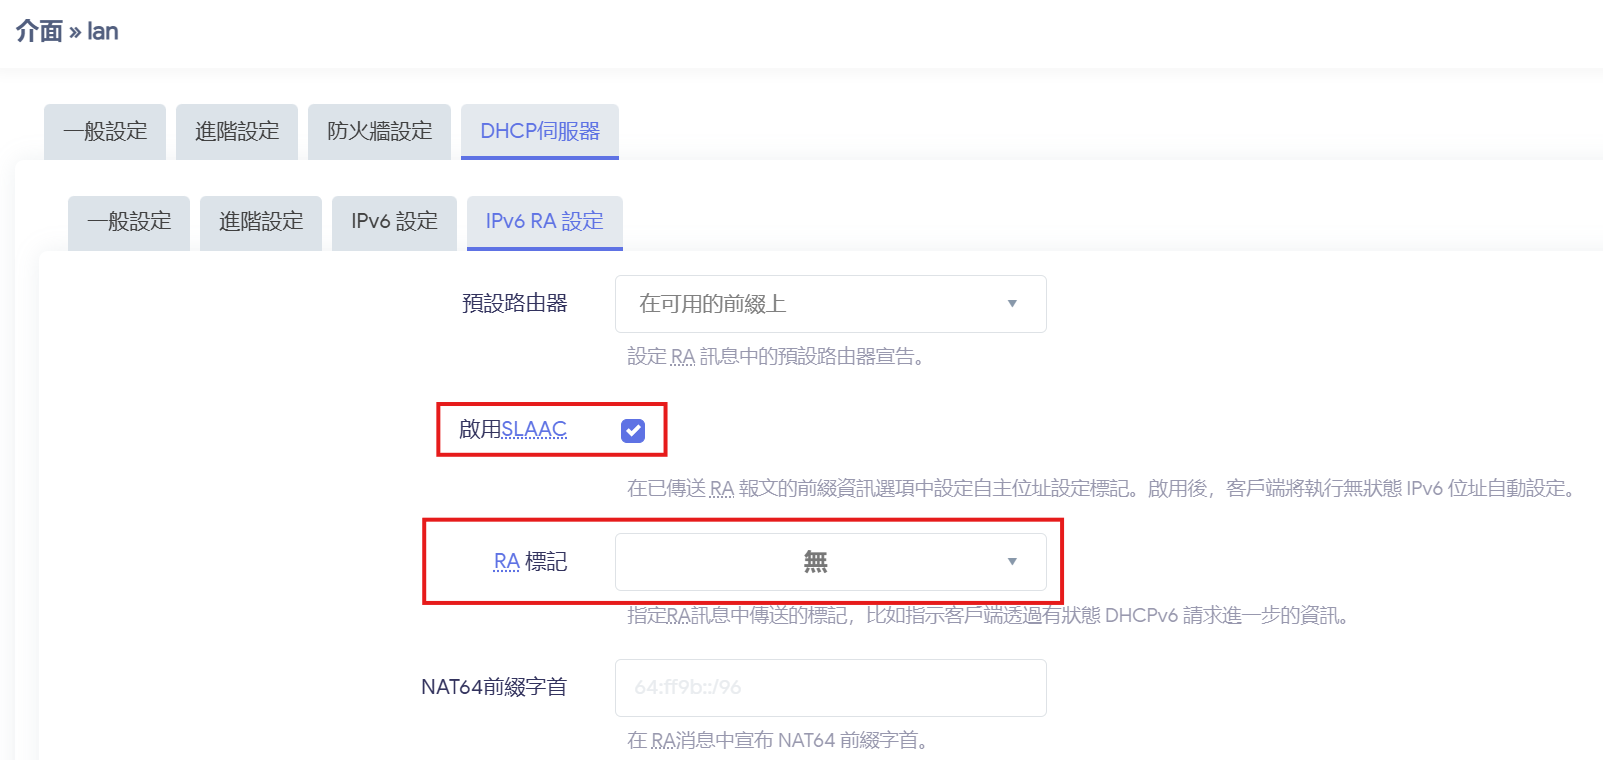](https://note.homesitetw.com/uploads/images/gallery/2025-10/cbHimage.png)
**儲存套用後設定完成**
##### **測試IPv6**
**[https://testipv6.com/](https://testipv6.com/)**
**參考:[https://github.com/Aethersailor/Custom\_OpenClash\_Rules/wiki/OpenWrt-IPv6-%E8%AE%BE%E7%BD%AE%E6%96%B9%E6%A1%88](https://github.com/Aethersailor/Custom_OpenClash_Rules/wiki/OpenWrt-IPv6-%E8%AE%BE%E7%BD%AE%E6%96%B9%E6%A1%88)**
# OpenWrt 發送syslog到遠端伺服器
##### **運行環境**
- **OpenWrt 23.05**
##### **外部Log Server設定**
**設定外部伺服器IP和PORT**
[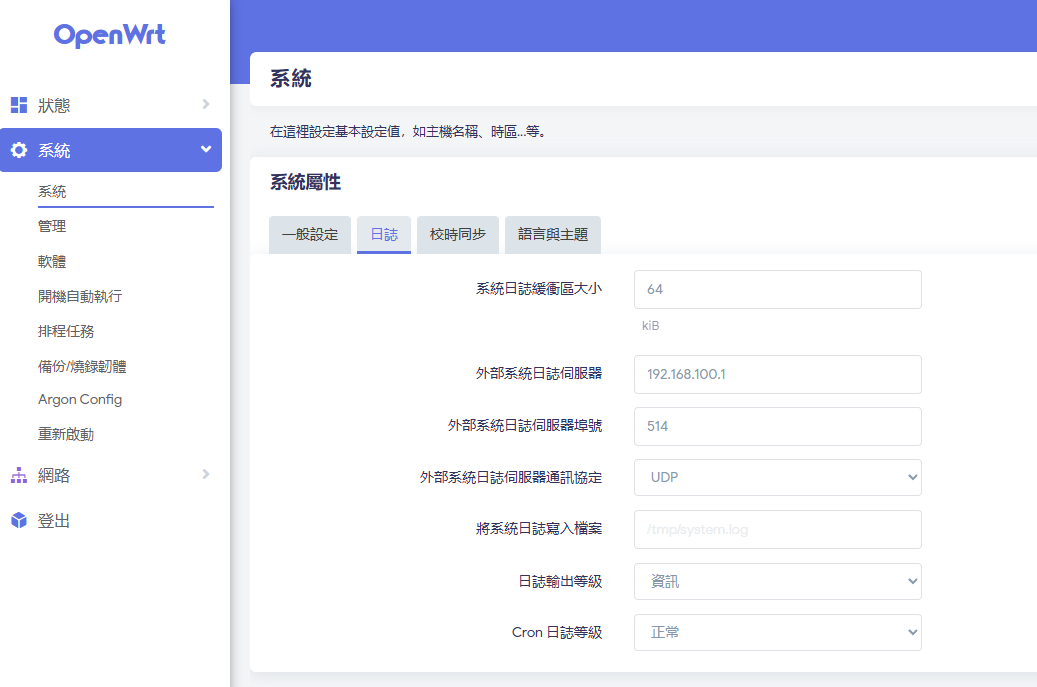](https://note.homesitetw.com/uploads/images/gallery/2025-10/ZH5image.png)
**重啟log服務**
```
service log restart
```
##### **測試**
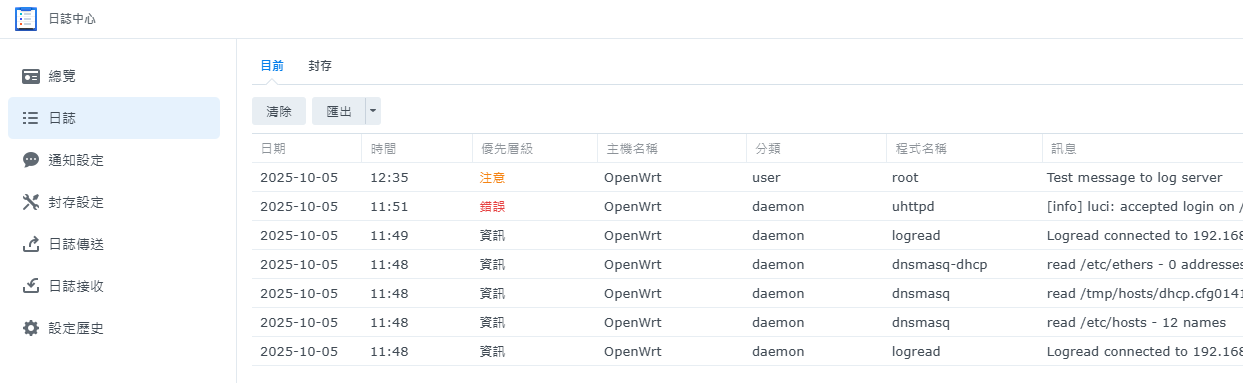
**使用Synology日誌接收,確認有OpenWrt的log**
[](https://note.homesitetw.com/uploads/images/gallery/2025-10/mwBimage.png)
# OpenWrt SSH Dropbear 替換 Openssh
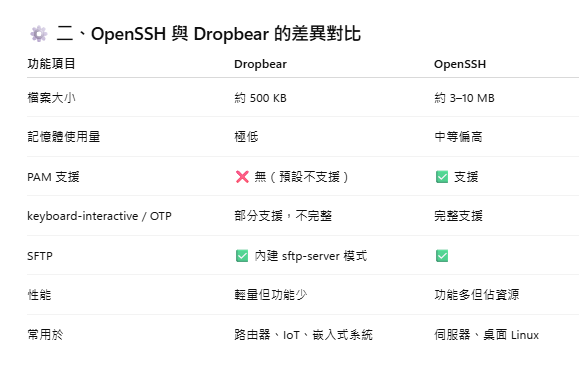
**OpenWrt內建使用Dropbear SSH ,屬於輕量化SSH伺服器以節省記憶體和資源,OpenWrt為軟路由,沒有記憶體不夠的困擾可安裝Openssh獲得完整功能**
**以下為ChatGPT整理差異**
[](https://note.homesitetw.com/uploads/images/gallery/2025-10/g2Pimage.png)
##### **安裝Openssh**
```
opkg update
opkg install openssh-server openssh-client openssh-sftp-server
```
**編輯`/etc/ssh/sshd_config`**
**先將openssh port改成不要和內建dropbear ssh 衝突,並開啟root登入**
```
Port 2222
PermitRootLogin yes
```
**啟動ssh**
```
/etc/init.d/sshd enable
/etc/init.d/sshd start
```
**打開新的openwrt session,確認可從port 2222 登入後,移除dropbear**
```
/etc/init.d/dropbear disable
/etc/init.d/dropbear stop
opkg remove dropbear
```