# Proxmox PVE

Proxmox PVE 相關

# Proxmox Virtual Environment

PVE

# PVE 掛載NFS目錄

**於PVE WEB介面新增NFS目錄，新增成功後於PVE內修改掛載參數/etc/pve/storage.cfg**

**option後加入soft**

```
nfs: pvebackup1
        export /xxx/xxx
        path /mnt/pve/pvebackup1
        server xxx.xxx.xxx.xxx
        content vztmpl,rootdir,snippets,iso,images,backup
        prune-backups keep-all=1
        options soft
```

**預設為hard(硬連結)，當NFS Server有問題時，client會持續進行連接，可能影響主機與節點(影響更久可能會觸發Watchdog)**

**更改後重開機或NFS Storage 取消掛載**

```
umount /mnt/pve/pvebackup1
```

**再去PVE WEB介面上點選左邊NFS儲存區就會自動掛載NFS目錄(可能會自動掛載)**

**於PVE內確認使用soft掛載**

```
mount | grep pvebackup
xxx.xxx.xxx.xxx:/xxx/xxx on /mnt/pve/pvebackup1 type nfs4 
(rw,relatime,vers=4.2,rsize=1048576,wsize=1048576,namlen=255,soft,
proto=tcp,timeo=600,retrans=2,sec=sys,clientaddr=xxx.xxx.xxx.xxx,local_lock=none,addr=xxx.xxx.xxx.xxx)
```

**如果要移除NFS連接，於PVE WEB介面上先停用此NFS然後cli 取消掛載**

```
umount /mnt/pve/pvebackup1
如果取消不了可以強制umount
umount -l /mnt/pve/pvebackup1
或
fusionrmount -u -z /mnt/pve/pvebackup1
```

**PVE WEB上再刪除此NFS即可**

# PVE LXC OpenVPN客戶端安裝

#### **運行環境**

- **PVE**
- **LXC**
- **Ubuntu**

#### **LXC設定**

**PVE`/etc/pve/lxc/xxx.conf`新增設定後啟動**

```
lxc.cgroup2.devices.allow: c 10:200 rwm
lxc.mount.entry: /dev/net dev/net none bind,create=dir
```

#### **安裝OpenVPN**

```
wget https://git.io/vpn -O openvpn-install.sh
```

```
chmod +x openvpn-install.sh
```

```
./openvpn-install.sh
```

**依序步驟使用預設安裝即可**

**範例:將homevpn.ovpn檔案丟到/etc/openvpn/client內**

**執行openvpn客戶端讀取設定檔**

```
```
openvpn --daemon --cd /etc/openvpn --config client/vpn.ovpn --log-append /var/log/openvpn.log &
```<button class="copy-the-code-button" data-style="button" title="複製至剪貼簿">Copy</button>
```

**確認連上 OpenVPN Server 所取得的 IP**

```
```
ip a | grep tun
```<button class="copy-the-code-button" data-style="button" title="複製至剪貼簿">Copy</button>
```

**關閉連線**

```
pkill openvpn
```

# PVE Postfix由Gmail寄發信件

##### **運行環境**

- **PVE 7**

##### **安裝相關套件**

```
apt install libsasl2-modules -y
```

##### **設定Postfix**

**編輯`/etc/postfix/main.cf`**

```
# GMail Setting
relayhost = [smtp.gmail.com]:587
#  use tls
smtp_use_tls=yes
# use sasl when authenticating to foreign SMTP servers
smtp_sasl_auth_enable = yes
# path to password map file
smtp_sasl_password_maps = hash:/etc/postfix/sasl_passwd
# list of CAs to trust when verifying server certificate
smtp_tls_CAfile = /etc/ssl/certs/ca-certificates.crt
# eliminates default security options which are imcompatible with gmail
smtp_sasl_security_options = noanonymous
smtp_always_send_ehlo = yes
smtpd_relay_restrictions = permit_mynetworks permit_sasl_authenticated reject_unauth_destination
```

**編輯` /etc/postfix/sasl_passwd`**

```
[smtp.gmail.com]:587 <google信箱>:<應用程式密碼>
```

<p class="callout info">需到 Google 帳號產生應用程式密碼</p>

**更改檔案權限**

```
postmap /etc/postfix/sasl_passwd
cd /etc/postfix
chown postfix /etc/postfix/sasl_passwd*

/etc/init.d/postfix reload
```

##### **測試寄件**

```
echo “Test mail from postfix” | mail -s “Test Postfix” test@test.com
```

# PVE 安裝Synology 黑群暉

#### **安裝**

##### **建立虛擬機**

[![image.png](https://note.homesitetw.com/uploads/images/gallery/2025-09/scaled-1680-/9Wuimage.png)](https://note.homesitetw.com/uploads/images/gallery/2025-09/9Wuimage.png)
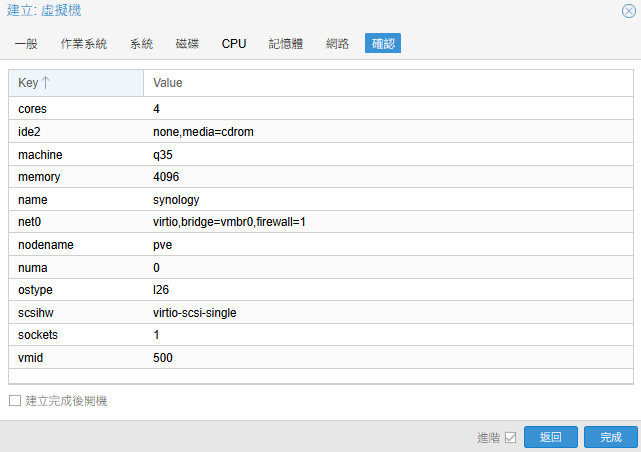
**於PVE內建立VM**

**作業系統:`不使用任何媒體`**

**系統:架構選`Q35`**

**磁碟:刪除**

**CPU:`核心`**自行設置**，類別選`host`**

**記憶體:**自行設置****

**網路:自行設置(VirtIO)**

**完成建立虛擬機**

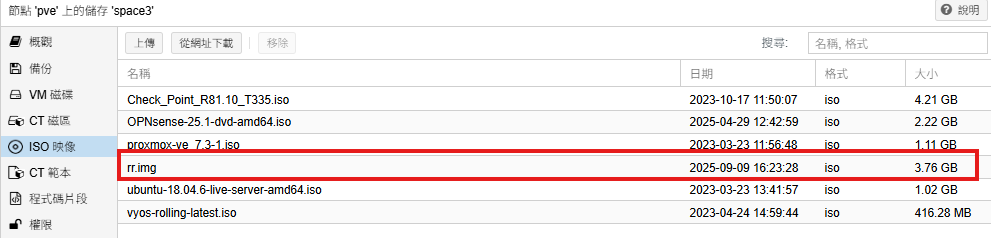
##### **下載RR**  


**下載最新版[RR引導](https://github.com/RROrg/rr)，並上傳ISO映像**

[![image.png](https://note.homesitetw.com/uploads/images/gallery/2025-09/scaled-1680-/BAnimage.png)](https://note.homesitetw.com/uploads/images/gallery/2025-09/BAnimage.png)

**進入PVE shell，導入RR映像**

**命令為導入VM編號 映像檔位置 磁碟儲存位置**

```
qm importdisk 500 /mnt/pve/space3/template/iso/rr.img space3
```

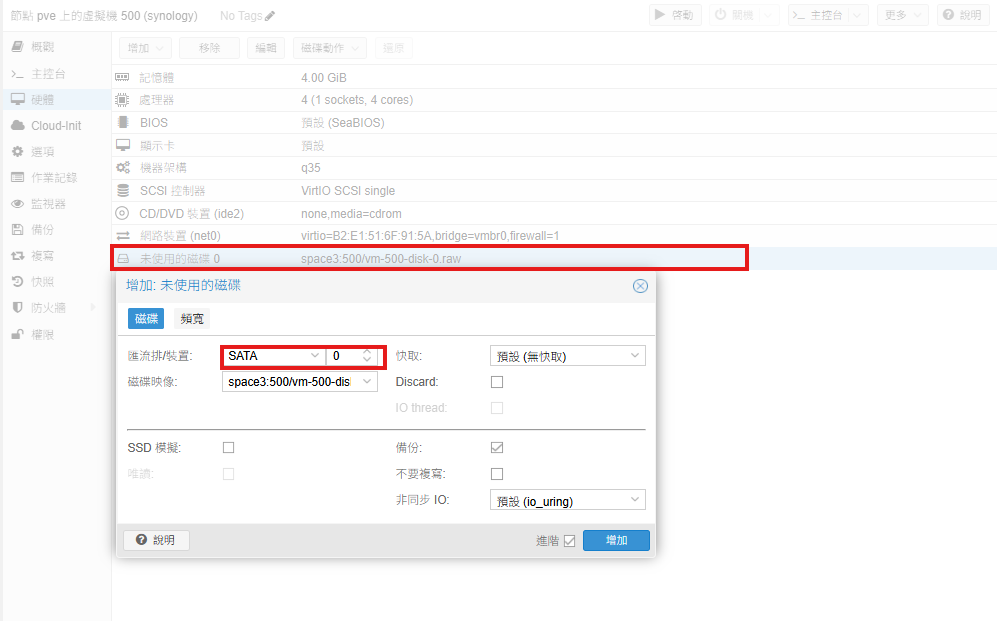
**虛擬機有出現剛剛導入的映像檔，選擇SATA**

[![image.png](https://note.homesitetw.com/uploads/images/gallery/2025-09/scaled-1680-/zSsimage.png)](https://note.homesitetw.com/uploads/images/gallery/2025-09/zSsimage.png)

**新增一塊SATA硬碟**

[![image.png](https://note.homesitetw.com/uploads/images/gallery/2025-09/scaled-1680-/M29image.png)](https://note.homesitetw.com/uploads/images/gallery/2025-09/M29image.png)
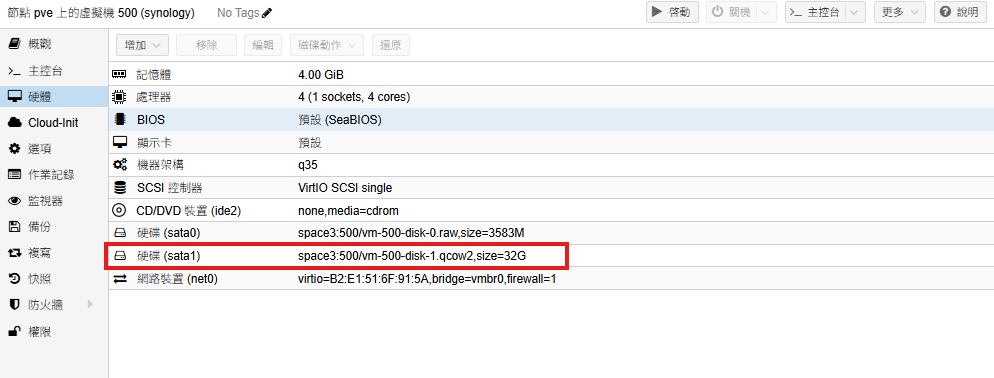
**將SATA0設置開機順序第一位**

[![image.png](https://note.homesitetw.com/uploads/images/gallery/2025-09/scaled-1680-/3rZimage.png)](https://note.homesitetw.com/uploads/images/gallery/2025-09/3rZimage.png)
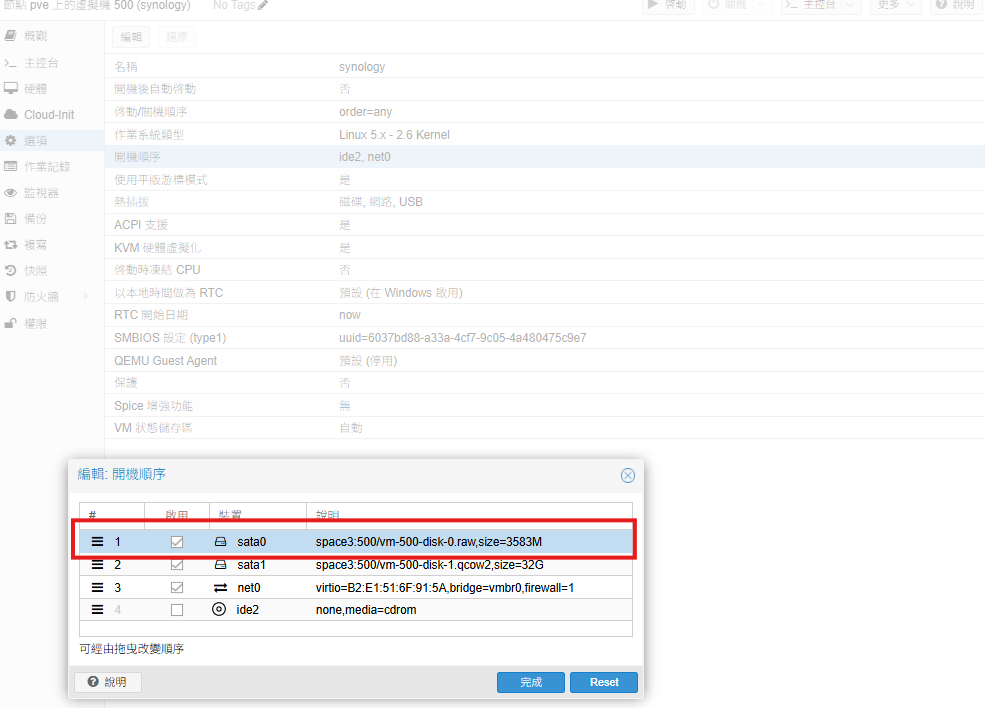
##### **RR引導安裝**

**虛擬機開機後進入控制台會看到提示，進入`IP:7681`進行設定**

**進入`Settings menu`選擇語言先切換中文**

**型號自行選擇，這裡使用`DS920+`，自行選擇版本**

**點選URL下載pat系統文件**

**最後編譯開機檔開機**

[![image.png](https://note.homesitetw.com/uploads/images/gallery/2025-09/scaled-1680-/f37image.png)](https://note.homesitetw.com/uploads/images/gallery/2025-09/f37image.png)
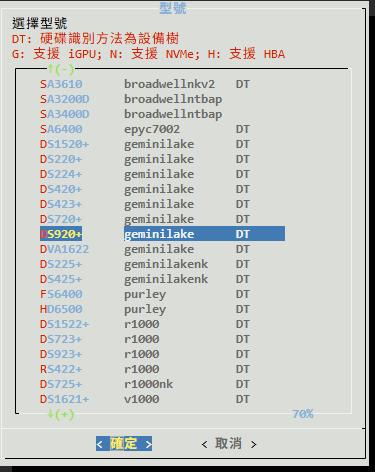
##### **NAS初始化安裝**

**進入`IP:5000`開始安裝**

[![image.png](https://note.homesitetw.com/uploads/images/gallery/2025-09/scaled-1680-/3wKimage.png)](https://note.homesitetw.com/uploads/images/gallery/2025-09/3wKimage.png)
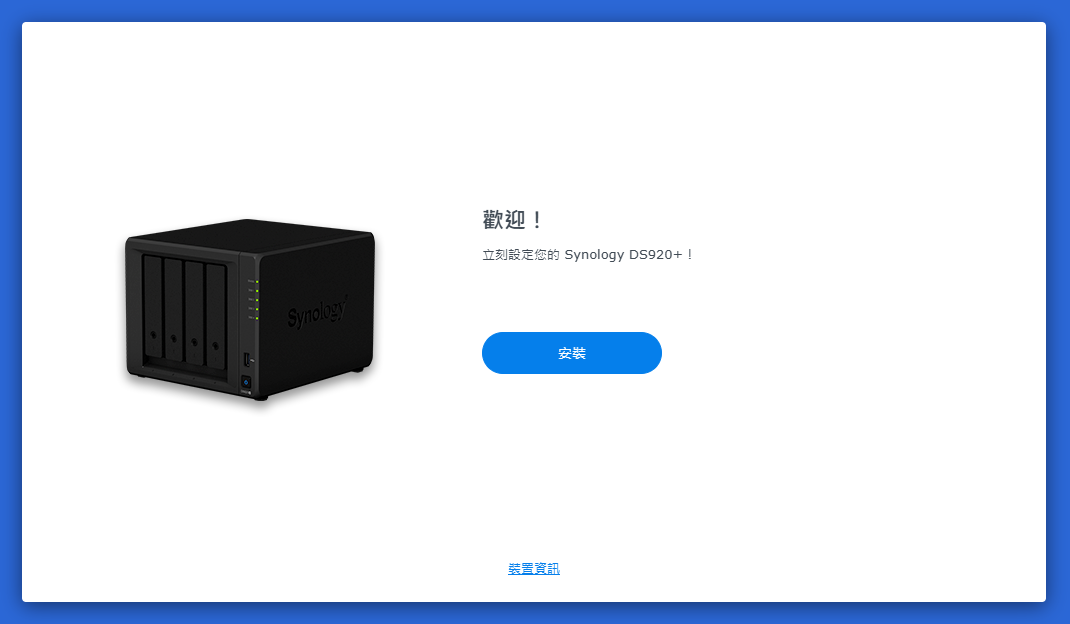
**上傳剛剛下載的pat檔案**

[![image.png](https://note.homesitetw.com/uploads/images/gallery/2025-09/scaled-1680-/fbmimage.png)](https://note.homesitetw.com/uploads/images/gallery/2025-09/fbmimage.png)
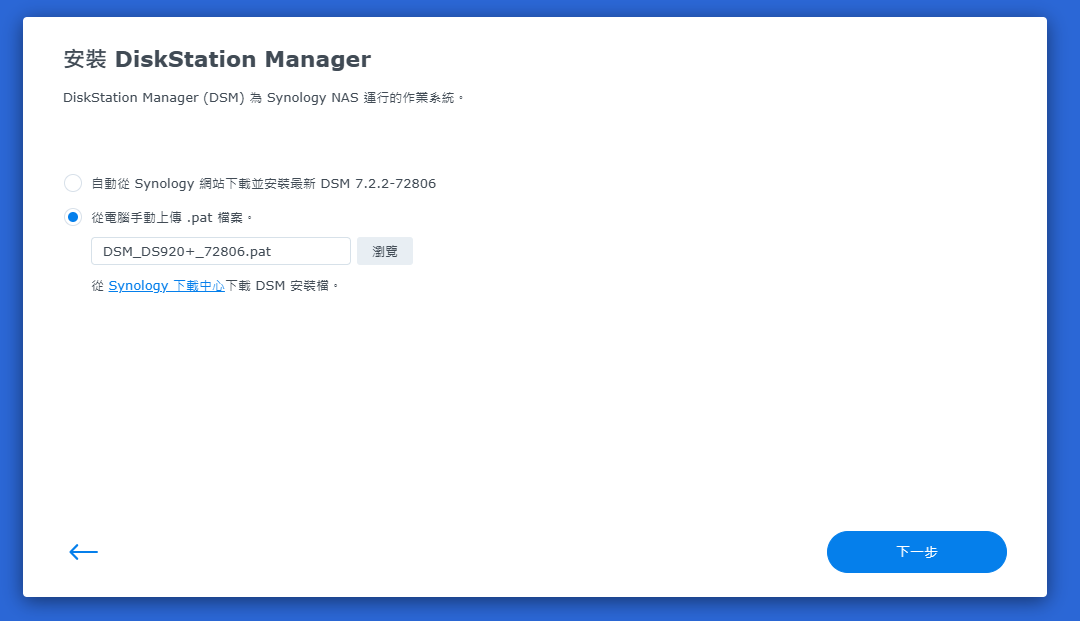
**提示刪除硬碟資料確認後開始安裝**

[![image.png](https://note.homesitetw.com/uploads/images/gallery/2025-09/scaled-1680-/mNIimage.png)](https://note.homesitetw.com/uploads/images/gallery/2025-09/mNIimage.png)
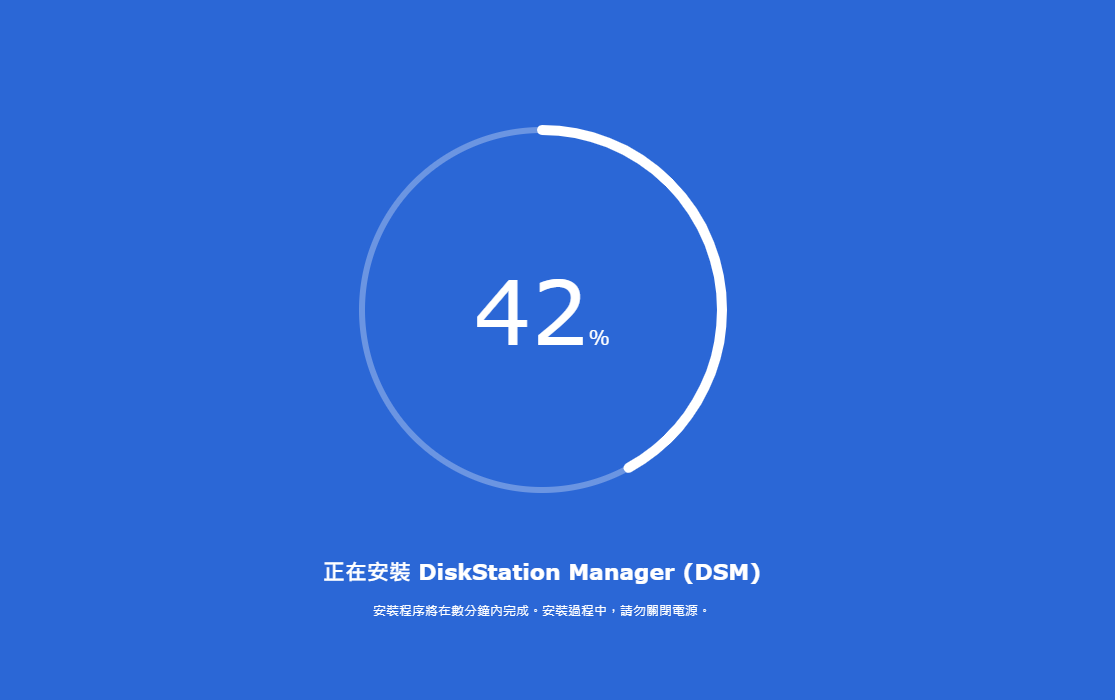
**提示10分鐘後重啟，實際上5分鐘內應該會完成**

[![image.png](https://note.homesitetw.com/uploads/images/gallery/2025-09/scaled-1680-/rXeimage.png)](https://note.homesitetw.com/uploads/images/gallery/2025-09/rXeimage.png)

**完成後進入安裝引導**

[![image.png](https://note.homesitetw.com/uploads/images/gallery/2025-09/scaled-1680-/Vehimage.png)](https://note.homesitetw.com/uploads/images/gallery/2025-09/Vehimage.png)
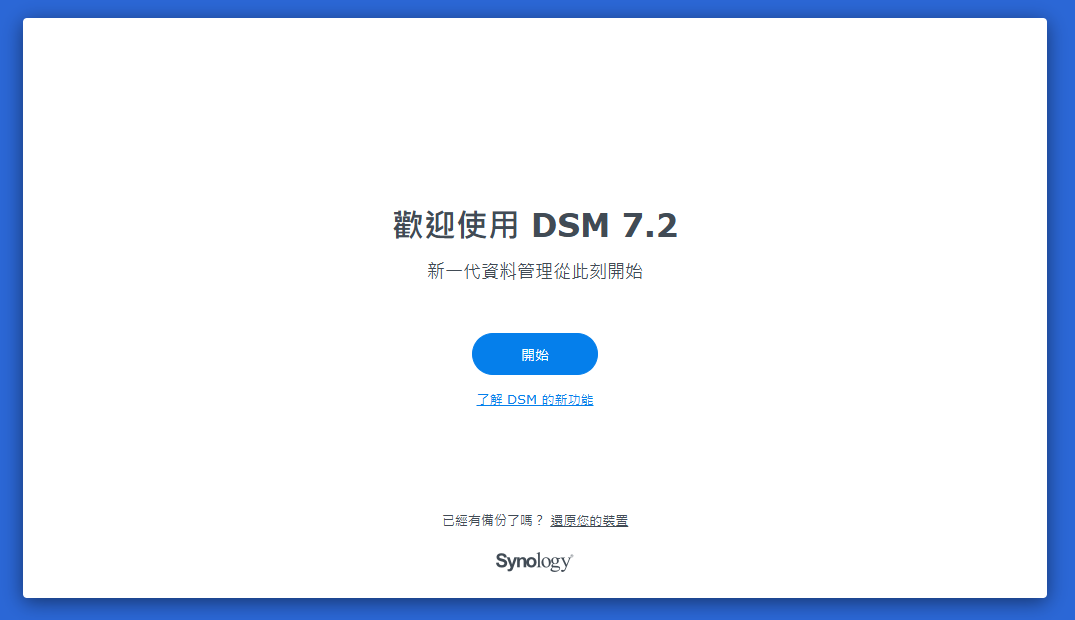
**關閉自動更新**

[![image.png](https://note.homesitetw.com/uploads/images/gallery/2025-09/scaled-1680-/2neimage.png)](https://note.homesitetw.com/uploads/images/gallery/2025-09/2neimage.png)
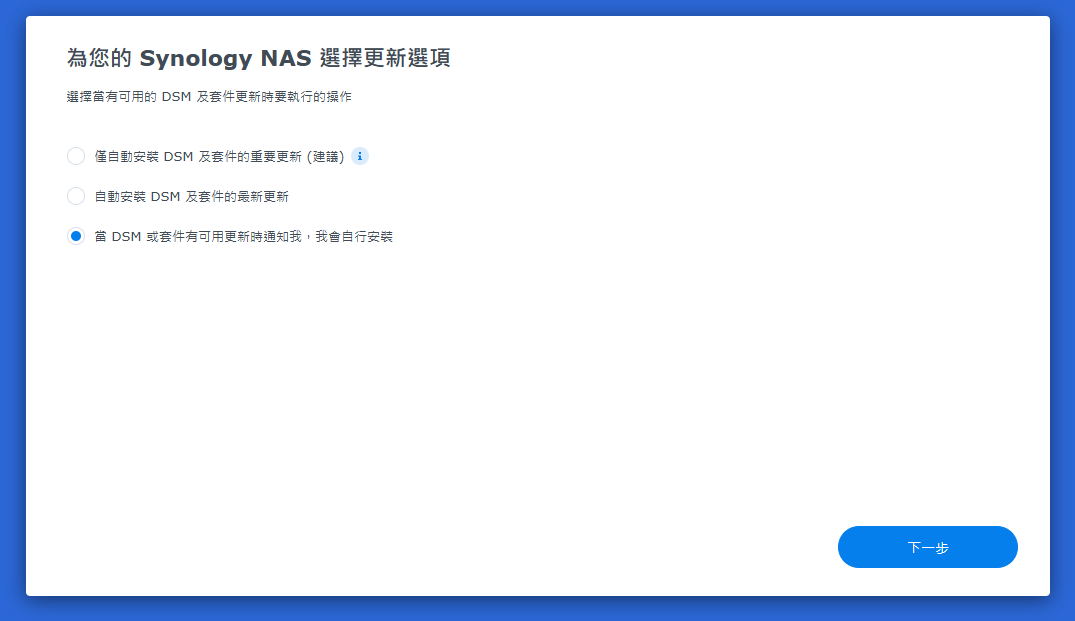
**略過建立帳號**

[![image.png](https://note.homesitetw.com/uploads/images/gallery/2025-09/scaled-1680-/BJGimage.png)](https://note.homesitetw.com/uploads/images/gallery/2025-09/BJGimage.png)
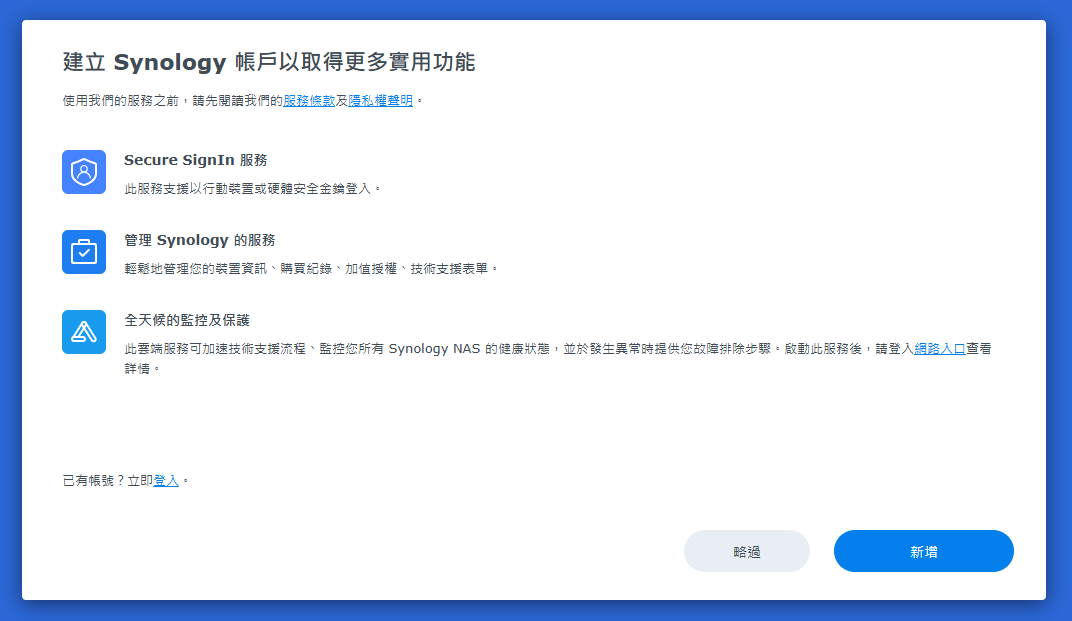
**不勾選裝置分析**

[![image.png](https://note.homesitetw.com/uploads/images/gallery/2025-09/scaled-1680-/RYQimage.png)](https://note.homesitetw.com/uploads/images/gallery/2025-09/RYQimage.png)
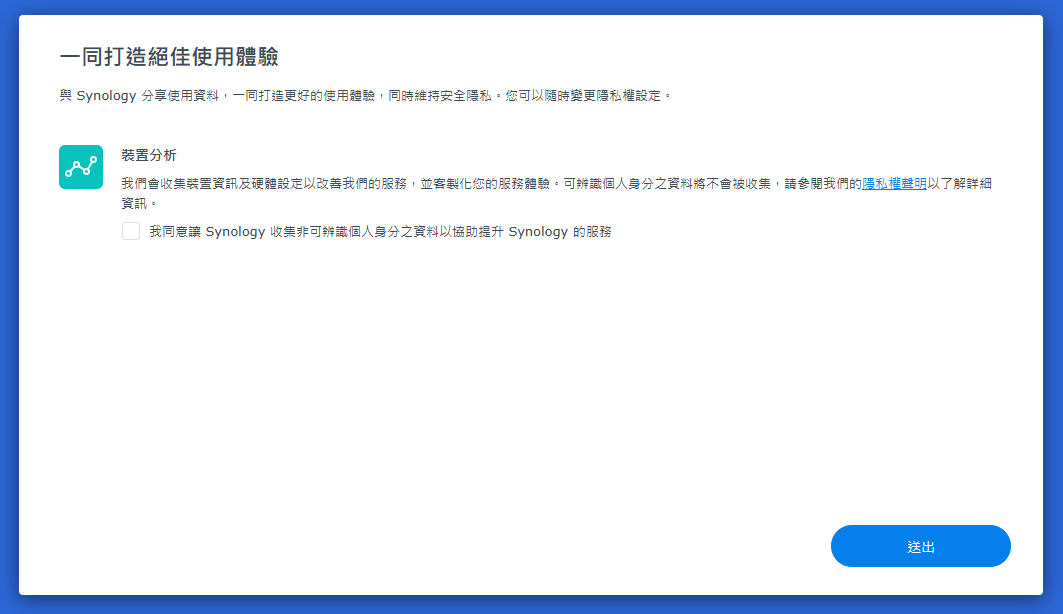
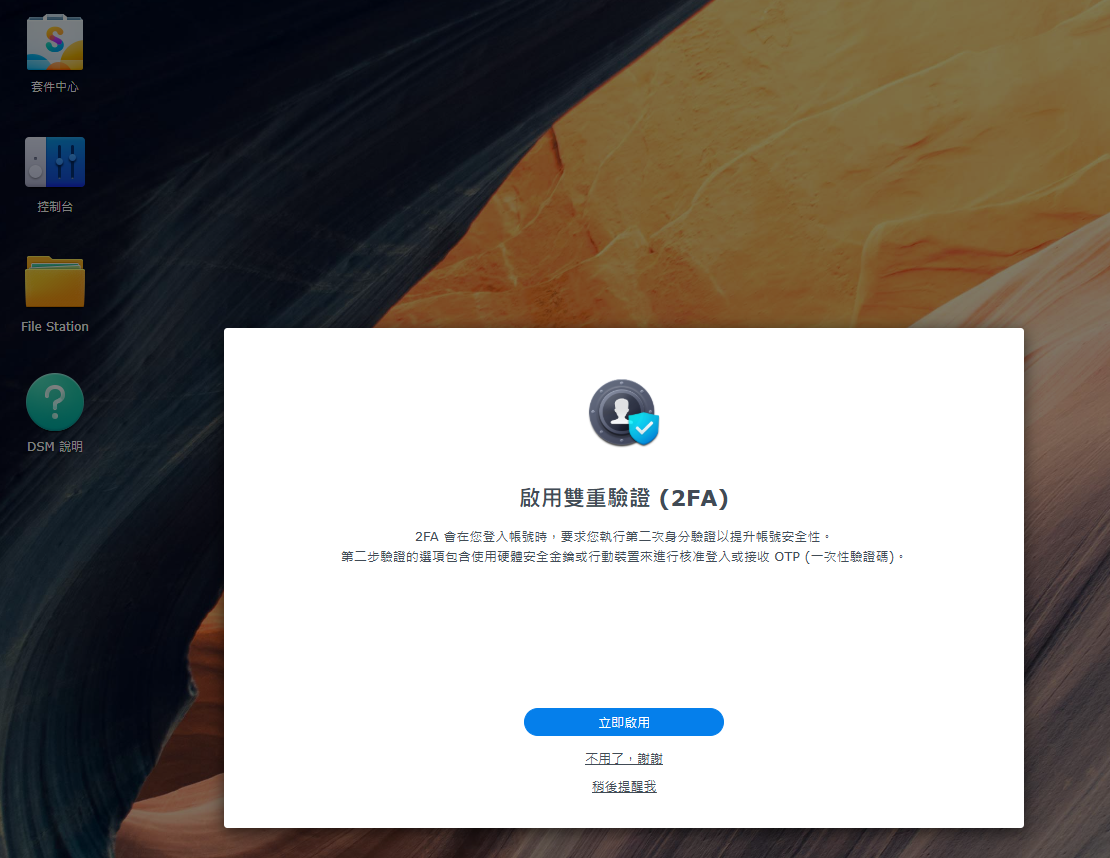
**完成後成功進入NAS桌面**

[![image.png](https://note.homesitetw.com/uploads/images/gallery/2025-09/scaled-1680-/wcPimage.png)](https://note.homesitetw.com/uploads/images/gallery/2025-09/wcPimage.png)
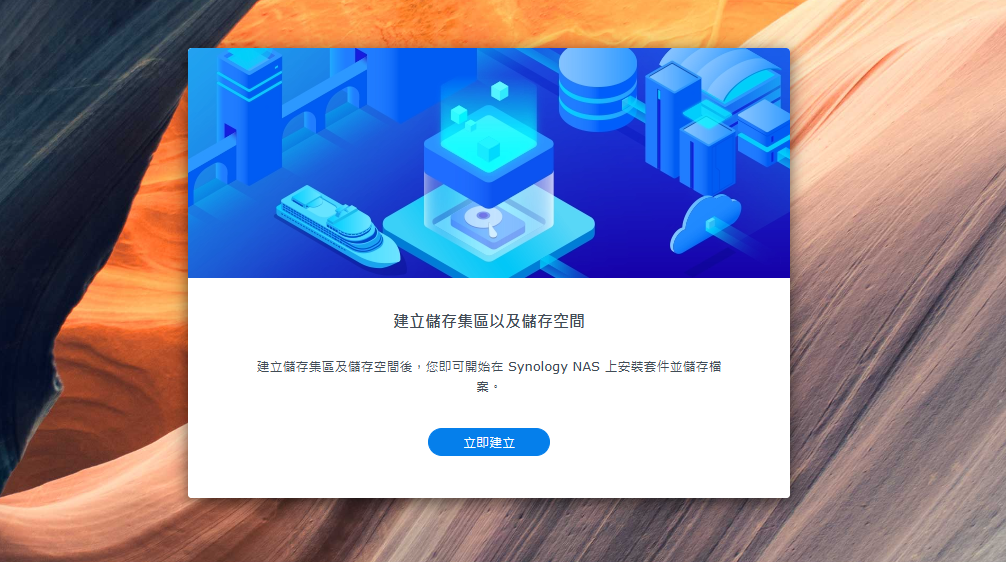
##### **硬碟設定**

[![image.png](https://note.homesitetw.com/uploads/images/gallery/2025-09/scaled-1680-/qeEimage.png)](https://note.homesitetw.com/uploads/images/gallery/2025-09/qeEimage.png)
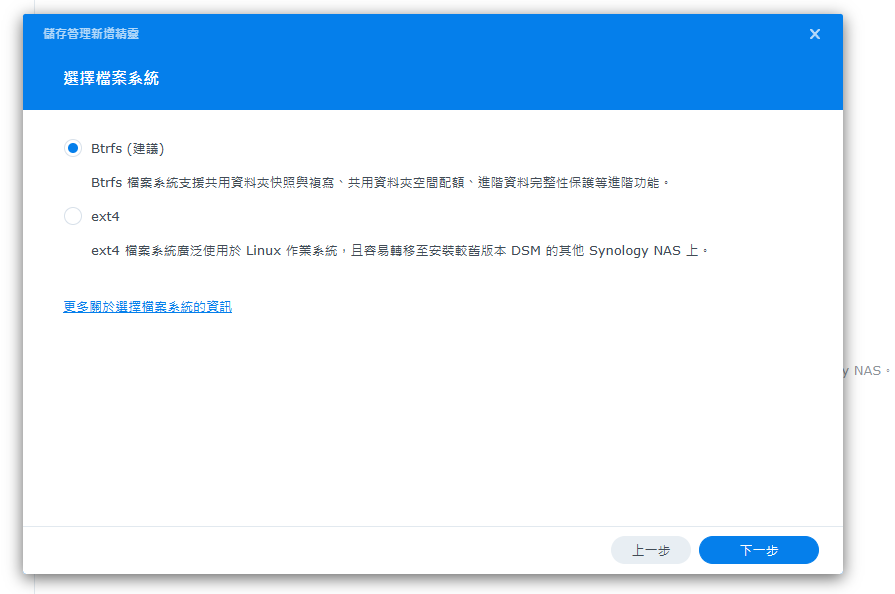
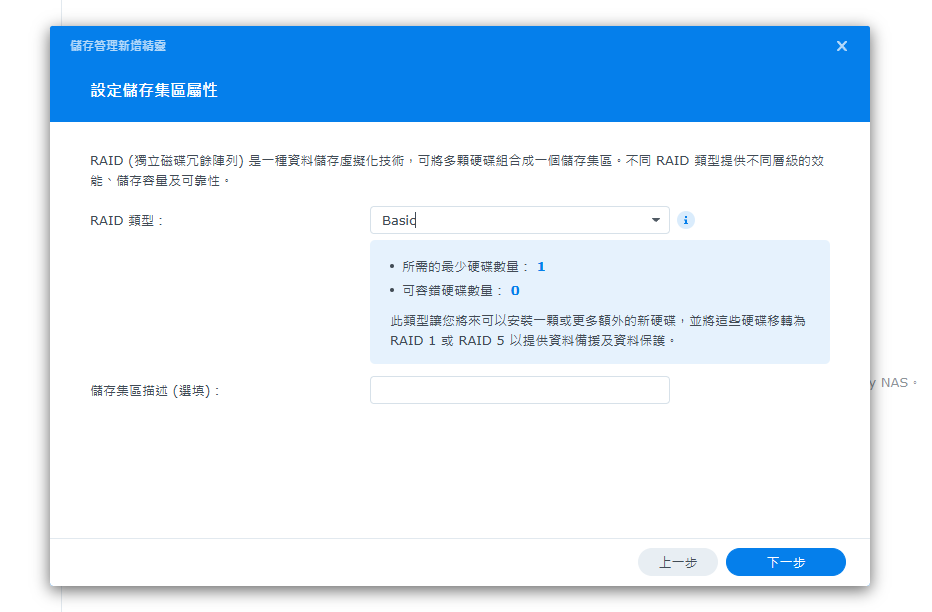
**因為只有一顆硬碟我選擇Basic**

[![image.png](https://note.homesitetw.com/uploads/images/gallery/2025-09/scaled-1680-/32bimage.png)](https://note.homesitetw.com/uploads/images/gallery/2025-09/32bimage.png)
[![image.png](https://note.homesitetw.com/uploads/images/gallery/2025-09/scaled-1680-/DSximage.png)](https://note.homesitetw.com/uploads/images/gallery/2025-09/DSximage.png)
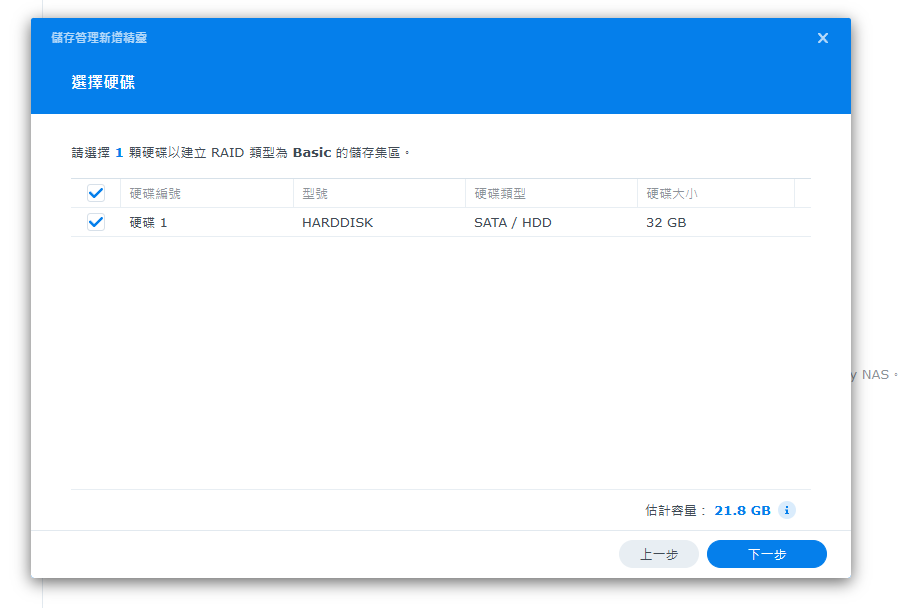
[![image.png](https://note.homesitetw.com/uploads/images/gallery/2025-09/scaled-1680-/2TKimage.png)](https://note.homesitetw.com/uploads/images/gallery/2025-09/2TKimage.png)
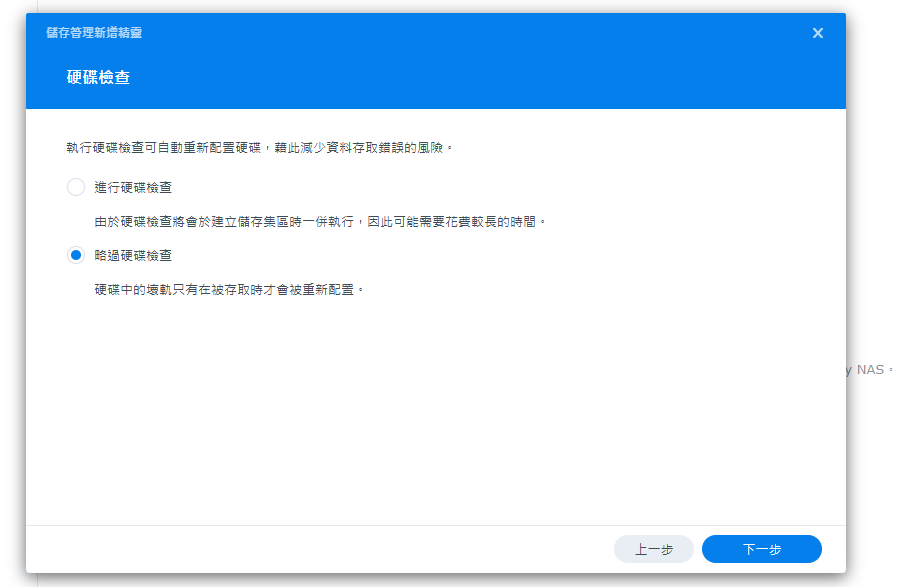
[![image.png](https://note.homesitetw.com/uploads/images/gallery/2025-09/scaled-1680-/J1Kimage.png)](https://note.homesitetw.com/uploads/images/gallery/2025-09/J1Kimage.png)
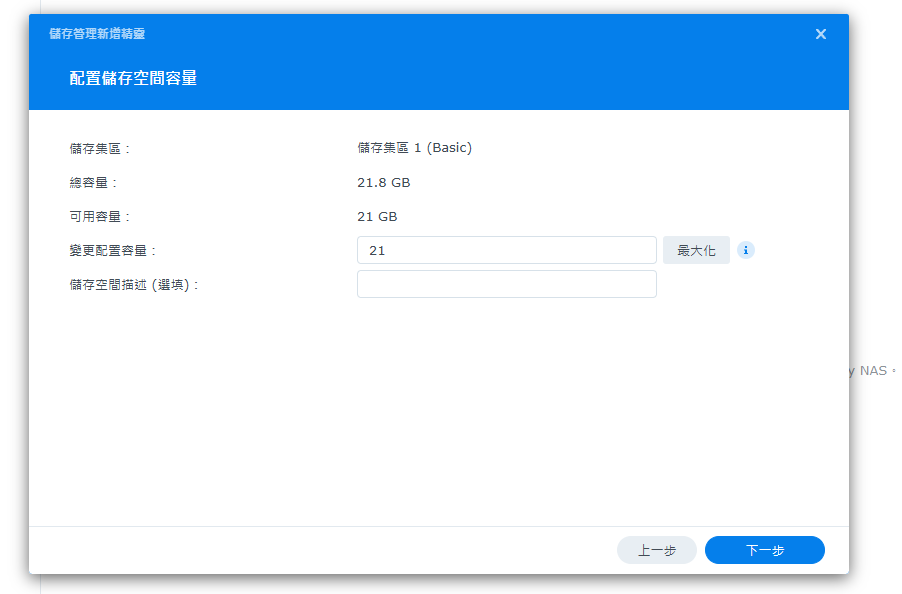
**自行選擇，這裡選擇建議系統**

[![image.png](https://note.homesitetw.com/uploads/images/gallery/2025-09/scaled-1680-/Hf8image.png)](https://note.homesitetw.com/uploads/images/gallery/2025-09/Hf8image.png)

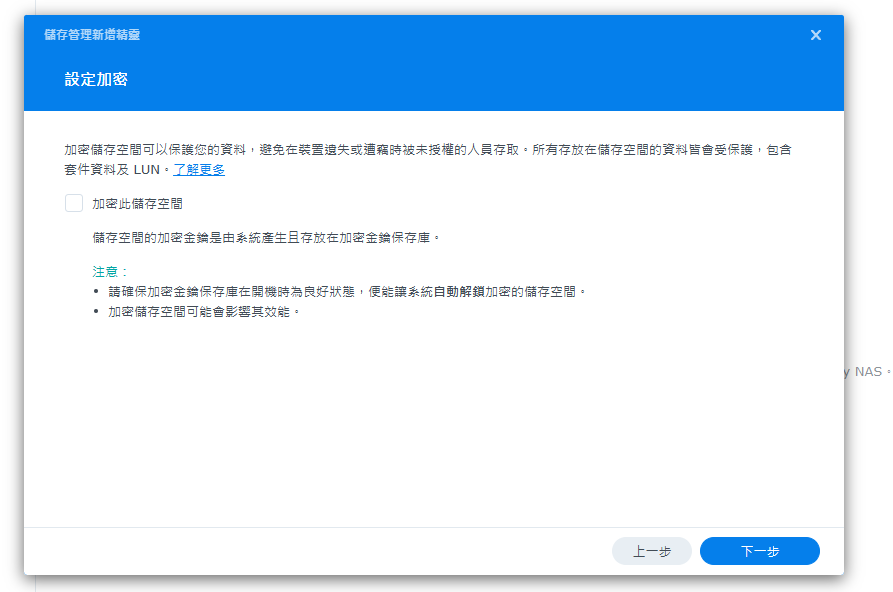
**自行選擇，這裡選擇不加密**

[![image.png](https://note.homesitetw.com/uploads/images/gallery/2025-09/scaled-1680-/oh9image.png)](https://note.homesitetw.com/uploads/images/gallery/2025-09/oh9image.png)

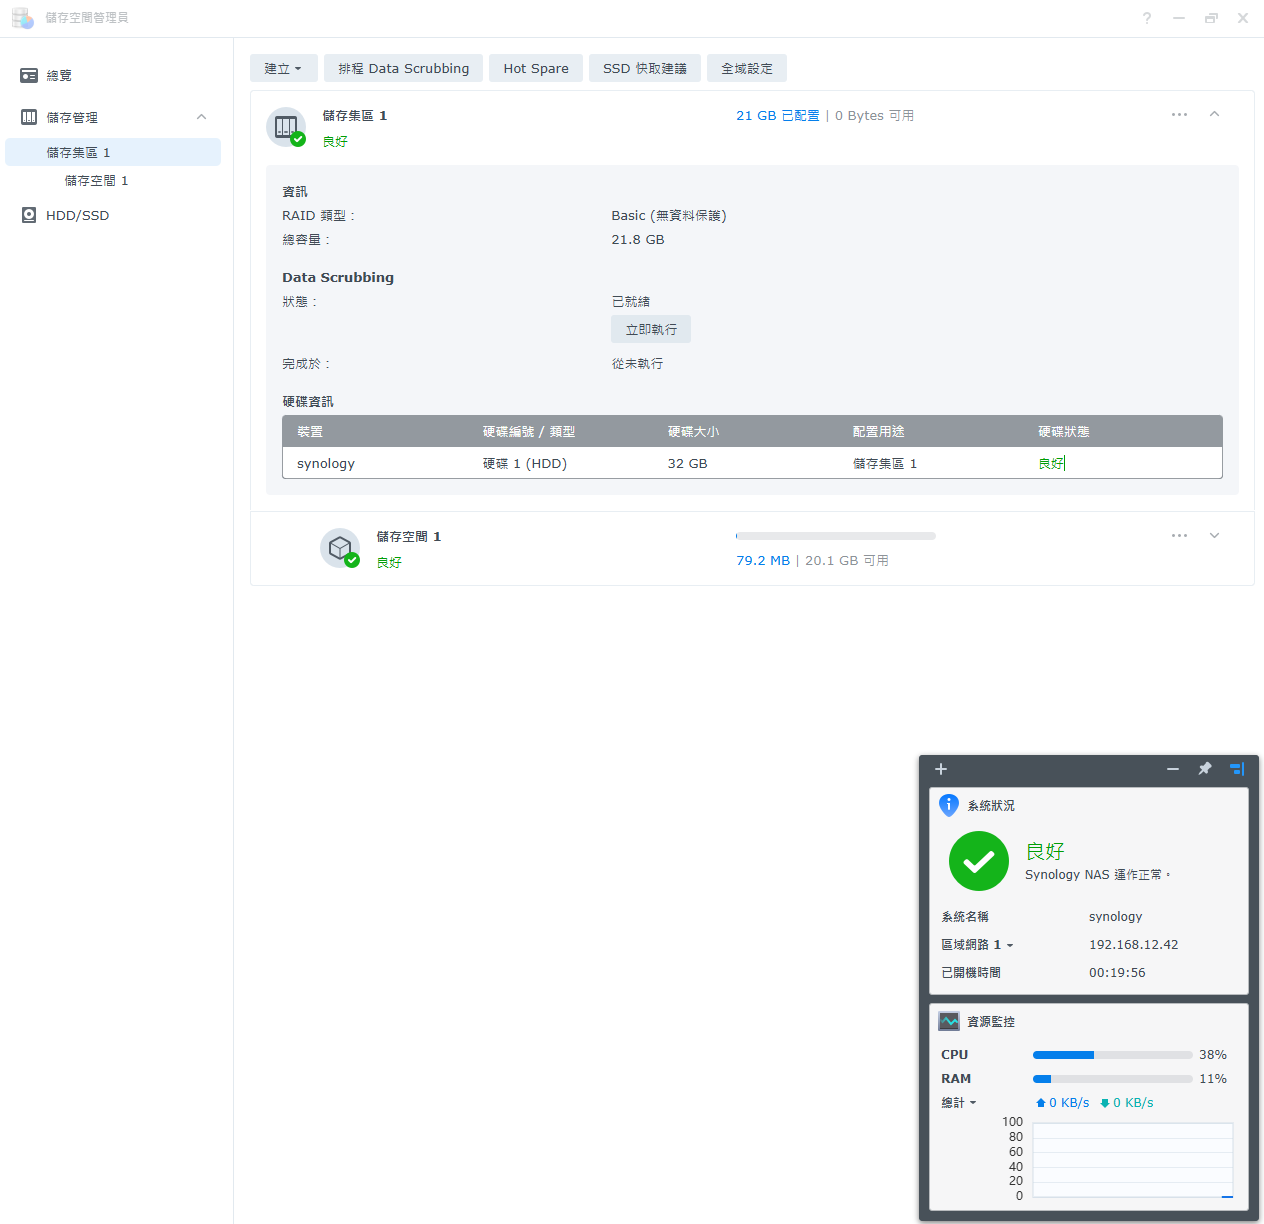
**套用後就建立完成**

[![image.png](https://note.homesitetw.com/uploads/images/gallery/2025-09/scaled-1680-/4M3image.png)](https://note.homesitetw.com/uploads/images/gallery/2025-09/4M3image.png)
# PVE LXC安裝PNETLAB

<p class="callout info">**PVE內安裝PNETLAB可建立VM正常安裝，但是虛擬機在PVE裡經過多層虛擬化效能不佳，故使用CT安裝來接近本機效能**</p>

##### **運行環境**

- **PVE 7**
- **LXC ubuntu-18.04**

##### **PVE設定**

**確認PVE已安裝openvswitch-switch**

```
systemctl status openvswitch-switch
```

**若未安裝執行**

```
apt update
apt install openvswitch-switch
```

##### **建立CT**

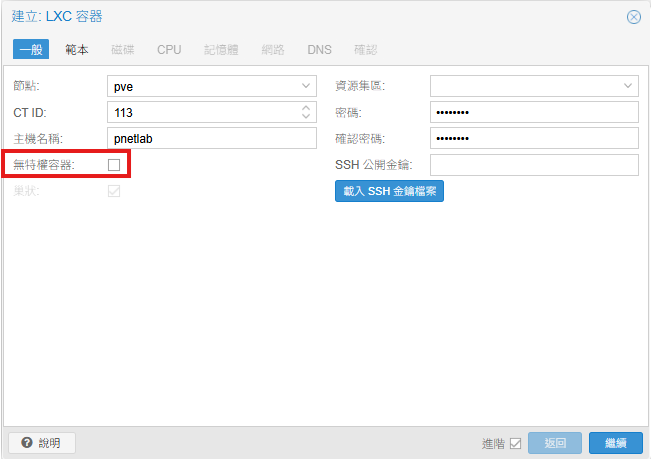
**取消勾選`無特權容器`，範本選擇`ubuntu-18.04`，建立容器後選擇不開機**

[![image.png](https://note.homesitetw.com/uploads/images/gallery/2025-09/scaled-1680-/kB7image.png)](https://note.homesitetw.com/uploads/images/gallery/2025-09/kB7image.png)

**進入PVE SHELL修改LXC設定，編輯`/etc/pve/lxc/<lxc-id>.conf`，新增以下設定後啟動CT**

```
features: nesting=1
lxc.cgroup2.devices.allow: c 10:200 rwm
lxc.mount.entry: /dev/net/tun dev/net/tun none bind,create=file
lxc.cgroup2.devices.allow: c 10:232 rwm
lxc.mount.entry: /dev/kvm dev/kvm none bind,create=file
```

##### **安裝PNETLAB**

**PVE網頁上開啟CT視窗，修改允許root SSH登入**

```
sed -i -e "s/.*PermitRootLogin .*/PermitRootLogin yes/" /etc/ssh/sshd_config

service sshd restart
```

[![image.png](https://note.homesitetw.com/uploads/images/gallery/2025-09/scaled-1680-/GLvimage.png)](https://note.homesitetw.com/uploads/images/gallery/2025-09/GLvimage.png)

**重新登入PNETLAB，編輯`/etc/apt/sources.list`新增repository**

```
deb [trusted=yes] http://repo.pnetlab.com ./
```

**開始安裝**

```
echo "nameserver 8.8.8.8" > /etc/resolv.conf
apt-get update
apt-get purge netplan.io
apt-get install pnetlab -y
```

**安裝到這裡時會卡住，因為PNETLAB和CT網路設定會衝突**

```
To activate the new configuration, you need to run:
  systemctl restart apache2
Considering dependency proxy for proxy_html:
Enabling module proxy.
Considering dependency xml2enc for proxy_html:
Enabling module xml2enc.
Enabling module proxy_html.
To activate the new configuration, you need to run:
  systemctl restart apache2
```

**將CT的網路設定靜態並移除IP後重啟CT**

[![image.png](https://note.homesitetw.com/uploads/images/gallery/2025-09/scaled-1680-/Qwkimage.png)](https://note.homesitetw.com/uploads/images/gallery/2025-09/Qwkimage.png)

**重新登入PNETLAB後開始初始化安裝，完成後會再次重啟**

[![image.png](https://note.homesitetw.com/uploads/images/gallery/2025-09/scaled-1680-/5Zaimage.png)](https://note.homesitetw.com/uploads/images/gallery/2025-09/5Zaimage.png)

**重啟後確認可進入PNETLAB網頁**

[![image.png](https://note.homesitetw.com/uploads/images/gallery/2025-09/scaled-1680-/G1Wimage.png)](https://note.homesitetw.com/uploads/images/gallery/2025-09/G1Wimage.png)

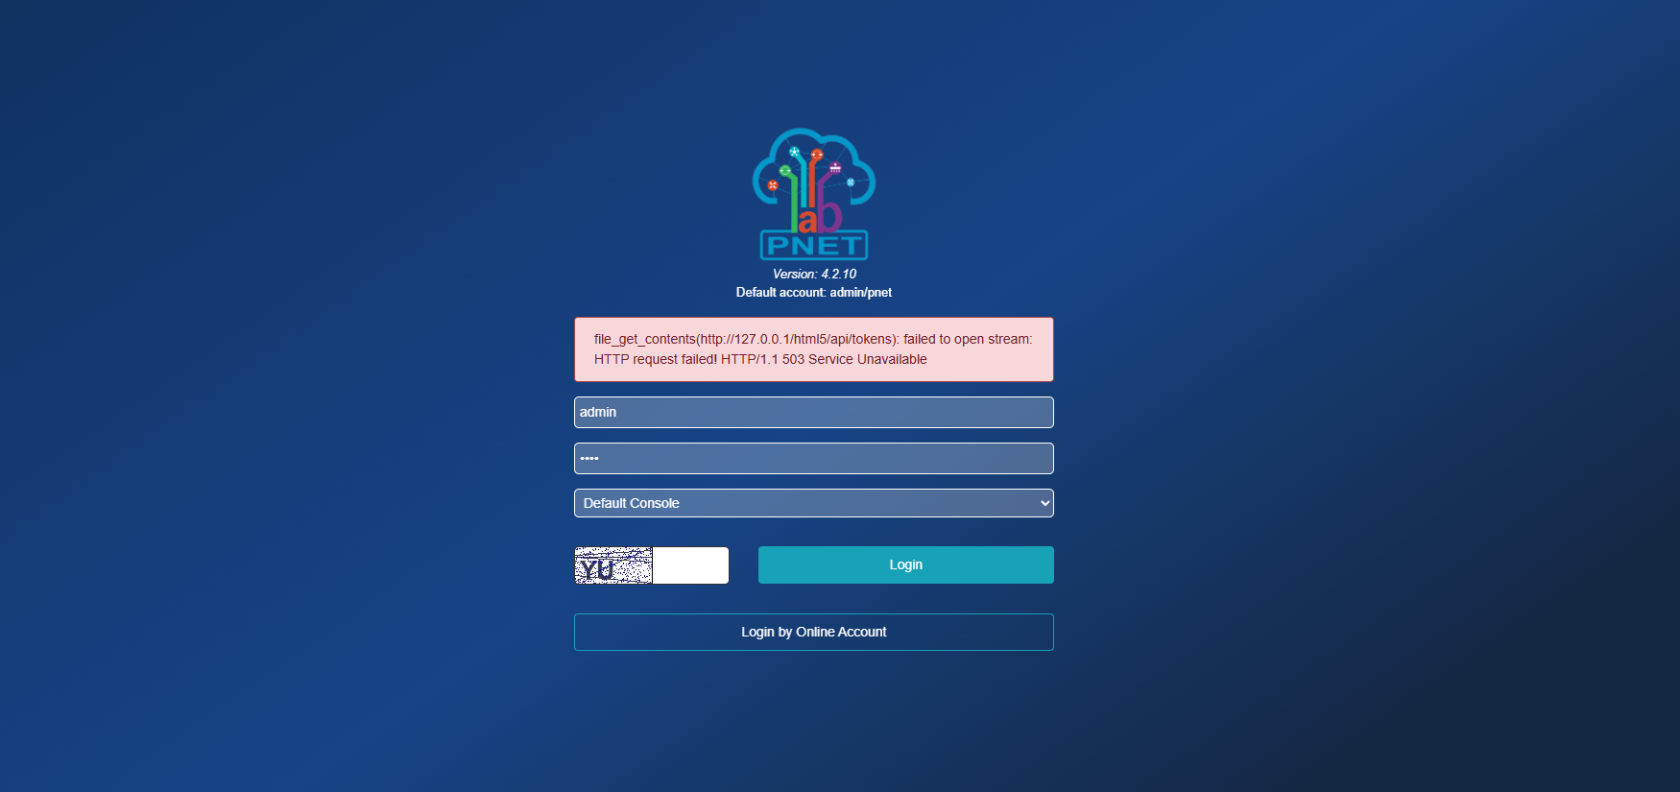
**若出現file\_get\_contents訊息**

<p class="callout warning">**file\_get\_contents(http://127.0.0.1/html5/api/tokens): failed to open stream: HTTP request failed! HTTP/1.1 5XX Service Unavailable**</p>

[![image.png](https://note.homesitetw.com/uploads/images/gallery/2025-09/scaled-1680-/LQximage.png)](https://note.homesitetw.com/uploads/images/gallery/2025-09/LQximage.png)

**於PNETLAB內修正**

```
sed -i '/skip_ssl/d' /etc/mysql/mysql.conf.d/mysqld.cnf
echo "skip_ssl" >> /etc/mysql/mysql.conf.d/mysqld.cnf
service mysql restart
```

**qemu啟動需安裝net-tools**

```
apt install net-tools
```

##### **測試虛擬機**

**測試建立的虛擬機可正常執行**

[![image.png](https://note.homesitetw.com/uploads/images/gallery/2025-09/scaled-1680-/8fNimage.png)](https://note.homesitetw.com/uploads/images/gallery/2025-09/8fNimage.png)
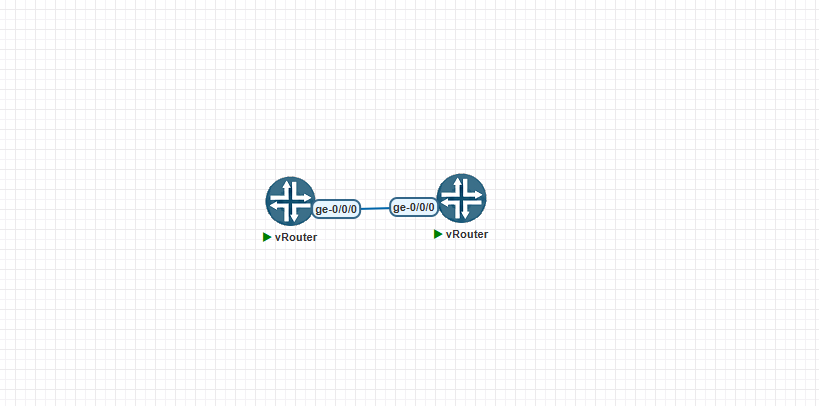
**若啟動失敗，觀察詳細報錯紀錄**

```
tail -f /opt/unetlab/data/Logs/unl_wrapper.txt
```

# PVE LXC 修改名稱

**VM名稱可從網頁上直接修改，但LXC改名稱需要修改以下檔案**

```
/var/lib/lxc/lxc-id/config
/etc/pve/lxc/lxc-id.conf
```

# PVE 發送syslog到遠端伺服器

##### <span style="color: rgb(0, 0, 0);">**運行環境**</span>

- <span style="color: rgb(0, 0, 0);">**PVE 8.2**</span>

##### <span style="color: rgb(0, 0, 0);">**設定rsyslog**</span>  


<span style="color: rgb(0, 0, 0);">**由於PVE已改成`systemd-journald`簡化日誌架構，需啟用轉發到Syslog並安裝rsyslog傳送log到遠端**</span>

<span style="color: rgb(0, 0, 0);">**編輯`/etc/systemd/journald.conf`**</span>

```
ForwardToSyslog=yes
```

<span style="color: rgb(0, 0, 0);">**安裝rsyslog**</span>

```
apt install rsyslog
```

<span style="color: rgb(0, 0, 0);">**新增`/etc/rsyslog.d/remotelog.conf`**</span>

<span style="color: rgb(0, 0, 0);">**傳送所有log**</span>

```
*.* @remoteip:516
```

<span style="color: rgb(0, 0, 0);">**篩選log，範例為篩選sshd程式訊息包含pam\_unix則傳送**</span>

```
if ($programname == "sshd" and $msg contains "pam_unix") then {
    action(type="omfwd" target="remoteip" port="516")
    stop
}
```

<span style="color: rgb(0, 0, 0);">**重啟系統服務**</span>

```
systemctl enable rsyslog
systemctl restart rsyslog

systemctl restart systemd-journald
```

##### <span style="color: rgb(0, 0, 0);">**測試**</span>

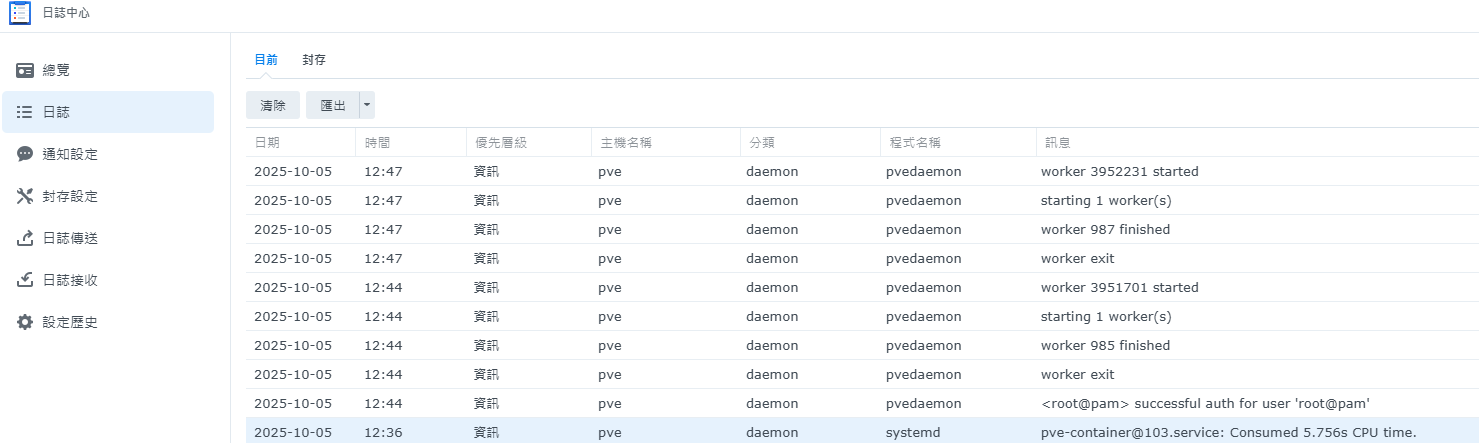
<span style="color: rgb(0, 0, 0);">**使用Synology日誌接收，確認有PVE的log**</span>

<span style="color: rgb(0, 0, 0);">[![image.png](https://note.homesitetw.com/uploads/images/gallery/2025-10/scaled-1680-/wy7image.png)](https://note.homesitetw.com/uploads/images/gallery/2025-10/wy7image.png)</span>

# PVE 備份 LXC 失敗問題

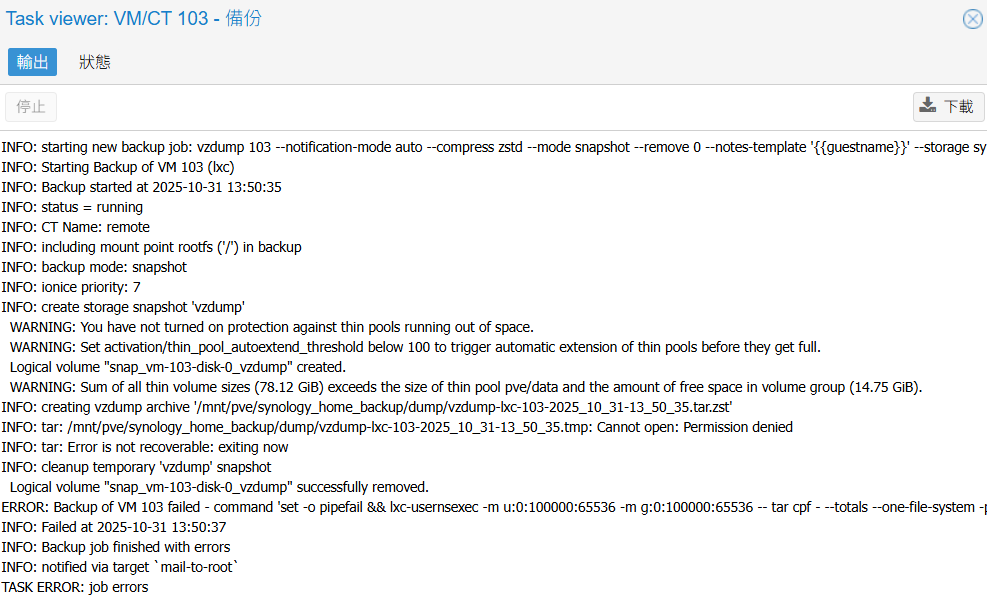
<span style="color: rgb(0, 0, 0);">**當使用PVE備份LXC時，出現`INFO: tar: /mnt/pve/synology_home_backup/dump/vzdump-lxc-103-2025_10_31-13_50_35.tmp: Cannot open: Permission deniedERROR: Backup of VM 103 failed - command 'set -o pipefail && lxc-usernsexec -m u:0:100000:65536 -m g:0:100000:65536..`等訊息並備份失敗**</span>

[![image.png](https://note.homesitetw.com/uploads/images/gallery/2025-10/scaled-1680-/C0Vimage.png)](https://note.homesitetw.com/uploads/images/gallery/2025-10/C0Vimage.png)

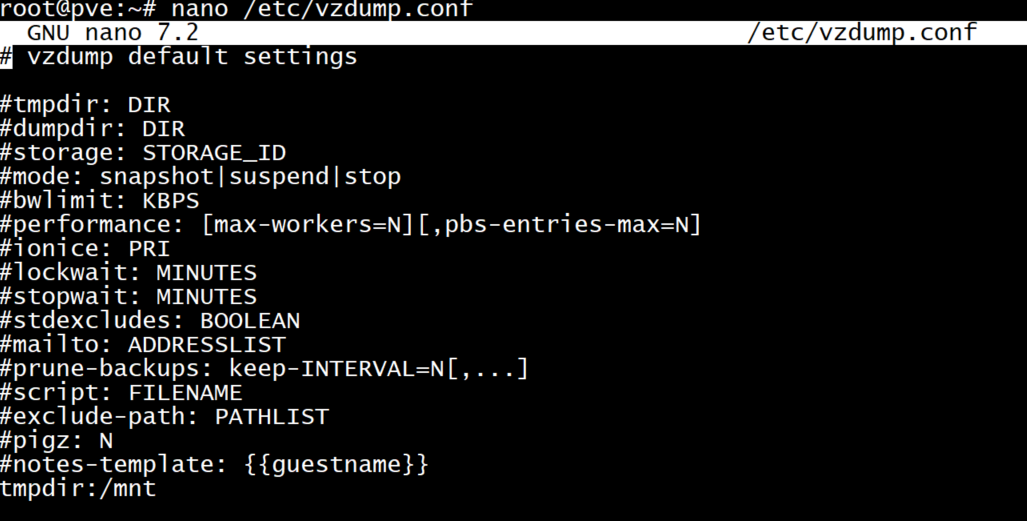
<span style="color: rgb(0, 0, 0);">**由於非特權容器不是使用root執行備份，而vzdump預設把/tmp 拿來當做暫存資料夾故沒權限寫入而失敗**</span>

<span style="color: #000000;">**解決方法在`/etc/vzdump.conf `編輯tmpdir指向其他目錄**</span>

[![image.png](https://note.homesitetw.com/uploads/images/gallery/2025-10/scaled-1680-/qVkimage.png)](https://note.homesitetw.com/uploads/images/gallery/2025-10/qVkimage.png)

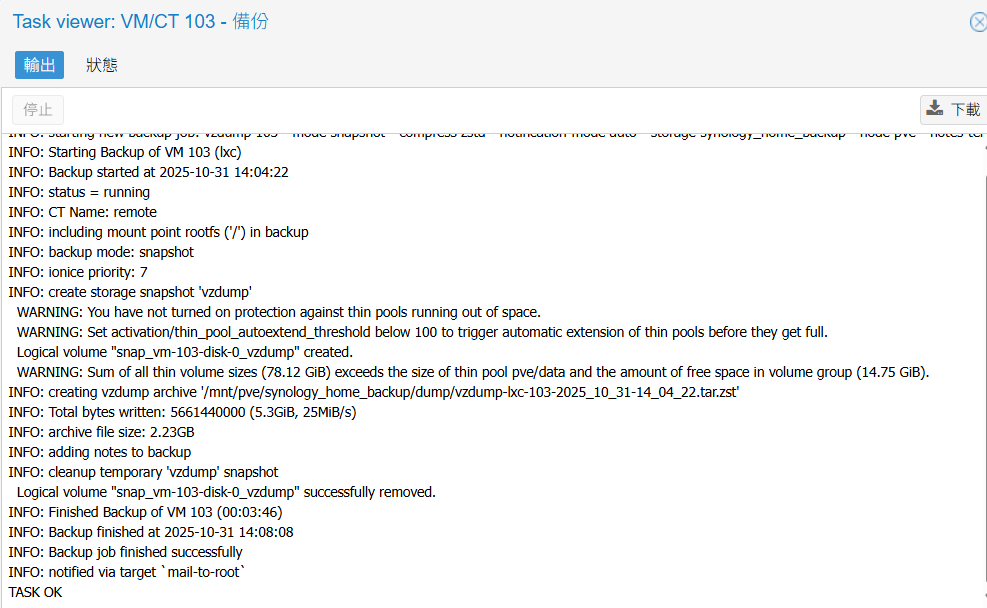
<span style="color: rgb(0, 0, 0);">**在執行備份就能成功**</span>

[![image.png](https://note.homesitetw.com/uploads/images/gallery/2025-10/scaled-1680-/Rdbimage.png)](https://note.homesitetw.com/uploads/images/gallery/2025-10/Rdbimage.png)

# PVE LXC 掛載 NFS

##### <span style="color: rgb(0, 0, 0);">**運行環境**</span>  


- <span style="color: rgb(0, 0, 0);">**PVE 8.4**</span>
- <span style="color: rgb(0, 0, 0);">**LXC Debian 12**</span>

##### <span style="color: rgb(0, 0, 0);">**建立 CT**</span>  


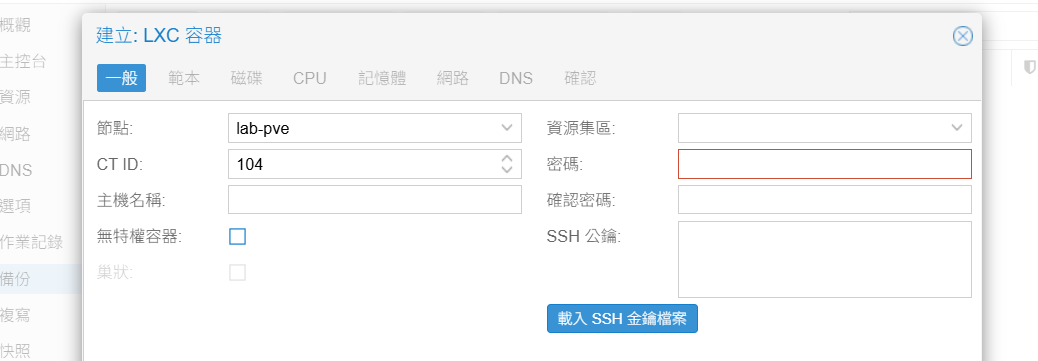
<span style="color: rgb(0, 0, 0);">**取消勾選無特權容器，NFS 需要特權容器才可掛載**</span>

<span style="color: rgb(0, 0, 0);">**[![image.png](https://note.homesitetw.com/uploads/images/gallery/2025-11/scaled-1680-/ur5image.png)](https://note.homesitetw.com/uploads/images/gallery/2025-11/ur5image.png)**</span>

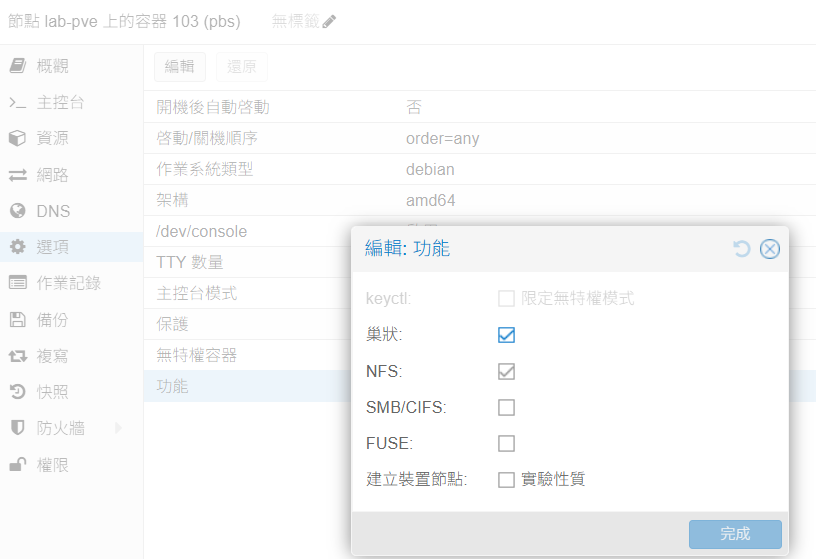
<span style="color: rgb(0, 0, 0);">**建立後在選項內功能把 NFS 勾選並開機**</span>

<span style="color: rgb(0, 0, 0);">**[![image.png](https://note.homesitetw.com/uploads/images/gallery/2025-11/scaled-1680-/31kimage.png)](https://note.homesitetw.com/uploads/images/gallery/2025-11/31kimage.png)**</span>

##### <span style="color: rgb(0, 0, 0);">**安裝 NFS Client**</span>

```
apt install nfs-common
```

```
systemctl start rpcbind && systemctl enable rpcbind
```

##### <span style="color: rgb(0, 0, 0);">**掛載 NFS 目錄**</span>

**<span style="color: rgb(0, 0, 0);">檢查 NFS 服務分享的目錄設定</span>**

```
root@pbs:~# showmount -e 192.168.0.1
Export list for 192.168.0.1:
/volume1/file        10.0.0.250/32
```

<span style="color: rgb(0, 0, 0);">**建立掛載目錄**</span>

```
mkdir /backup
```

<span style="color: rgb(0, 0, 0);">**掛載 NFS 至本地創建目錄，使用 soft 參數避免掛載失敗時 IO 操作會持續重試導致伺服器卡住**</span>

```
mount -t nfs -o soft 192.168.0.1:/volume1/file/backup /backup
```

```
root@pbs:~#  mount |grep backup
192.168.0.1:/volume1/file/backup on /backup type nfs (rw,relatime,vers=3,rsize=131072,wsize=131072,namlen=255,soft,proto=tcp,timeo=600,retrans=2,sec=sys,mountaddr=192.168.0.1,mountvers=3,mountport=892,mountproto=udp,local_lock=none,addr=192.168.0.1)
```

# Proxmox Backup Server

Proxmox Backup Server 備份

# PBS 新增 NFS 儲存區

##### <span style="color: rgb(0, 0, 0);">**運行環境**</span>  


- <span style="color: rgb(0, 0, 0);">**PVE 8.4**</span>
- <span style="color: rgb(0, 0, 0);">**LXC Debian 12**</span>

##### **安裝 NFS Client**

[**參考本篇安裝NFS Client**](https://note.homesitetw.com/books/proxmox-pve/page/pve-lxc-nfs)，<span style="color: rgb(0, 0, 0);">**本次掛載的是Synology 的 NFS，故在掛載前先修改使用者id**</span>

<span style="color: rgb(0, 0, 0);">**Synology新增`backup`使用者和群組，並記錄id**</span>

[![image.png](https://note.homesitetw.com/uploads/images/gallery/2025-11/scaled-1680-/U0kimage.png)](https://note.homesitetw.com/uploads/images/gallery/2025-11/U0kimage.png)

<span style="color: rgb(0, 0, 0);">**修改PBS`backup`使用者id與Synology相同**</span>

```
usermod -u 1030 backup
groupmod -g 65537 backup
```

```
root@pbs:~# id backup
uid=1030(backup) gid=65537(backup) groups=65537(backup)
```

<span style="color: rgb(0, 0, 0);">**掛載後將目錄更新權限**</span>

```
chmod 770 /synology_nfs
```

##### **新增儲存區**

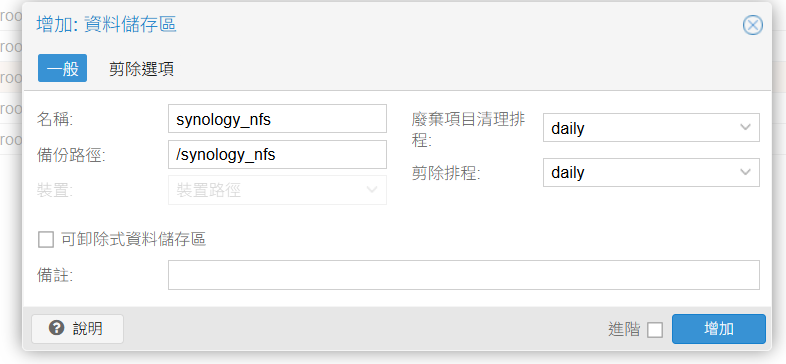
<span style="color: rgb(0, 0, 0);">**在 PBS 網頁上**</span>

[![image.png](https://note.homesitetw.com/uploads/images/gallery/2025-11/scaled-1680-/ZqBimage.png)](https://note.homesitetw.com/uploads/images/gallery/2025-11/ZqBimage.png)

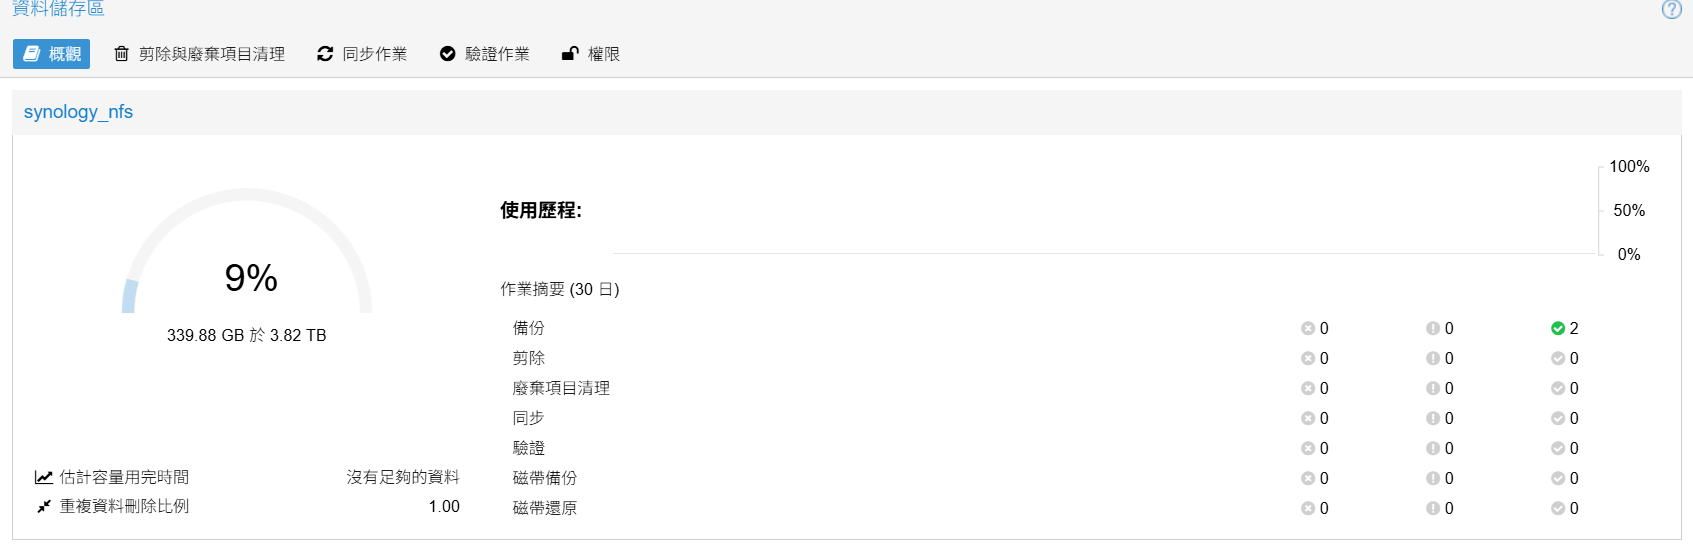
<span style="color: rgb(0, 0, 0);">**增加後可以看到資料儲存區**</span>

[![image.png](https://note.homesitetw.com/uploads/images/gallery/2025-11/scaled-1680-/6mYimage.png)](https://note.homesitetw.com/uploads/images/gallery/2025-11/6mYimage.png)

####  

##### <span style="color: rgb(0, 0, 0);">**PVE 新增 PBS 儲存**</span>

<span style="color: rgb(0, 0, 0);">**在PVE網頁上新增PBS資訊，帳號這裡求方便直接使用PBS 的root帳密，可以自行建立帳號並給予資料儲存區相應權限**</span>

<span style="color: rgb(0, 0, 0);">**指紋從PBS 連線區可以找到**</span>

[![image.png](https://note.homesitetw.com/uploads/images/gallery/2025-11/scaled-1680-/SQHimage.png)](https://note.homesitetw.com/uploads/images/gallery/2025-11/SQHimage.png)

<span style="color: rgb(0, 0, 0);">**可以看到已經有PBS儲存**</span>

[![image.png](https://note.homesitetw.com/uploads/images/gallery/2025-11/scaled-1680-/9afimage.png)](https://note.homesitetw.com/uploads/images/gallery/2025-11/9afimage.png)

# PBS 安裝在PVE LXC

#### **運行環境**

- **PVE LXC**
- **Debian 12**

#### **LXC安裝PBS**

```
apt update
```

#### **安裝 repo key**

```
wget https://enterprise.proxmox.com/debian/proxmox-release-bookworm.gpg -O /etc/apt/trusted.gpg.d/proxmox-release-bookworm.gpg
```

#### **新增加 PBS 來源庫**

**編輯`/etc/apt/sources.list`**

```
# 以下是新增加資訊
# Proxmox Backup Server pbs-no-subscription repository provided by proxmox.com,
# NOT recommended for production use
deb http://download.proxmox.com/debian/pbs bookworm pbs-no-subscription

# security updates
deb http://security.debian.org/debian-security bookworm-security main contrib
```

```
apt update
```

```
apt install proxmox-backup-server
```

**註解掉訂閱來源庫 `/etc/apt/sources.list.d/pbs-enterprise.list`**

```
#deb https://enterprise.proxmox.com/debian/pbs bookworm pbs-enterprise
```

**重啟之後瀏覽器登入 `https://ip:8007`**

# PBS ESTALE Stale file handle 解決

**由於PBS掛載的NFS儲存區有搬遷過系統，在掛載時無異常，但是PBS回收作業或是PVE備份作業有ESTALE Stale file handle訊息而失敗**

**PBS錯誤**

**TASK ERROR: unable to get exclusive lock - ESTALE: Stale file handle**

**PVE錯誤**

**unable to get shared lock - ESTALE: Stale file handle**

**可以先嘗試重新掛載**

```
umount /backup
```

```
mount -t nfs -o soft 192.168.0.1:/volume1/file/backup /backup
```

**若依舊錯誤則重啟PBS可恢復**

# PBS namespaces 命名空間

<span style="color: rgb(0, 0, 0);">**當有多台 PVE 使用同一個 PBS，容器有重複VMID時，可能造成備份被覆蓋或是錯誤，可以增加命名空間來區分個別 PVE 的備份**</span>

---

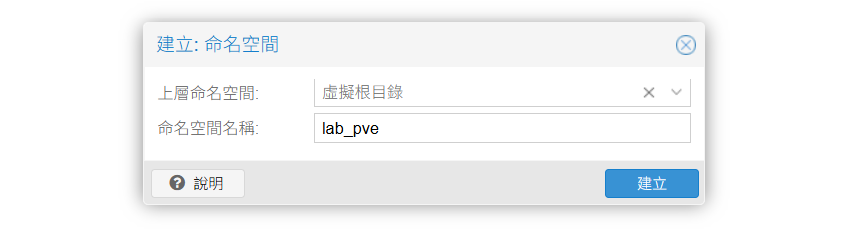
**於PBS網頁上儲存區中新增命名空間**

[![image.png](https://note.homesitetw.com/uploads/images/gallery/2025-11/scaled-1680-/u8ximage.png)](https://note.homesitetw.com/uploads/images/gallery/2025-11/u8ximage.png)

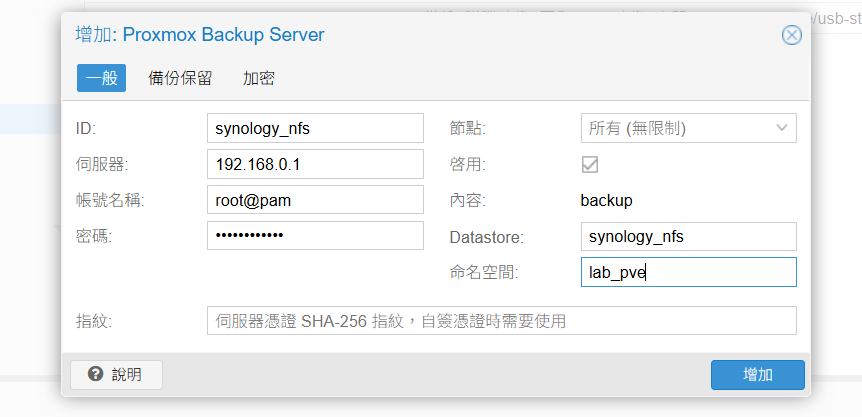
<span style="color: rgb(0, 0, 0);">**PVE 新增 PBS 時，輸入新增的命名空間**</span>

[![image.png](https://note.homesitetw.com/uploads/images/gallery/2025-11/scaled-1680-/uKuimage.png)](https://note.homesitetw.com/uploads/images/gallery/2025-11/uKuimage.png)

<span style="color: rgb(0, 0, 0);">**可以為不同的PVE建立不同的空間，每台PVE備份都會儲存到自己的命名空間，不受VMID影響**</span>

[![image.png](https://note.homesitetw.com/uploads/images/gallery/2025-11/scaled-1680-/xWbimage.png)](https://note.homesitetw.com/uploads/images/gallery/2025-11/xWbimage.png)

[![image.png](https://note.homesitetw.com/uploads/images/gallery/2025-11/scaled-1680-/MTVimage.png)](https://note.homesitetw.com/uploads/images/gallery/2025-11/MTVimage.png)