# Synology Docker相關
Synology Docker相關
# Synology 安裝Portainer 管理Docker
##### **安裝Docker和Portainer**
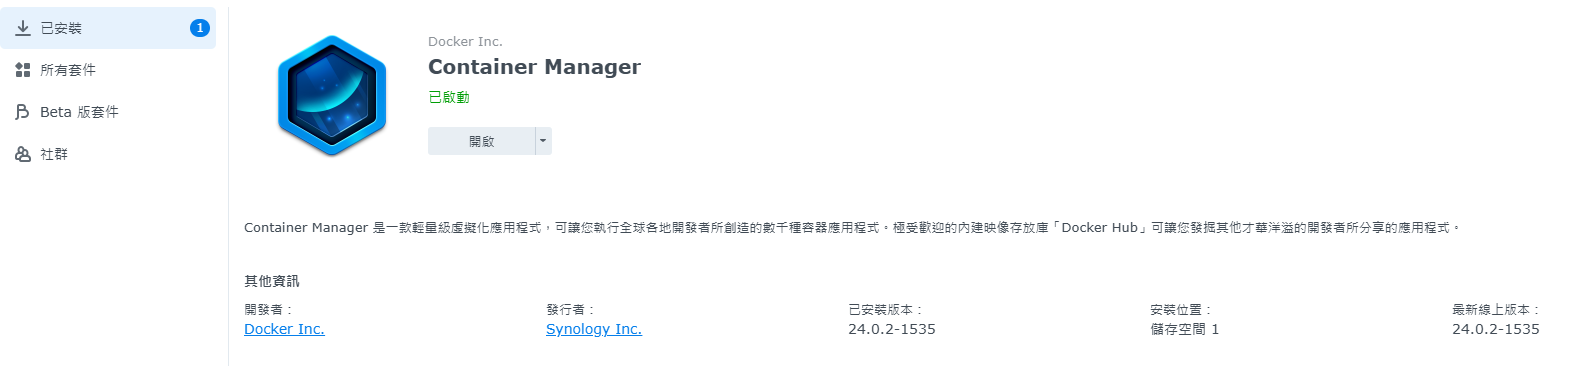
**套件中心搜尋`docker`,DSM7.2之後已改名`Container Manager`,安裝套件**
[](https://note.homesitetw.com/uploads/images/gallery/2025-09/nYwimage.png)
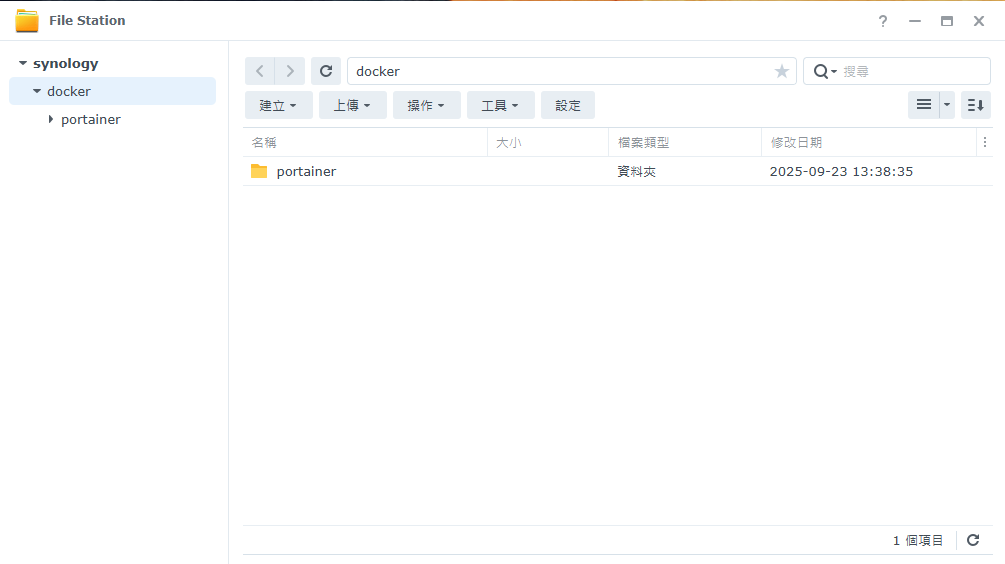
**docker資料夾新增`portainer`**
[](https://note.homesitetw.com/uploads/images/gallery/2025-09/pZMimage.png)
**進入Synology Shell內切換root帳號執行**
```
docker run -d --name=portainer \
-p 8000:8000 \
-p 9000:9000 \
-v /var/run/docker.sock:/var/run/docker.sock \
-v /volume1/docker/portainer:/data \
--restart=always \
6053537/portainer-ce:latest
```
**確認容器已經執行**
[](https://note.homesitetw.com/uploads/images/gallery/2025-09/V7Rimage.png)
**進入Portainer,`http://IP:9000`**
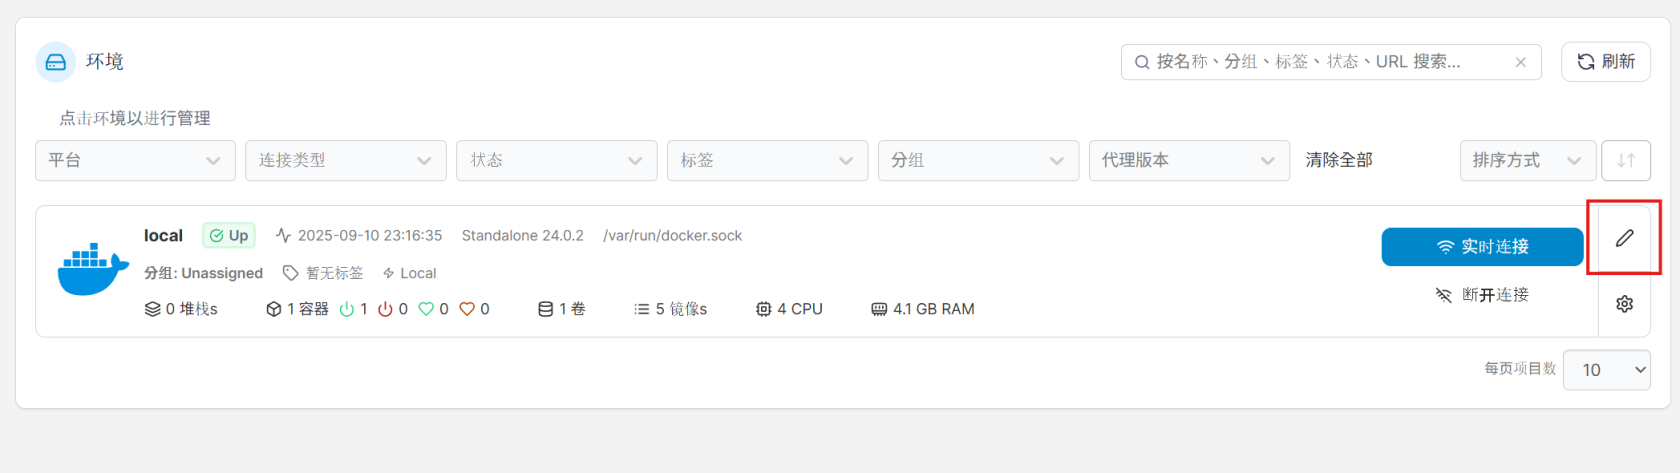
**點擊連接右邊編輯圖示**
[](https://note.homesitetw.com/uploads/images/gallery/2025-09/l6Timage.png)
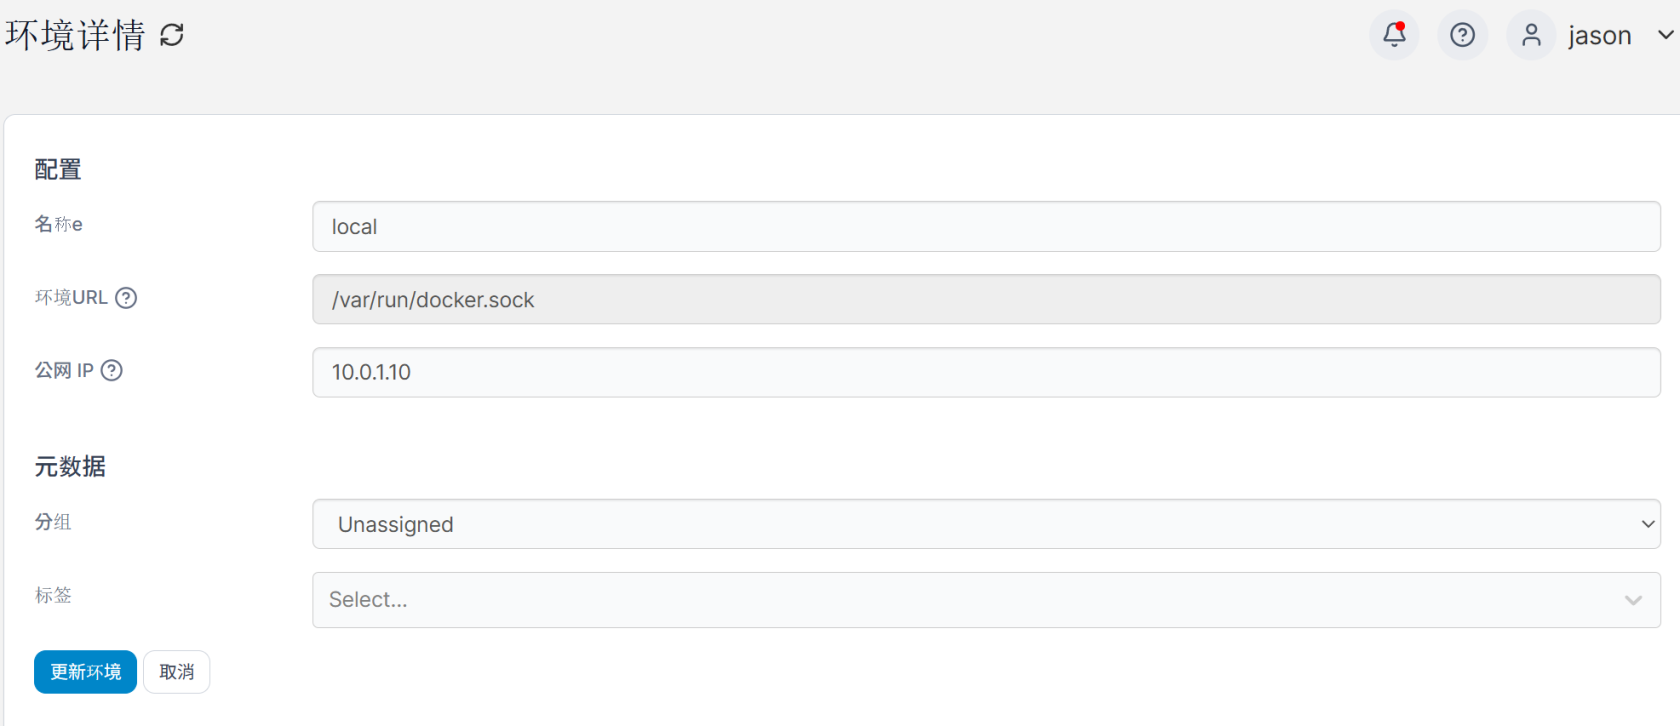
**輸入你的Synology IP並更新環境**
[](https://note.homesitetw.com/uploads/images/gallery/2025-09/QuXimage.png)
**安裝完成**
# Synology 使用Docker架設LibreNMS
##### **運行環境**
- **DSM 7.2**
##### **安裝LibreNMS**
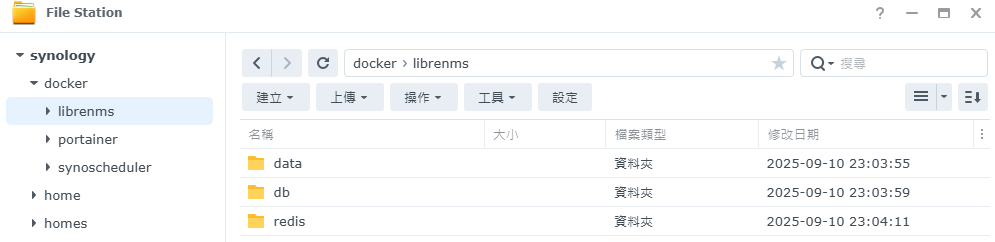
**確認已安裝[Portainer](https://note.homesitetw.com/books/synology/page/synology-portainer-docker#bkmrk-%E5%AE%89%E8%A3%9Ddocker%E5%92%8Cportainer),在docker內新增資料夾librenms並且在裡面分別新增data、db、redis資料夾**
[](https://note.homesitetw.com/uploads/images/gallery/2025-09/czaimage.png)
**修改資料夾權限使docker能夠寫入執行**
```
chmod 755 /volume1/docker/librenms -R
```
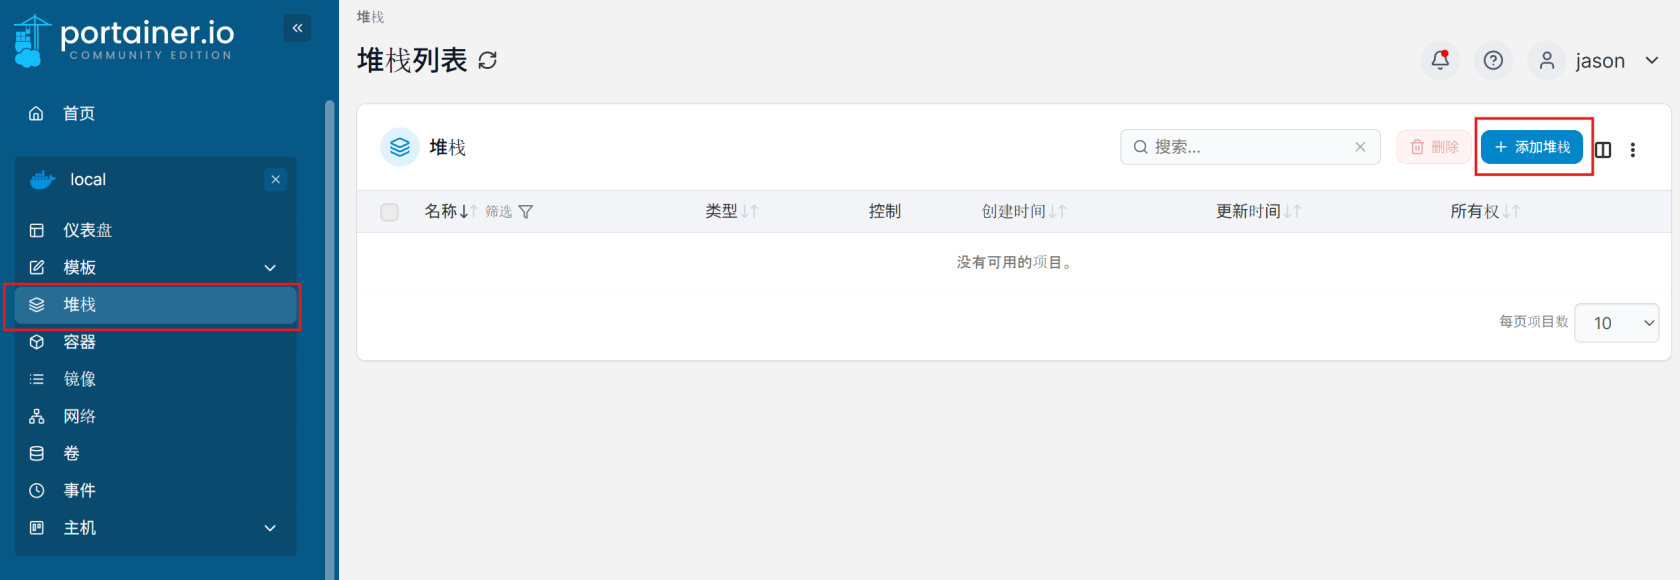
**進入Portainer,點選堆棧(Stack),並添加堆棧**
[](https://note.homesitetw.com/uploads/images/gallery/2025-09/7hMimage.png)
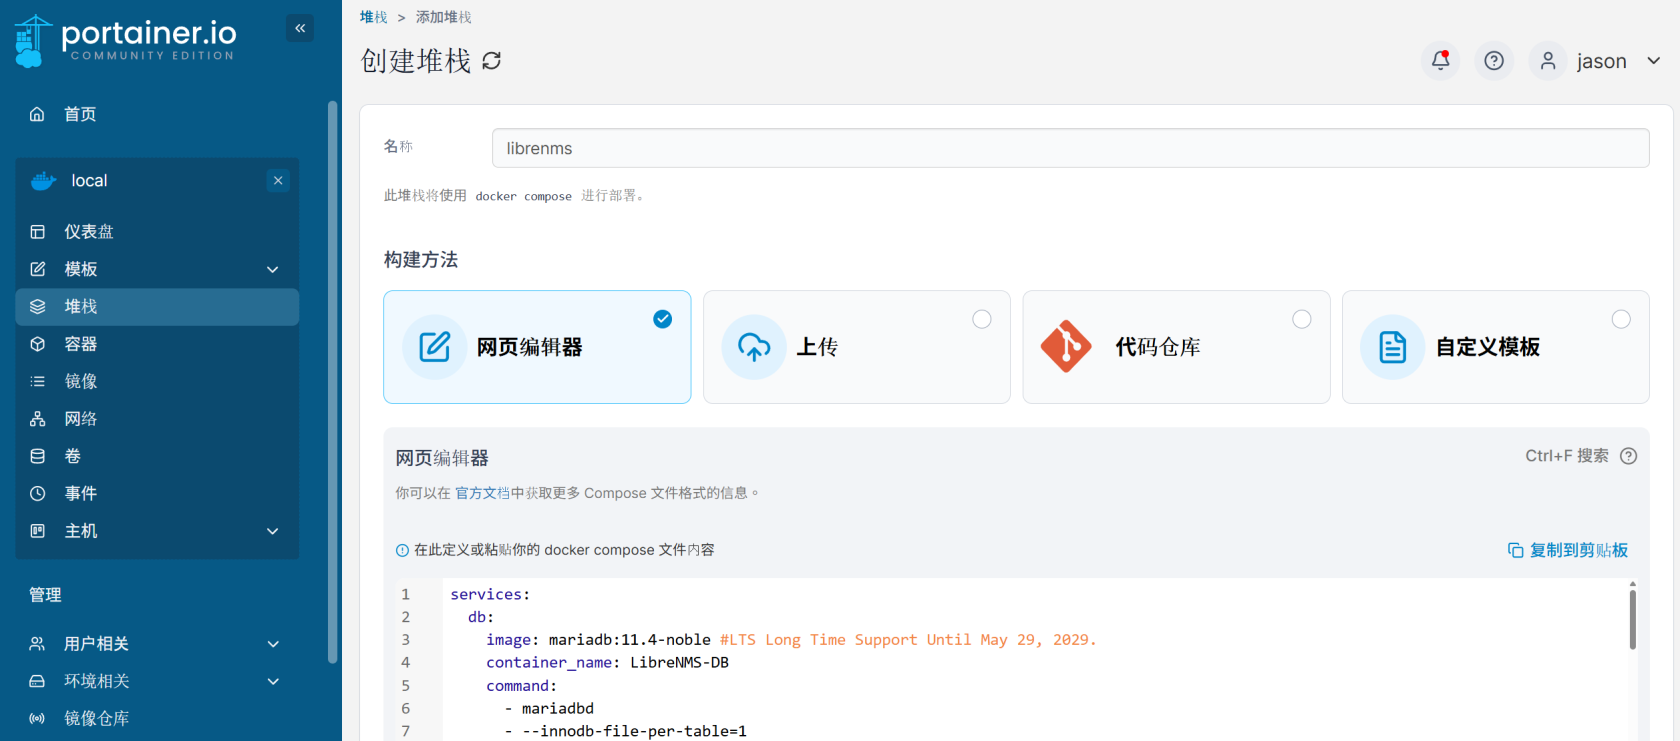
**名稱填寫`librenms`,並貼到編輯器中,指令內PUID和PGID於Shell內執行id並自行替換**
```
user1@synology:~$ id
uid=1026(user1) gid=100(users)
```
[](https://note.homesitetw.com/uploads/images/gallery/2025-09/WN2image.png)
```
services:
db:
image: mariadb:11.4-noble #LTS Long Time Support Until May 29, 2029.
container_name: LibreNMS-DB
command:
- mariadbd
- --innodb-file-per-table=1
- --lower-case-table-names=0
- --character-set-server=utf8mb4
- --collation-server=utf8mb4_unicode_ci
volumes:
- /volume1/docker/librenms/db:/var/lib/mysql:rw
environment:
TZ: Asia/Taipei
MARIADB_RANDOM_ROOT_PASSWORD: yes
MARIADB_DATABASE: librenms
MARIADB_USER: librenmsuser
MARIADB_PASSWORD: librenmspass
restart: on-failure:5
redis:
image: redis:7.2-alpine
container_name: LibreNMS_REDIS
healthcheck:
test: ["CMD-SHELL", "redis-cli ping || exit 1"]
volumes:
- /volume1/docker/librenms/redis:/data:rw
environment:
TZ: Asia/Taipei
restart: on-failure:5
librenms:
image: librenms/librenms:latest
container_name: LibreNMS
healthcheck:
test: ["CMD-SHELL", "nc -z 127.0.0.1 8000 || exit 1"]
interval: 10s
timeout: 5s
retries: 3
start_period: 90s
hostname: librenms
cap_add:
- NET_ADMIN
- NET_RAW
ports:
- target: 8000
published: 28083
protocol: tcp
depends_on:
- db
- redis
volumes:
- /volume1/docker/librenms/data:/data:rw
environment:
TZ: Asia/Taipei
PUID: 1026
PGID: 100
SESSION_SECURE_COOKIE: true
DB_HOST: db
DB_NAME: librenms
DB_USER: librenmsuser
DB_PASSWORD: librenmspass
DB_TIMEOUT: 120
MEMORY_LIMIT: 512M
MAX_INPUT_VARS: 1000
UPLOAD_MAX_SIZE: 128M
OPCACHE_MEM_SIZE: 128
REAL_IP_FROM: 0.0.0.0/32
REAL_IP_HEADER: X-Forwarded-For
LOG_IP_VAR: remote_addr
CACHE_DRIVER: redis
SESSION_DRIVER: redis
REDIS_HOST: redis
LIBRENMS_SNMP_COMMUNITY: librenmsdocker
LIBRENMS_WEATHERMAP: false
LIBRENMS_WEATHERMAP_SCHEDULE: "0 0 */2 * * *" # Schedule WeatherMAP every 2 hours
restart: on-failure:5
dispatcher:
image: librenms/librenms:latest
container_name: LibreNMS-DISPATCHER
hostname: librenms-dispatcher
cap_add:
- NET_ADMIN
- NET_RAW
depends_on:
- librenms
- redis
volumes:
- /volume1/docker/librenms/data:/data:rw
environment:
TZ: Asia/Taipei
PUID: 1026
PGID: 100
DB_HOST: db
DB_NAME: librenms
DB_USER: librenmsuser
DB_PASSWORD: librenmspass
DB_TIMEOUT: 120
DISPATCHER_NODE_ID: dispatcher1
SIDECAR_DISPATCHER: 1
MEMORY_LIMIT: 512M
MAX_INPUT_VARS: 1000
UPLOAD_MAX_SIZE: 128M
OPCACHE_MEM_SIZE: 128
REAL_IP_FROM: 0.0.0.0/32
REAL_IP_HEADER: X-Forwarded-For
LOG_IP_VAR: remote_addr
CACHE_DRIVER: redis
SESSION_DRIVER: redis
REDIS_HOST: redis
LIBRENMS_SNMP_COMMUNITY: librenmsdocker
LIBRENMS_WEATHERMAP: false
LIBRENMS_WEATHERMAP_SCHEDULE: "0 0 */2 * * *" # Schedule WeatherMAP every 2 hours
restart: on-failure:5
syslogng:
image: librenms/librenms:latest
container_name: LibreNMS_SYSLOGNG
hostname: librenms-syslogng
healthcheck:
test: ["CMD-SHELL", "nc -z 127.0.0.1 514 || exit 1"]
interval: 10s
timeout: 5s
retries: 3
start_period: 90s
cap_add:
- NET_ADMIN
- NET_RAW
depends_on:
- librenms
- redis
ports:
- target: 514
published: 514
protocol: tcp
- target: 514
published: 514
protocol: udp
volumes:
- /volume1/docker/librenms/data:/data:rw
environment:
TZ: Asia/Taipei
PUID: 1026
PGID: 100
DB_HOST: db
DB_NAME: librenms
DB_USER: librenmsuser
DB_PASSWORD: librenmspass
DB_TIMEOUT: 120
SIDECAR_SYSLOGNG: 1
MEMORY_LIMIT: 512M
MAX_INPUT_VARS: 1000
UPLOAD_MAX_SIZE: 128M
OPCACHE_MEM_SIZE: 128
REAL_IP_FROM: 0.0.0.0/32
REAL_IP_HEADER: X-Forwarded-For
LOG_IP_VAR: remote_addr
CACHE_DRIVER: redis
SESSION_DRIVER: redis
REDIS_HOST: redis
LIBRENMS_SNMP_COMMUNITY: librenmsdocker
LIBRENMS_WEATHERMAP: false
LIBRENMS_WEATHERMAP_SCHEDULE: "0 0 */2 * * *" # Schedule WeatherMAP every 2 hours
restart: on-failure:5
snmptrapd:
image: librenms/librenms:latest
container_name: LibreNMS_SNMPTRAPD
healthcheck:
test: ["CMD-SHELL", "nc -z 127.0.0.1 162 || exit 1"]
interval: 10s
timeout: 5s
retries: 3
start_period: 90s
hostname: librenms-snmptrapd
cap_add:
- NET_ADMIN
- NET_RAW
depends_on:
- librenms
- redis
ports:
- target: 162
published: 162
protocol: tcp
- target: 162
published: 162
protocol: udp
volumes:
- /volume1/docker/librenms/data:/data:rw
environment:
TZ: Asia/Taipei
PUID: 1026
PGID: 100
DB_HOST: db
DB_NAME: librenms
DB_USER: librenmsuser
DB_PASSWORD: librenmspass
DB_TIMEOUT: 120
SIDECAR_SNMPTRAPD: 1
MEMORY_LIMIT: 512M
MAX_INPUT_VARS: 1000
UPLOAD_MAX_SIZE: 128M
OPCACHE_MEM_SIZE: 128
REAL_IP_FROM: 0.0.0.0/32
REAL_IP_HEADER: X-Forwarded-For
LOG_IP_VAR: remote_addr
CACHE_DRIVER: redis
SESSION_DRIVER: redis
REDIS_HOST: redis
LIBRENMS_SNMP_COMMUNITY: librenmsdocker
LIBRENMS_WEATHERMAP: false
LIBRENMS_WEATHERMAP_SCHEDULE: "0 0 */2 * * *" # Schedule WeatherMAP every 2 hours
restart: on-failure:5
scheduler:
image: librenms/librenms:latest
container_name: LibreNMS_scheduler
volumes:
- /volume1/docker/librenms/data:/data:rw # 請與主容器掛載的路徑一致
environment:
- SIDECAR_CRON=1
- DB_HOST=db
- DB_NAME=librenms
- DB_USER=librenmsuser
- DB_PASSWORD=librenmspass
- PUID=1026
- PGID=100
- TZ=Asia/Taipei
depends_on:
- db
- redis
- librenms
restart: on-failure:5
```
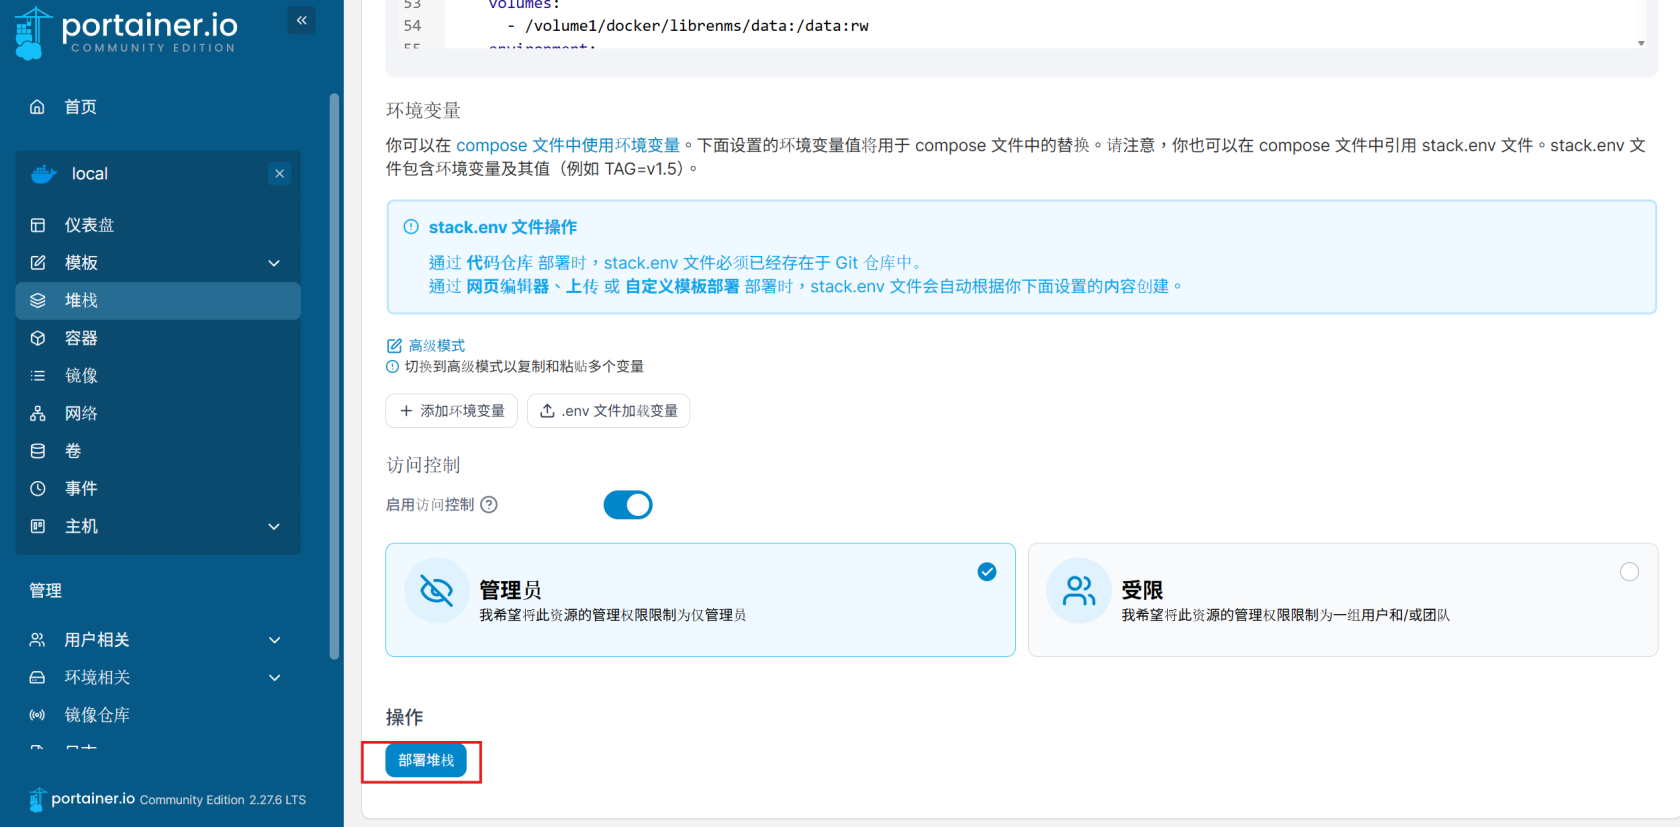
**部屬堆棧**
[](https://note.homesitetw.com/uploads/images/gallery/2025-09/u4dimage.png)
**成功後右上角應會顯示堆棧部署成功**
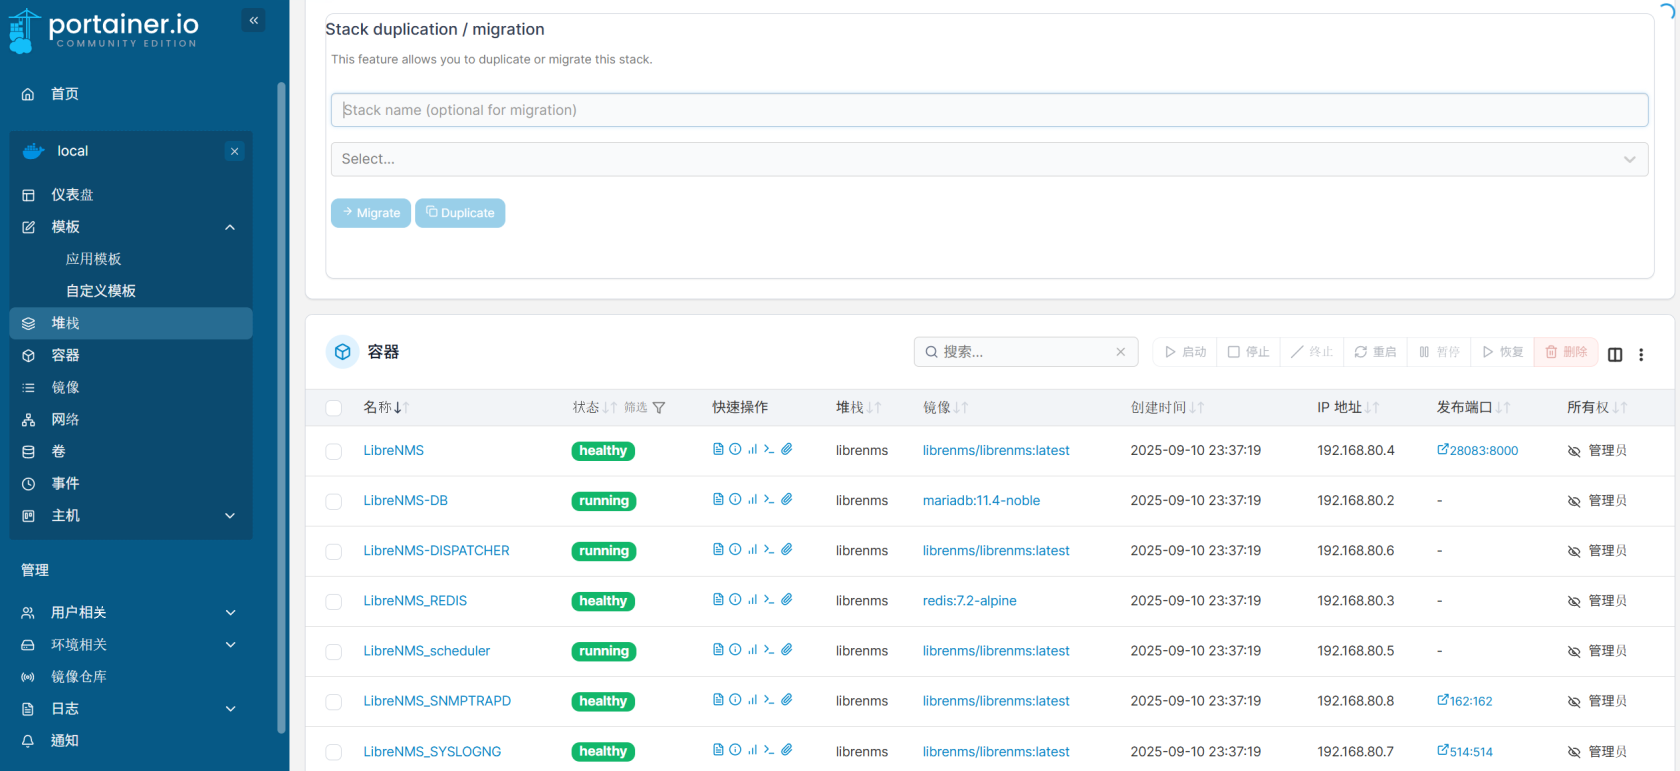
**等待幾分鐘安裝,確認所有服務已經執行**
[](https://note.homesitetw.com/uploads/images/gallery/2025-09/R5pimage.png)
**輸入IP和設定的PORT,例如`http://Synology IP:28083`,進入LibreNMS 安裝頁面**
[](https://note.homesitetw.com/uploads/images/gallery/2025-09/Buhimage.png)
**建立管理員後完成安裝**
[](https://note.homesitetw.com/uploads/images/gallery/2025-09/f5fimage.png)
**若出現419 Page Expired先清除快取**
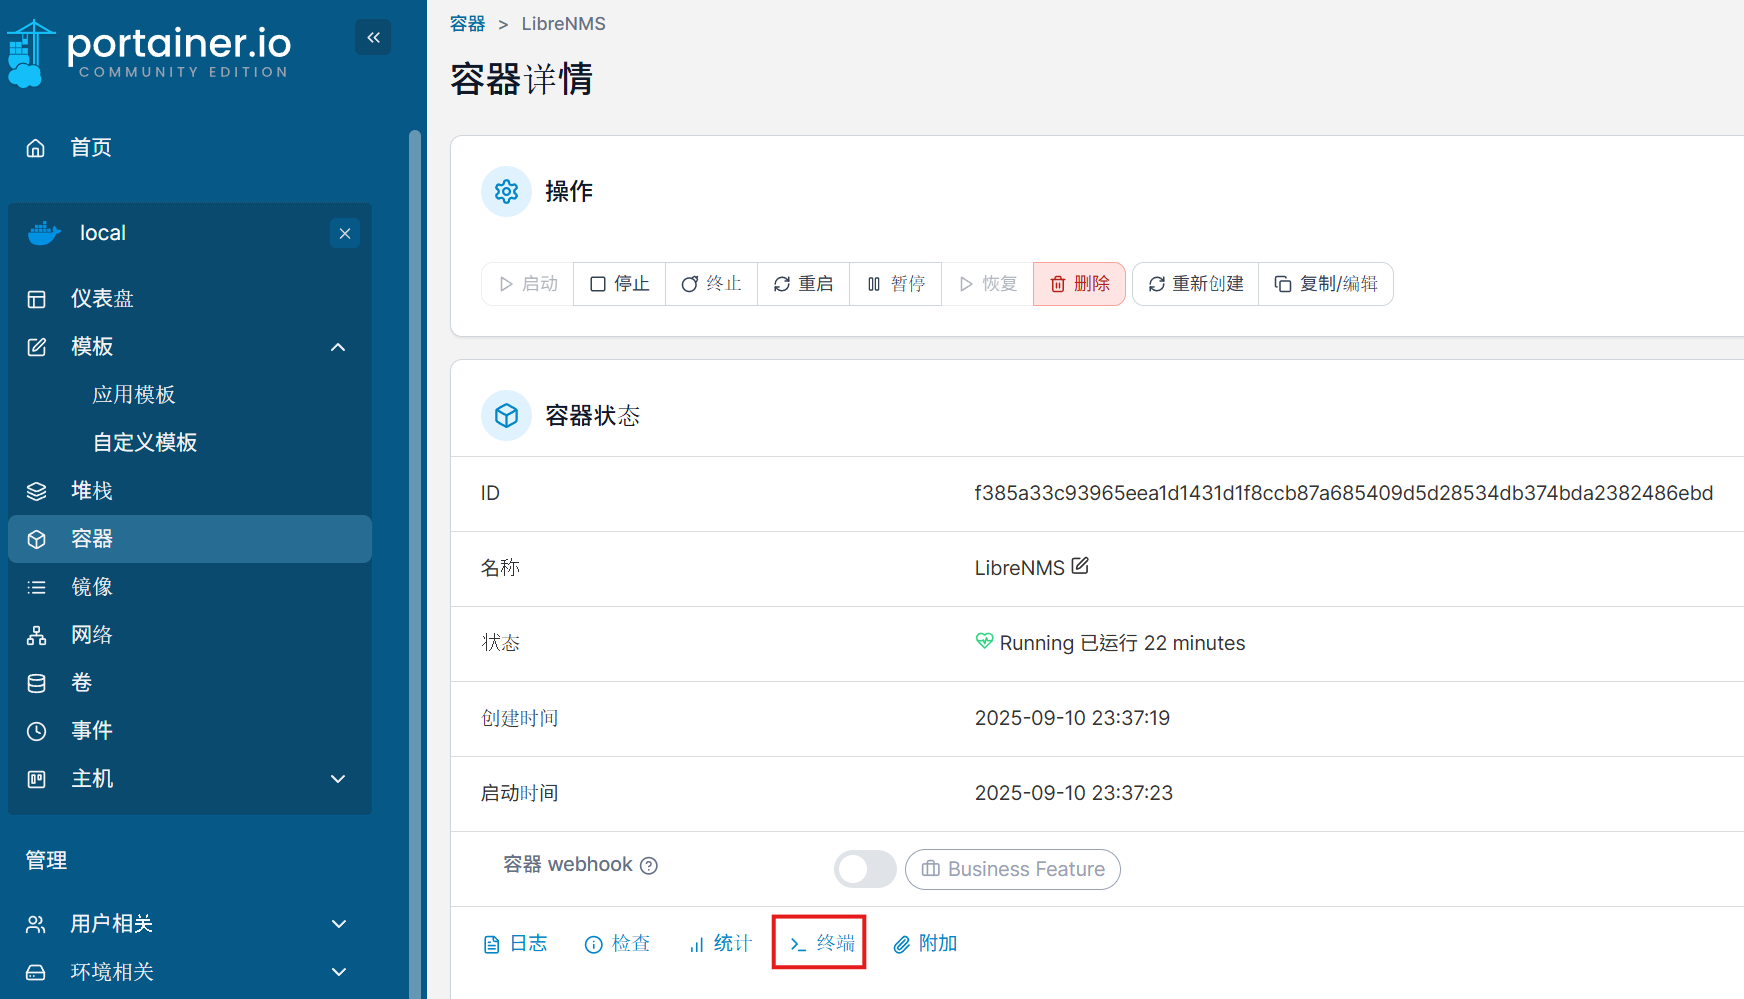
**點選LibreNMS容器並進入終端**
[](https://note.homesitetw.com/uploads/images/gallery/2025-09/aOkimage.png)
[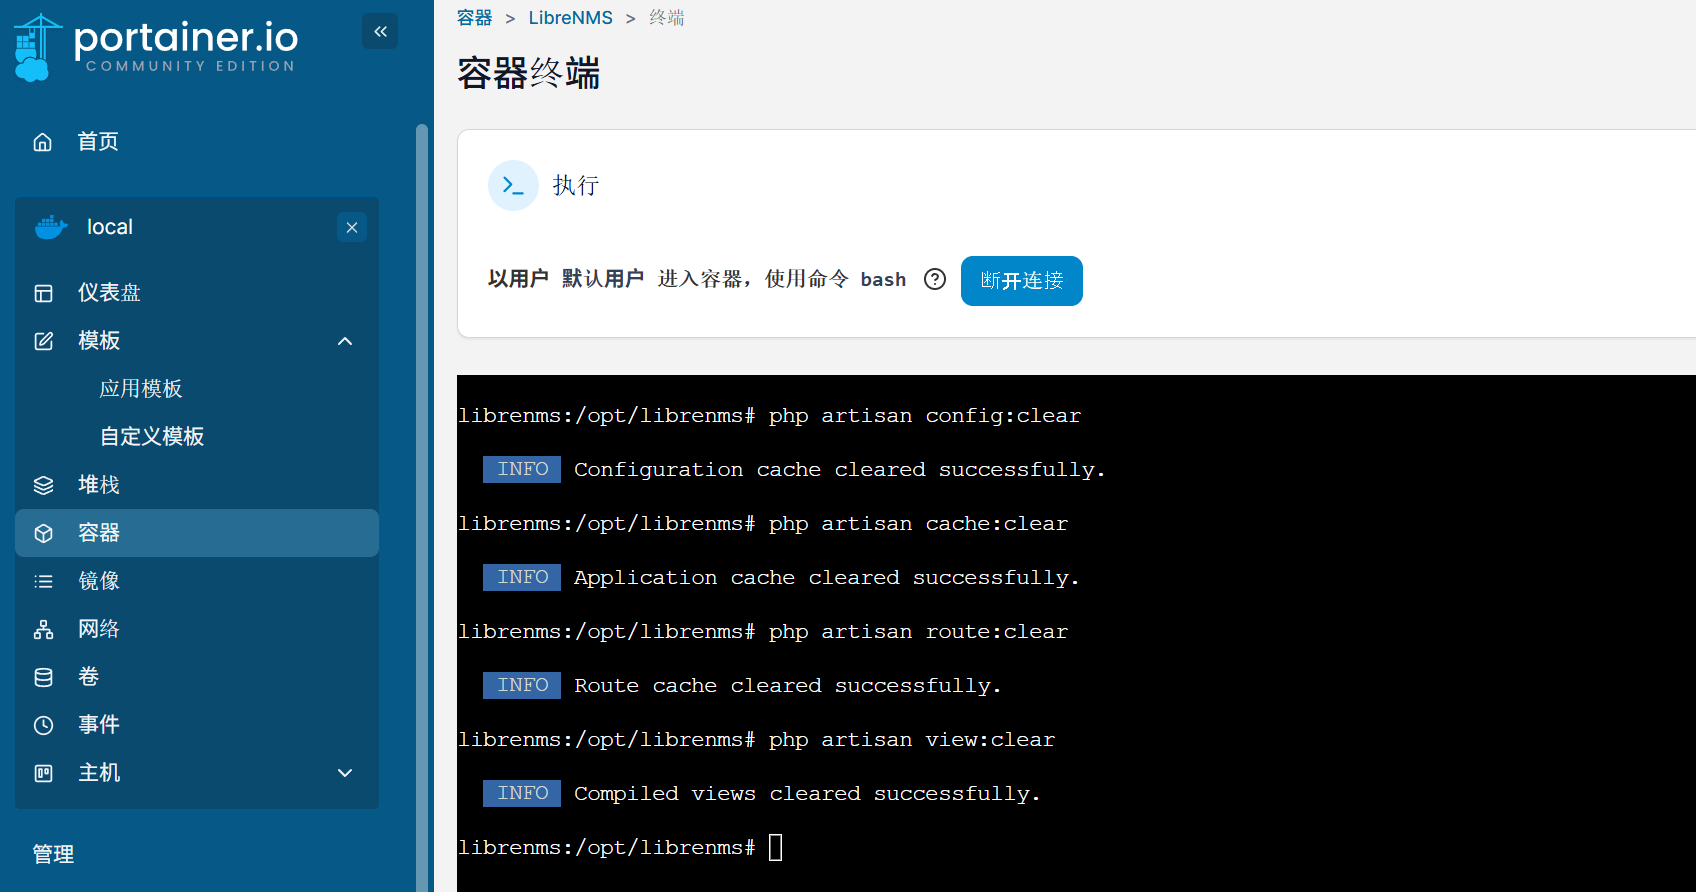](https://note.homesitetw.com/uploads/images/gallery/2025-09/j06image.png)
```
php artisan config:clear
php artisan cache:clear
php artisan route:clear
php artisan view:clear
```
**重新整理網頁後再次登入**
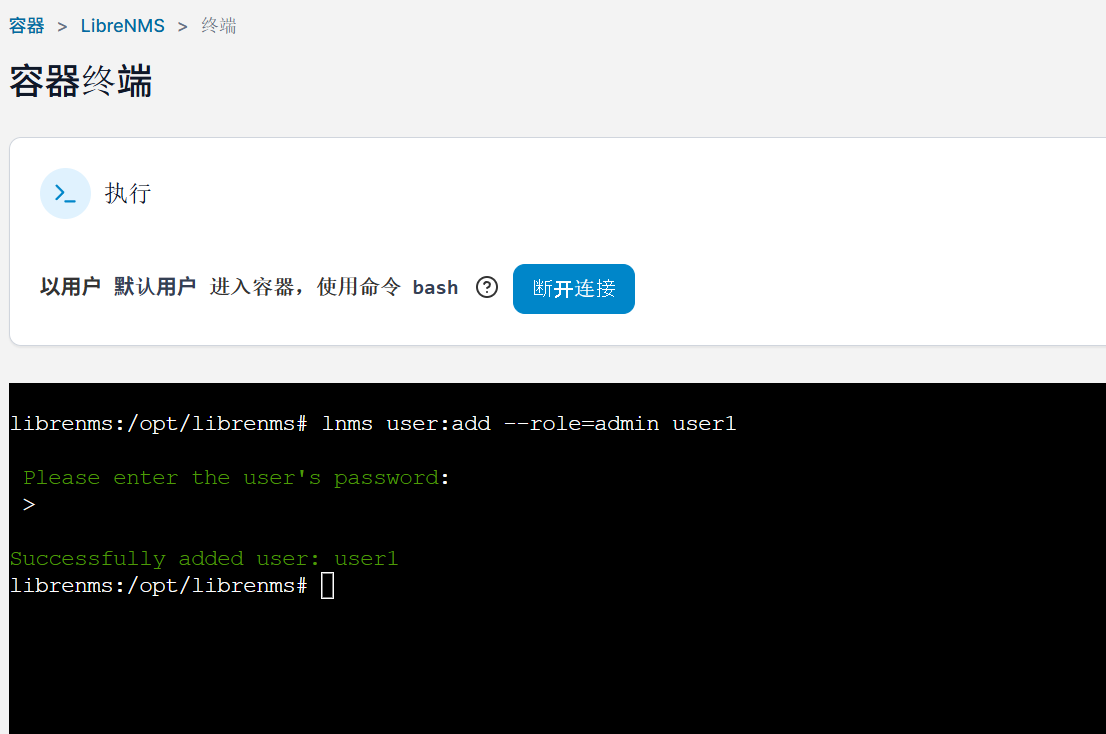
**若輸入網址後直接跳過安裝頁面到登入畫面請手動新增使用者**
**點選LibreNMS容器並進入終端新增使用者**
[](https://note.homesitetw.com/uploads/images/gallery/2025-09/aOkimage.png)
[](https://note.homesitetw.com/uploads/images/gallery/2025-09/Wzdimage.png)
```
lnms user:add --role=admin user1
```
**重新整理網頁後再次登入**
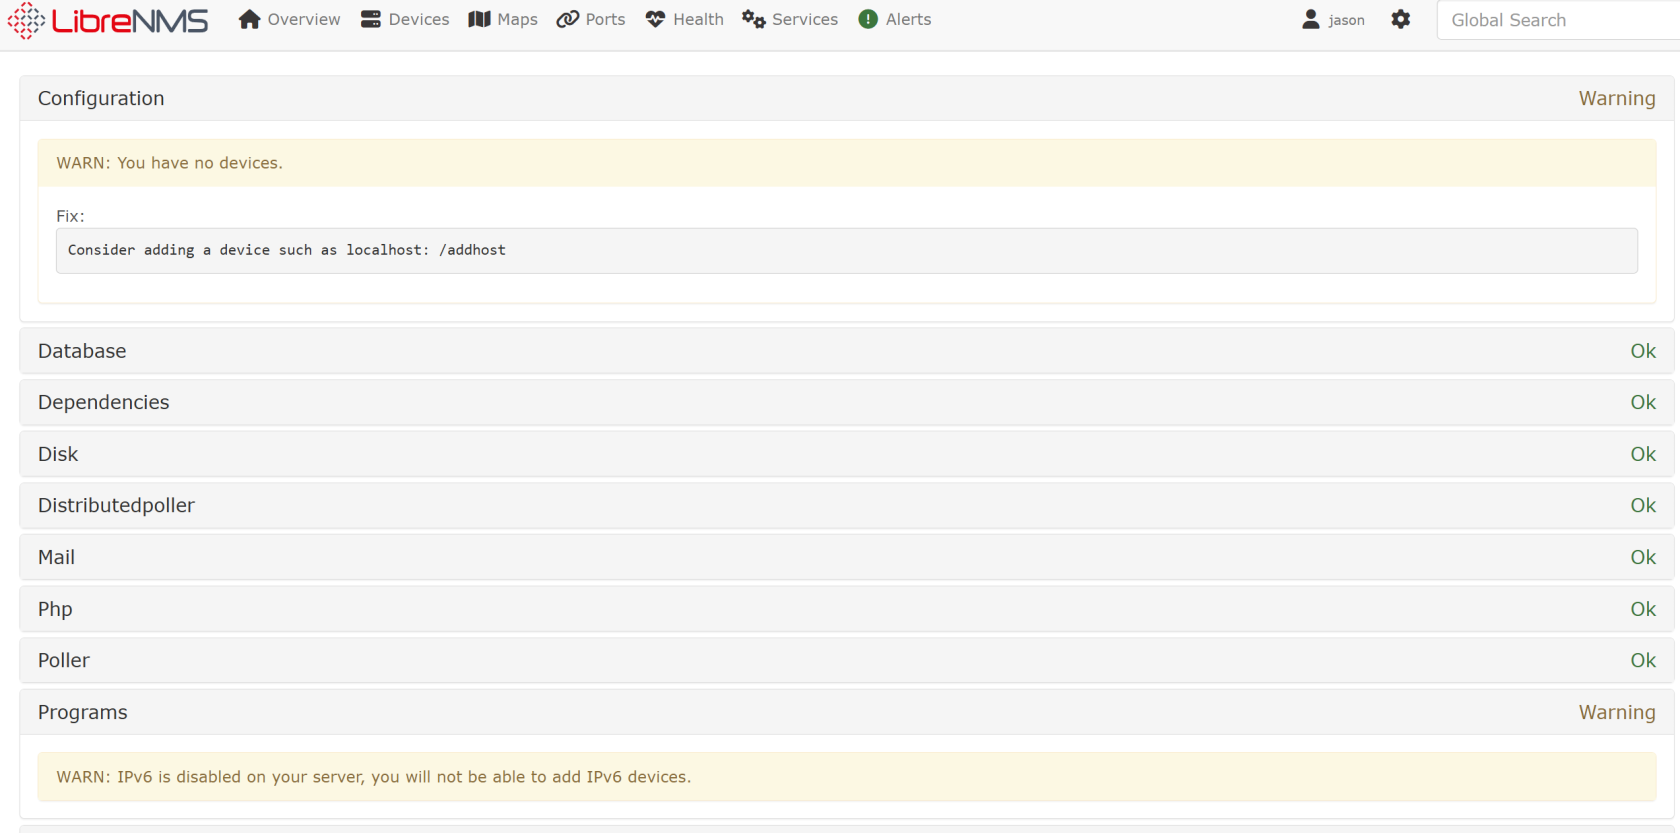
**進行組態驗證確認無錯誤設定,若有依照建議修正**
[](https://note.homesitetw.com/uploads/images/gallery/2025-09/JZnimage.png)
##### **開始監控Synology設備**
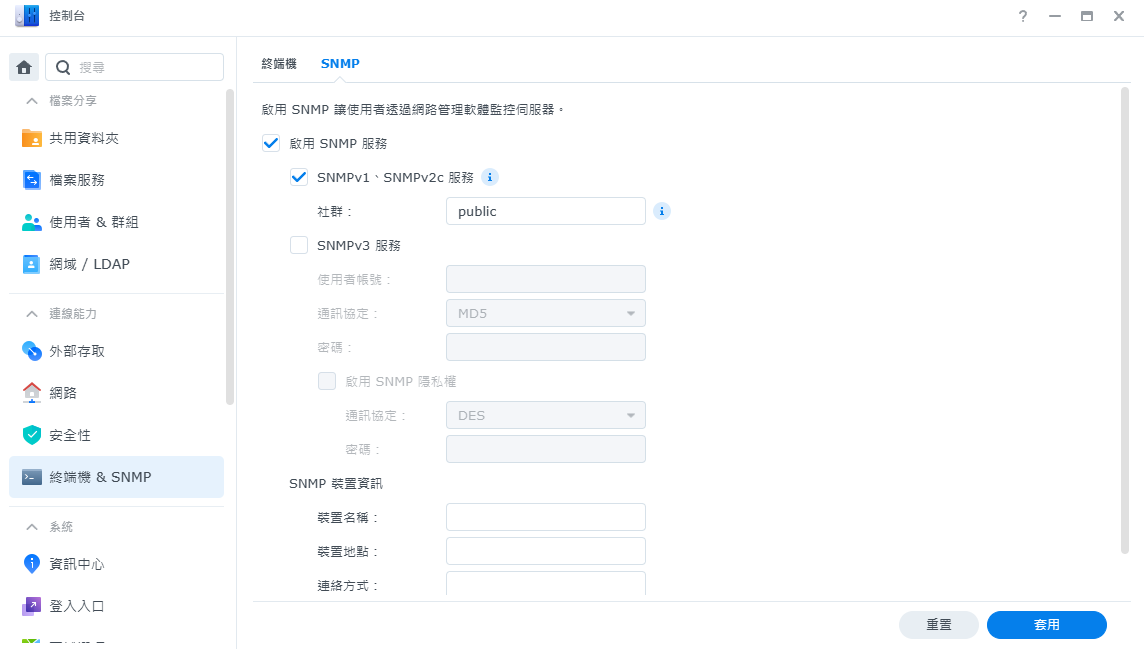
**開啟SNMP功能**
[](https://note.homesitetw.com/uploads/images/gallery/2025-09/cxximage.png)
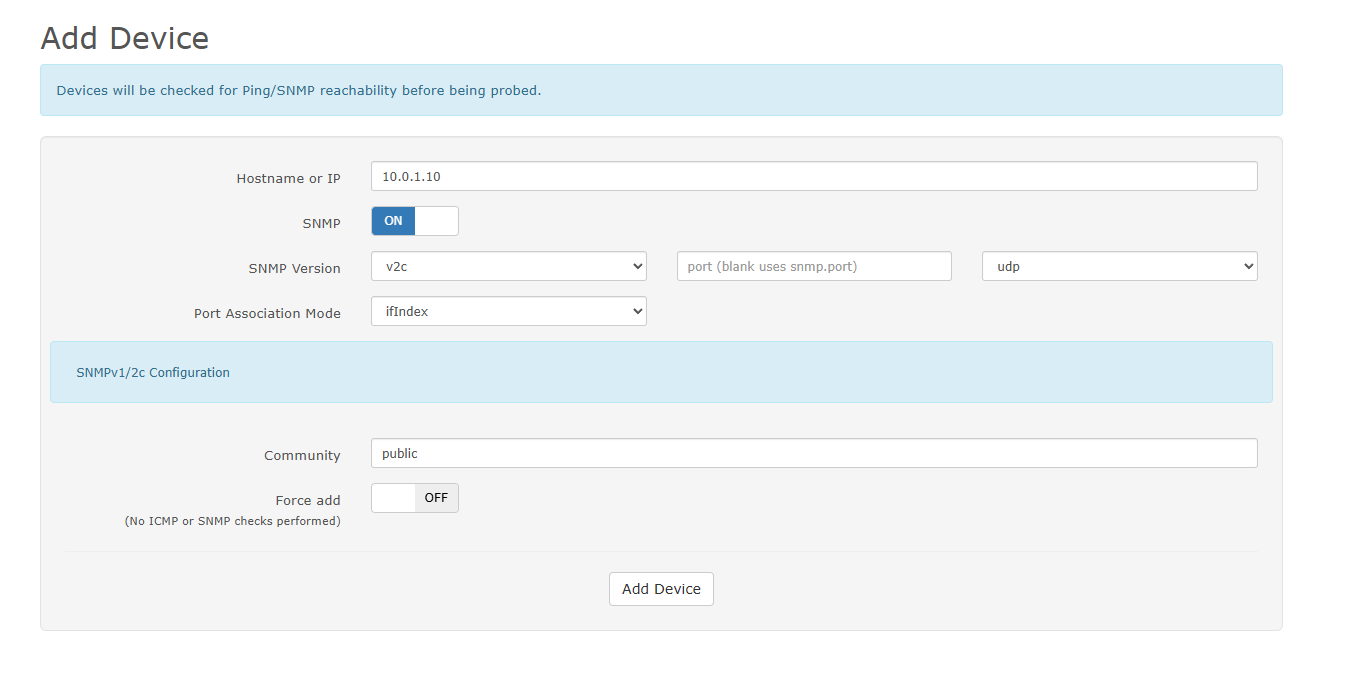
**LibreNMS新增Synology設備,輸入IP和community**
[](https://note.homesitetw.com/uploads/images/gallery/2025-09/hhLimage.png)
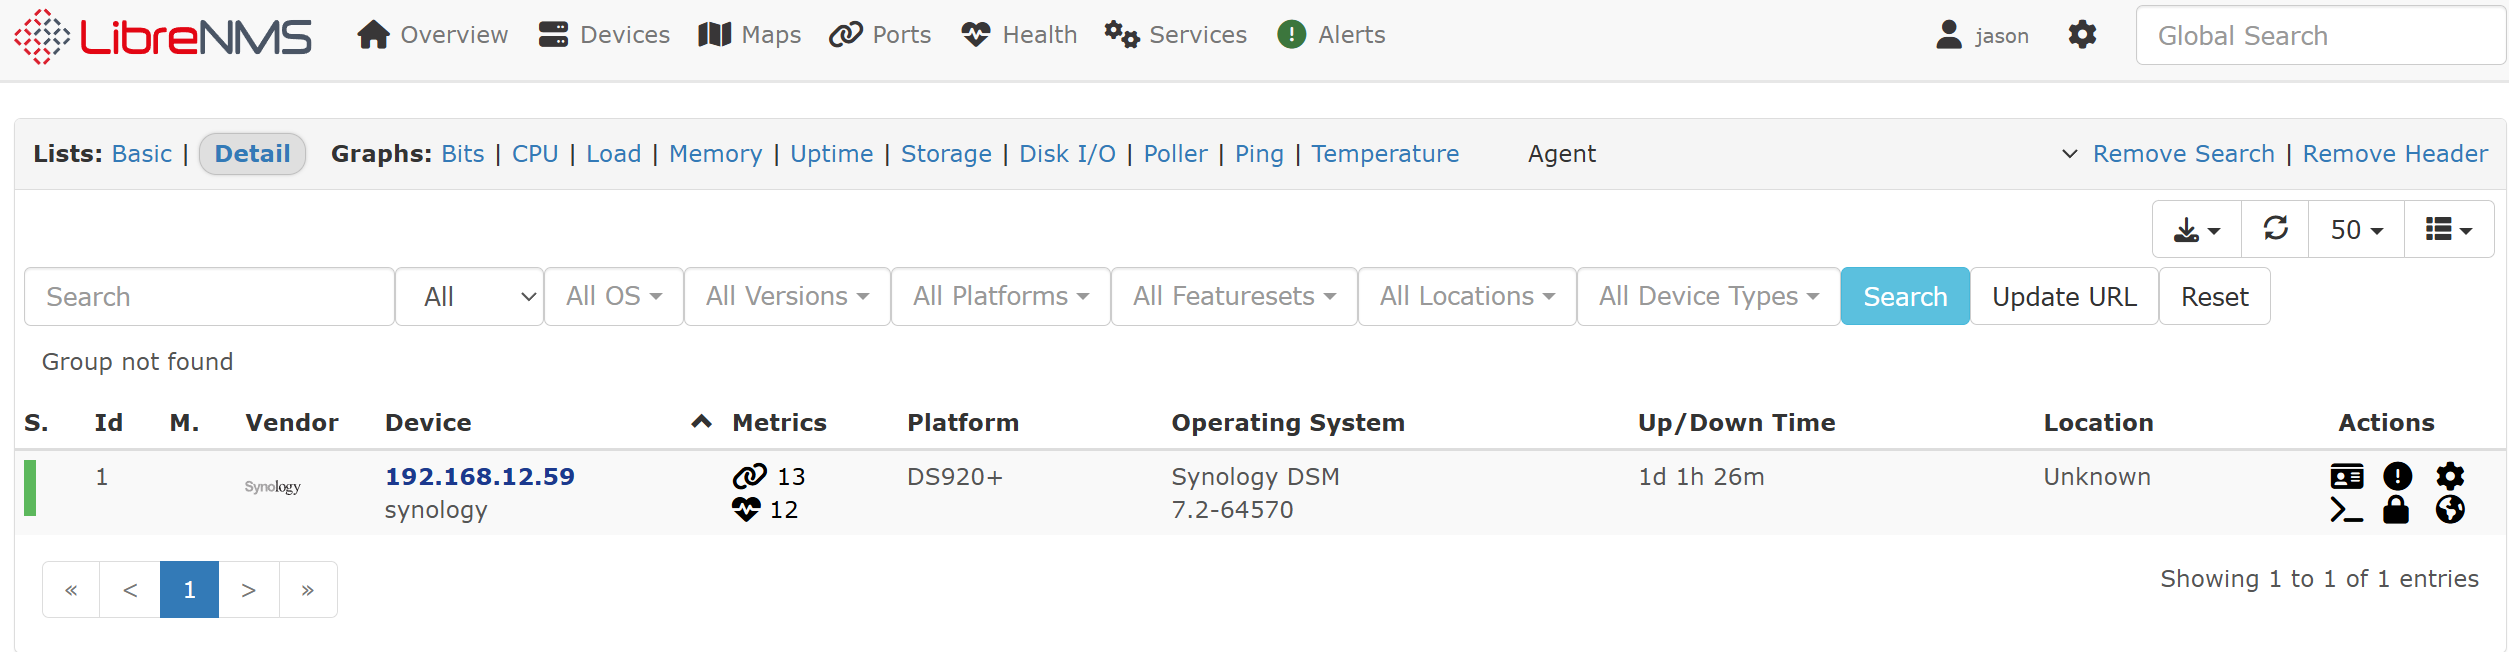
**查看已新增的設備**
[](https://note.homesitetw.com/uploads/images/gallery/2025-09/k9Limage.png)
# Synology 使用Docker架設Vaultwarden密碼管理
**Vaultwarden為官方的 Bitwarden 社群版本,使用SQLite非常輕量,適合個人架設使用**
##### **運行環境**
- **DSM 7.1**
##### **安裝Vaultwarden**
**確認已安裝[Portainer](https://note.homesitetw.com/books/synology/page/synology-portainer-docker#bkmrk-%E5%AE%89%E8%A3%9Ddocker%E5%92%8Cportainer),在docker資料夾新增`vaultwarden`,裡面新增`vw-data`**
**[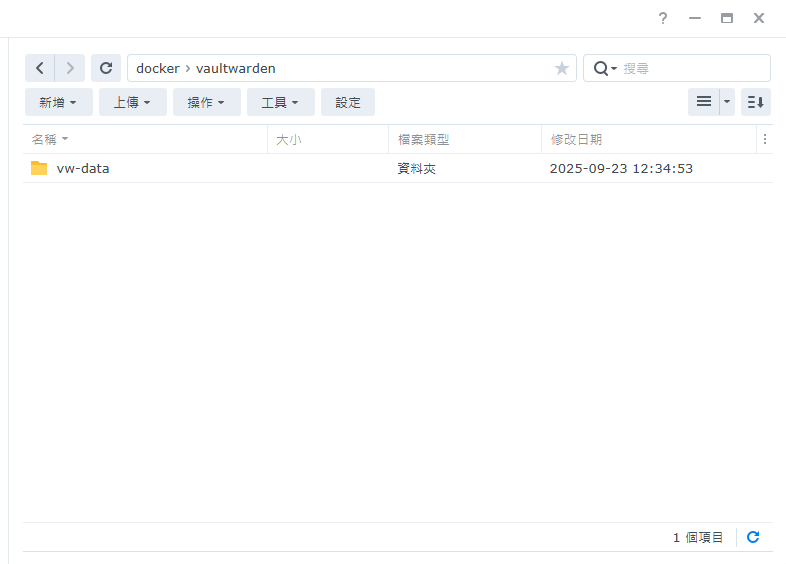](https://note.homesitetw.com/uploads/images/gallery/2025-09/qbRimage.png)**
**進入Portainer,新增堆棧(Stack)並部屬**
```
services:
app:
image: vaultwarden/server:latest
container_name: vaultwarden
restart: always
volumes:
- /volume1/docker/vaultwarden/vw-data:/data/
environment:
- ADMIN_TOKEN=1qaxxwsx3xx
ports:
- 8080:80
```
**Vaultwarden需要https才能使用,Synology內`登入入口`>`進階`>`反向代理`**
**新增你的網域和通訊埠**
**[](https://note.homesitetw.com/uploads/images/gallery/2025-09/1joimage.png)**
**進入`https://domain:12345/admin`,修改Domain URL和管理員token後儲存**
**管理員token在docker部屬時的ADMIN\_TOKEN參數**
**[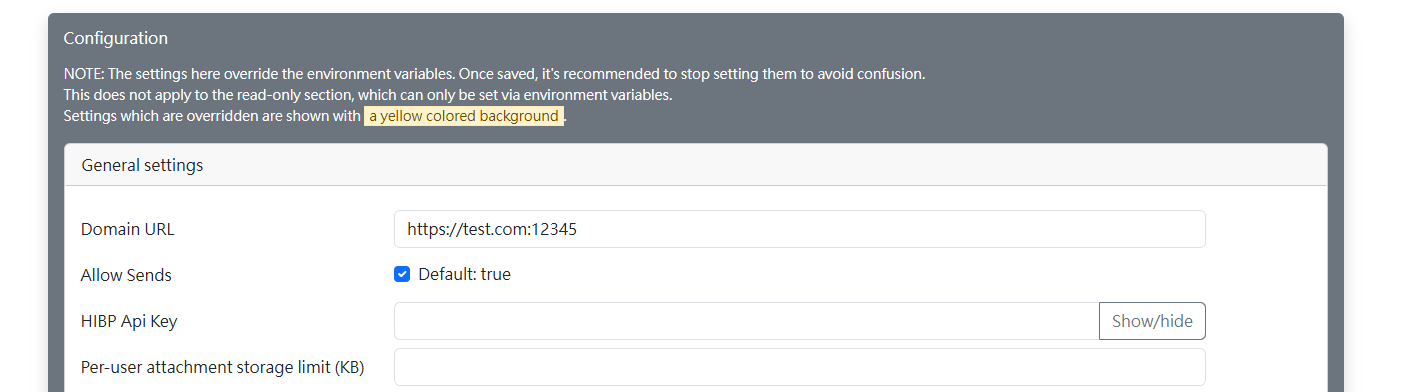](https://note.homesitetw.com/uploads/images/gallery/2025-09/VFVimage.png)**
**[](https://note.homesitetw.com/uploads/images/gallery/2025-09/y2dimage.png)**
**進入`https://domain:12345/`,創建使用者,登入後完成架設**
**[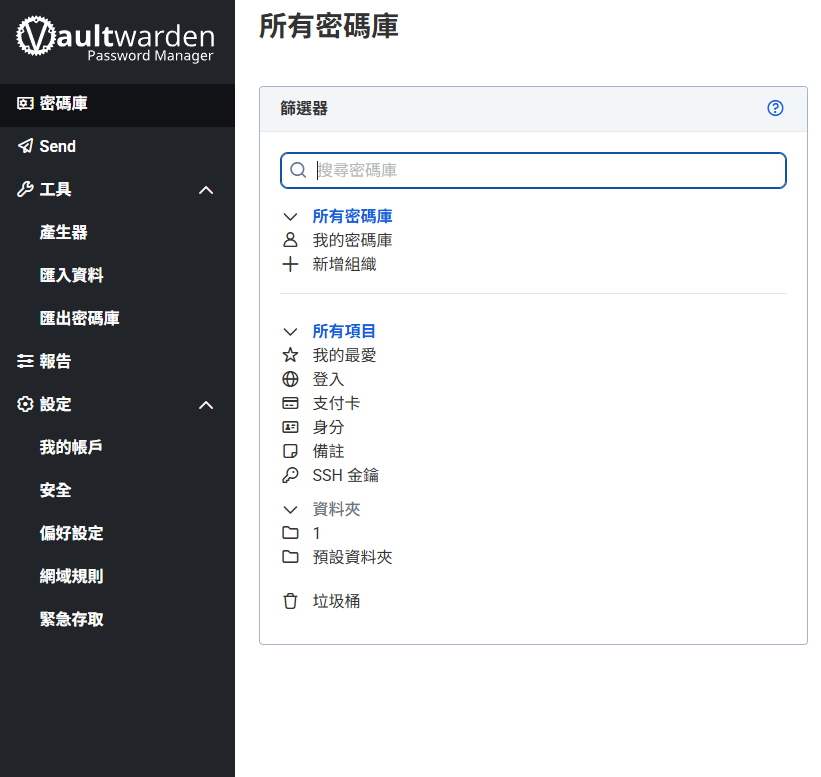](https://note.homesitetw.com/uploads/images/gallery/2025-09/nGPimage.png)**
##### **Chrome新增擴充功能**
**安裝[Bitwarden - 免費密碼管理工具](https://chromewebstore.google.com/detail/bitwarden-password-manage/nngceckbapebfimnlniiiahkandclblb?hl=zh-TW)後,點選自架輸入伺服器URL並登入**
[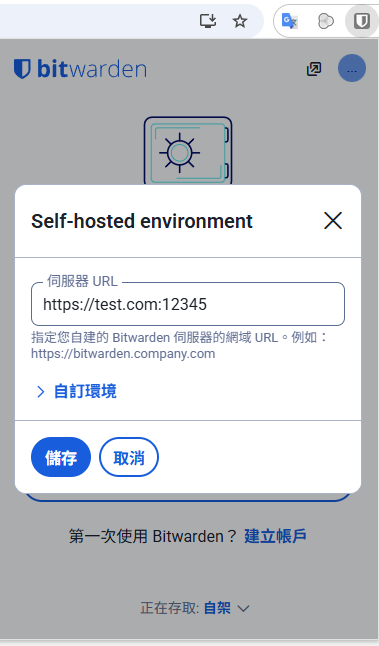](https://note.homesitetw.com/uploads/images/gallery/2025-09/Y6cimage.png)
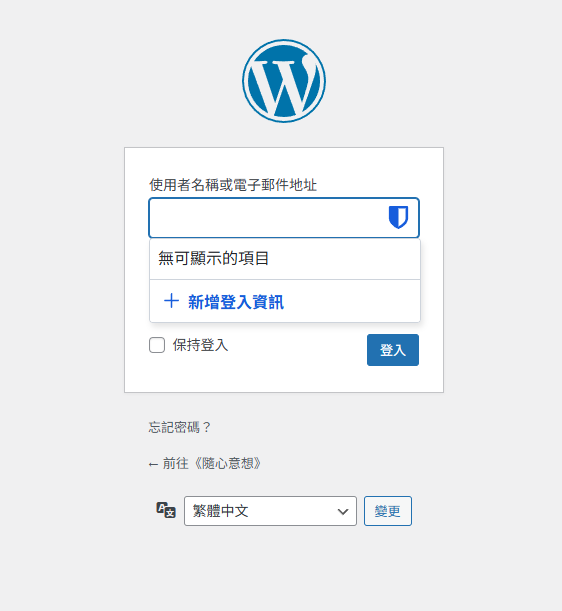
**進入其他網站,會顯示登入功能**
[](https://note.homesitetw.com/uploads/images/gallery/2025-09/hIqimage.png)
# Synology 使用 Docker 架設 immich相簿
**immich是一套開源的相簿系統,可當作替代Google相簿,提供手機APP,並有地圖標記和人臉辨識等功能**
[](https://note.homesitetw.com/uploads/images/gallery/2025-10/GH9image.png)
**官方Demo**
##### **運行環境**
- **DSM 7.1**
##### **安裝immich**
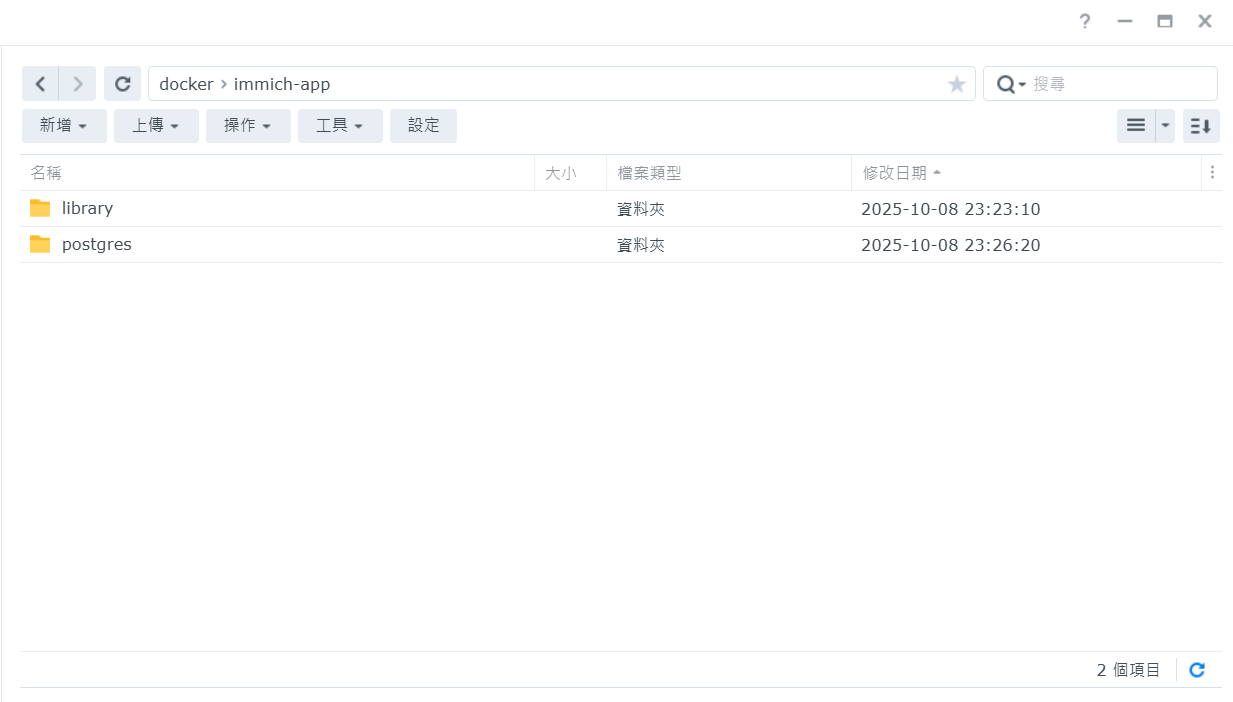
**確認已安裝[Portainer](https://note.homesitetw.com/books/synology/page/synology-portainer-docker#bkmrk-%E5%AE%89%E8%A3%9Ddocker%E5%92%8Cportainer),在docker資料夾新增`immich-app`,裡面新增`library`和`postgres`資料夾**
[](https://note.homesitetw.com/uploads/images/gallery/2025-10/zfKimage.png)
**從官方下載docker-compose.yml和.env檔案**
```
https://github.com/immich-app/immich/releases/latest/download/docker-compose.yml
```
```
https://github.com/immich-app/immich/releases/latest/download/example.env
```
**修改下載的docker-compose.yml和.env檔案**
**編輯`example.env`並改名為`.env`**
```
# You can find documentation for all the supported env variables at https://docs.immich.app/install/environment-variables
# The location where your uploaded files are stored
UPLOAD_LOCATION=/volume1/docker/immich-app/library
# The location where your database files are stored. Network shares are not supported for the database
DB_DATA_LOCATION=/volume1/docker/immich-app/postgres
# To set a timezone, uncomment the next line and change Etc/UTC to a TZ identifier from this list: https://en.wikipedia.org/wiki/List_of_tz_database_time_zones#List
# TZ=Asia/Taipei
# The Immich version to use. You can pin this to a specific version like "v1.71.0"
IMMICH_VERSION=release
# Connection secret for postgres. You should change it to a random password
# Please use only the characters `A-Za-z0-9`, without special characters or spaces
DB_PASSWORD=postgres
# The values below this line do not need to be changed
###################################################################################
DB_USERNAME=postgres
DB_DATABASE_NAME=immich
```
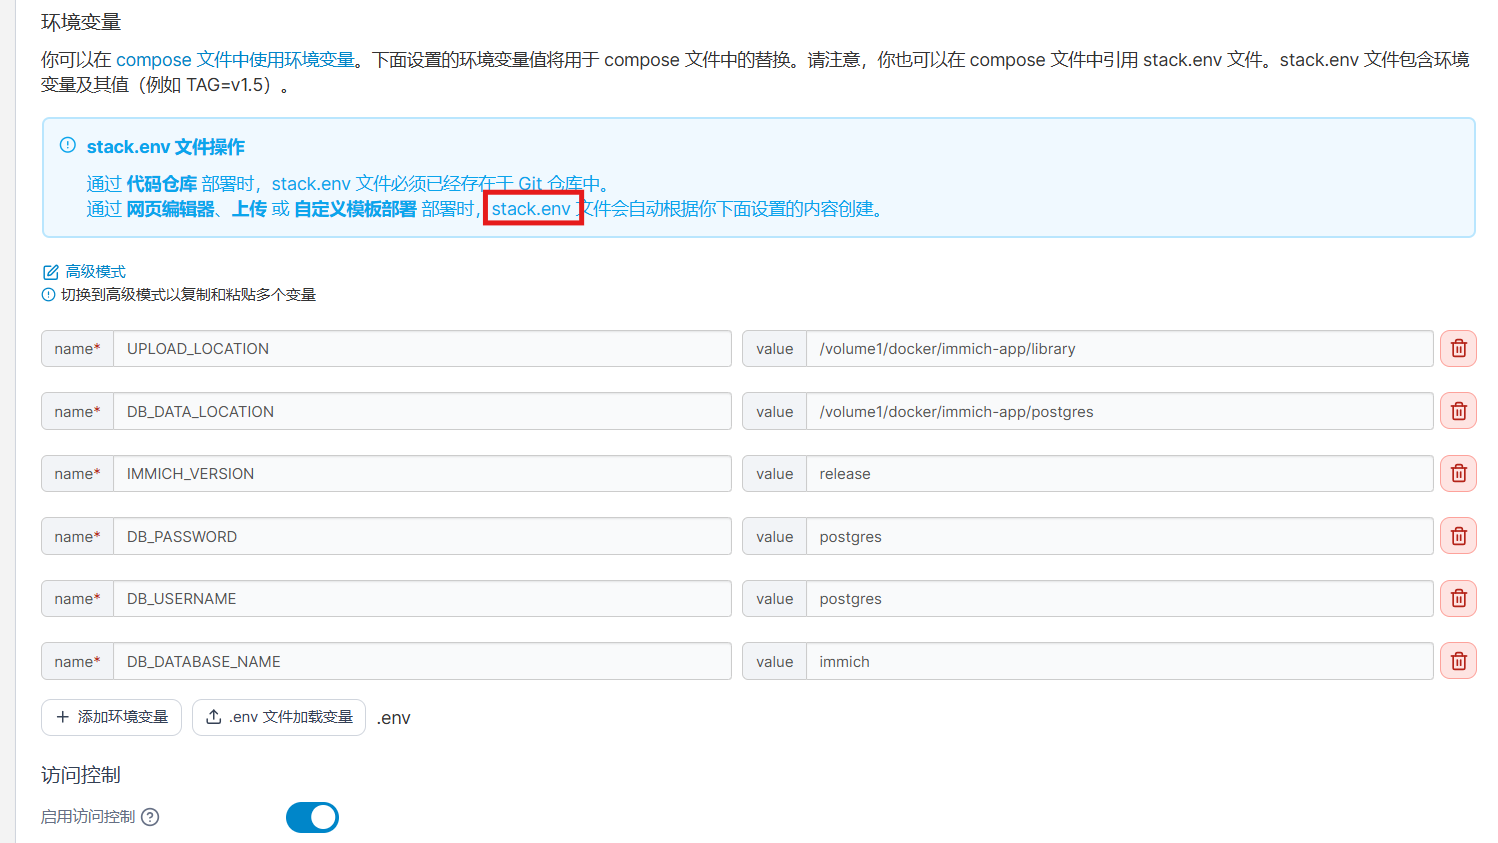
- **UPLOAD\_LOCATION和DB\_DATA\_LOCATION為剛剛在docker 內建立的資料夾的路徑**
- **TZ改成Asia/Taipei**
- **DB\_PASSWORD 密碼可自行更改**
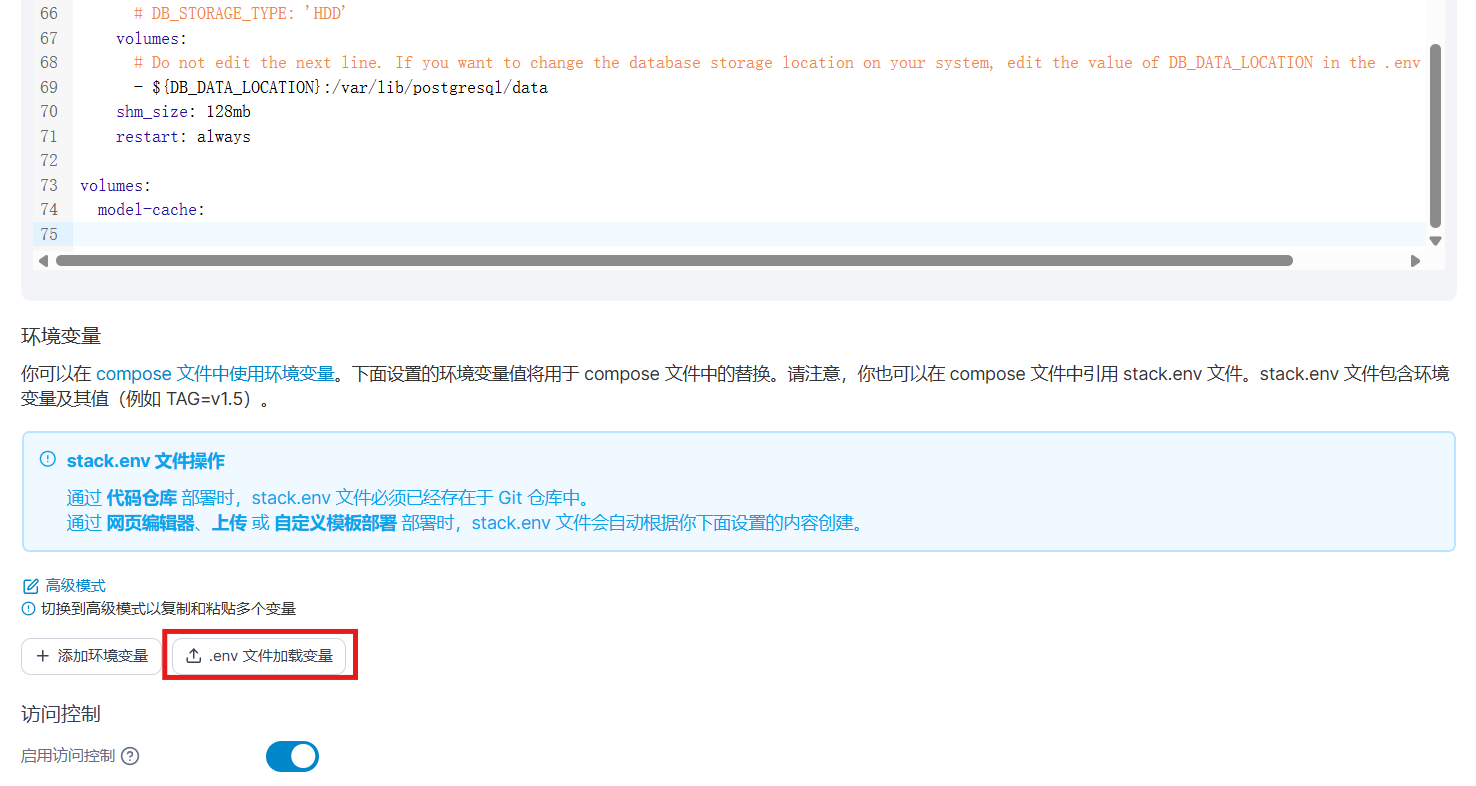
**進入Portainer,新增堆棧(Stack)**
將docker-compose.yml內容貼到**Stack編輯器,並上傳剛剛修改的`.env`檔案**
[](https://note.homesitetw.com/uploads/images/gallery/2025-10/17eimage.png)
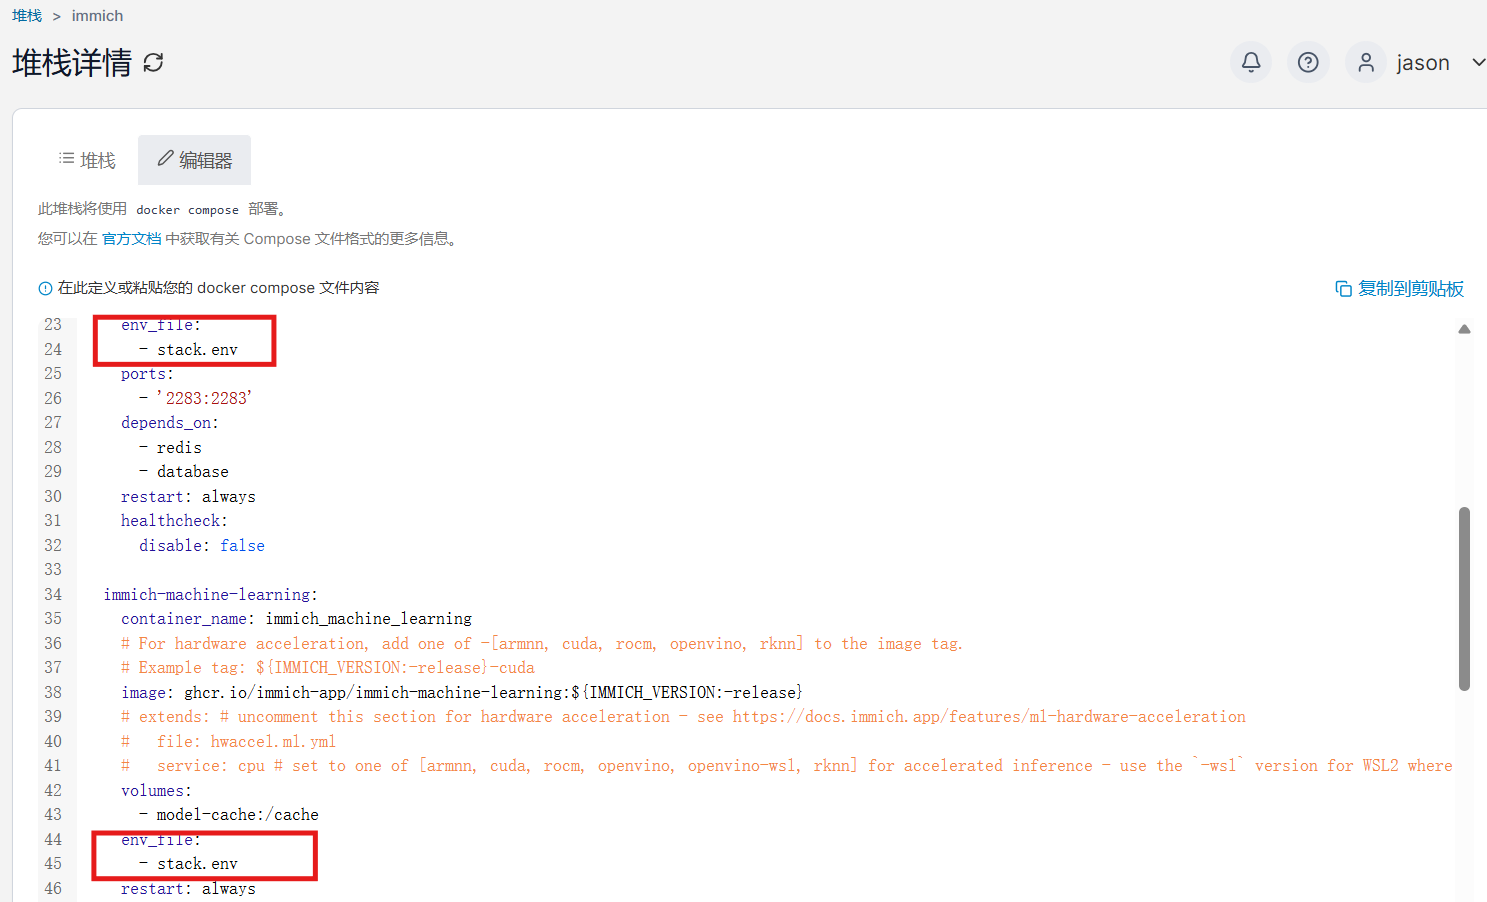
**上傳後確認以下環境變量正確,並將編輯器內的`- .env`改成`- stack.env`**
[](https://note.homesitetw.com/uploads/images/gallery/2025-10/jdfimage.png)
[](https://note.homesitetw.com/uploads/images/gallery/2025-10/wm9image.png)
**修改完成後部屬,第一次下載容器需等待一段間,所有容器成功開啟後即可登入`http://192.168.0.250:2283/`初始化安裝**